How to set up an iPhone or iPad for children
Introduction
Smartphones run the modern world. There's no getting around it; most people throughout the world, old or young, have a smartphone in their pocket. This is becoming increasingly true for young children. According to a survey from 2019, more than half of 11 year olds in the United States owned a smartphone. This growth in smartphone use among the younger generation has spurred many parents to wonder how they can safeguard a child's device.
That's where this guide steps in. Here, we will show you how to set up a new iPhone or iPad for a child, making it simple and relatively safe for them to use. We will also cover the bevy of options available to parents to monitor how their children use iDevices. We will publish a separate guide on setting up Android for children in the near future.

Disclaimers
Before we begin, keep in mind that no method of safeguarding a computer, smartphone, or other internet-connected device is 100% effective. There are bugs and workarounds for every security method. That said, the best ways to keep your children safe online are supervision, education, and communication. Talking with your kids about safe online behaviors (not talking to strangers, being wary of searches and downloads, etc.) will work better than any software- or hardware-based method. There are still some things that can make your job as a parent easier and more streamlined listed below.
First steps
The first is creating a unique Apple ID for the child. Unlike most Android devices, iPhones and iPads are designed for one user; there's not a way to switch between accounts on iOS (at least, none that are simple and segregated). As such, the child will need a new Apple ID to use exclusively with the iDevice. There are a few reasons for this.
First, creating an Apple ID for your child will keep all of their apps, settings, messages, etc. under one profile. This will help streamline setting up a new iPhone or iPad in the future and will allow multiple Apple devices to sync with one another. The second (and perhaps more important) reason is that it prevents a child from seeing everything synced to their parent's Apple ID, including text messages, emails, app data, and more. Finally, giving your child their own Apple ID will set the groundwork for the crux of fortifying their iDevice: Family Sharing and Screen Time.
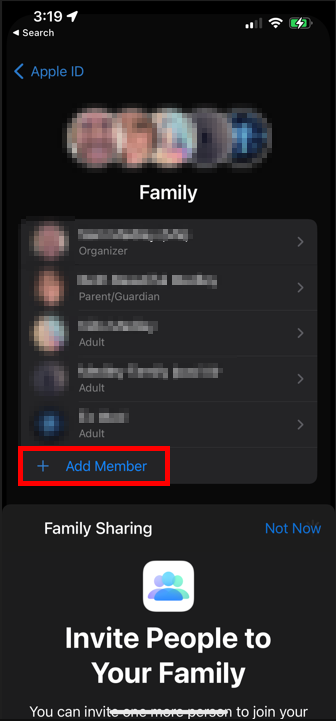
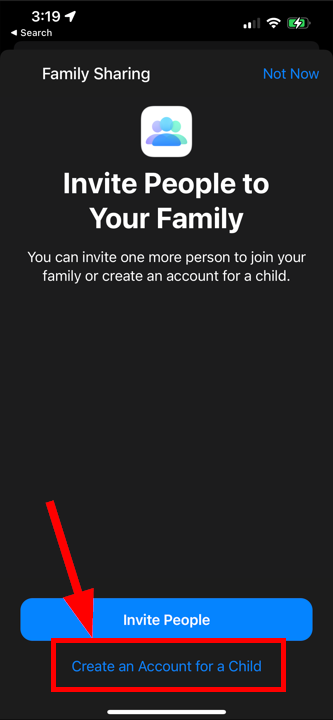
You can also create an Apple ID for your kid if you already have an iPhone, iPad, or Mac. On your iPhone or iPad, go to Settings, then tap on your name. Tap "Family Sharing." Here, choose "Add Member," and select "Create an account for a child." You may need to confirm your payment methods to verify that you are an adult; this doesn't incur a charge. After confirming, you will need to use a unique email address for your child (you can make one for them at this point; they don't need access to it), but the process is fairly straightforward from there.
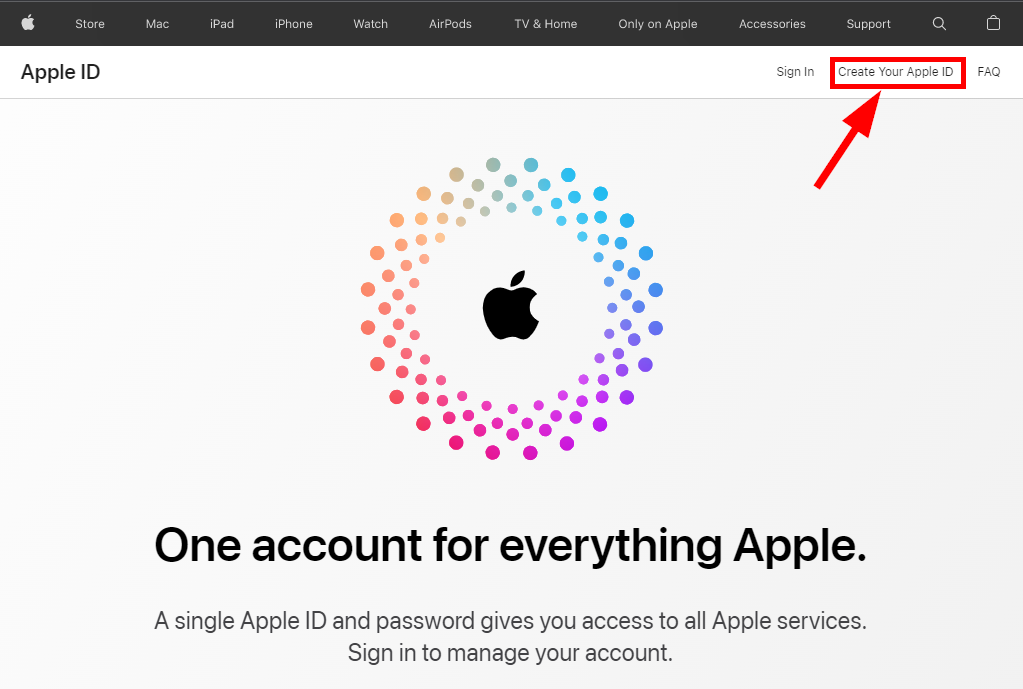
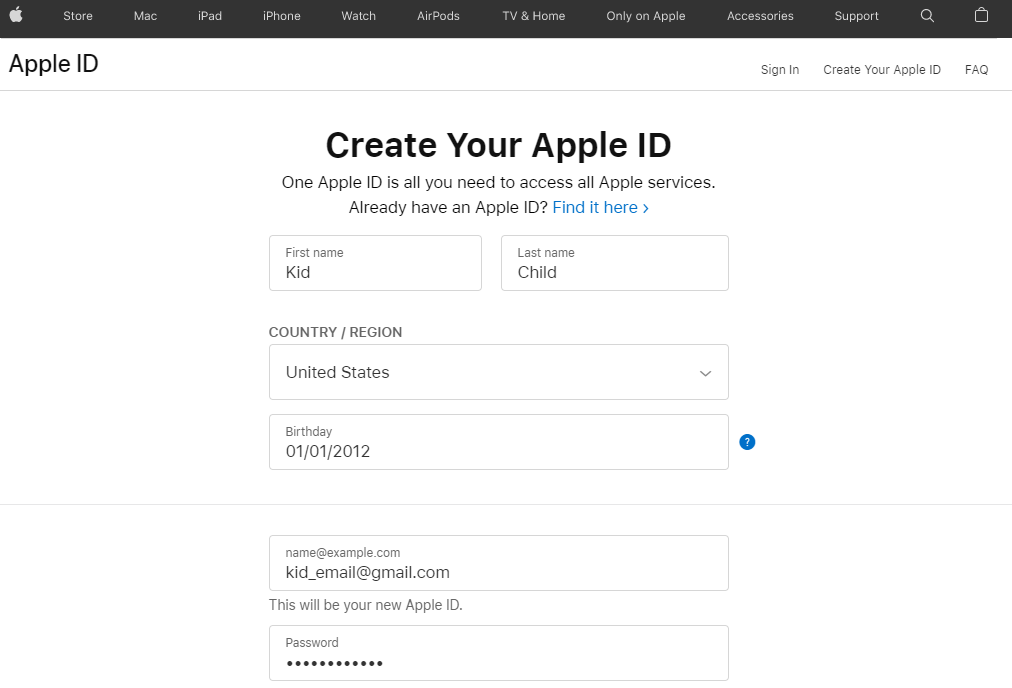
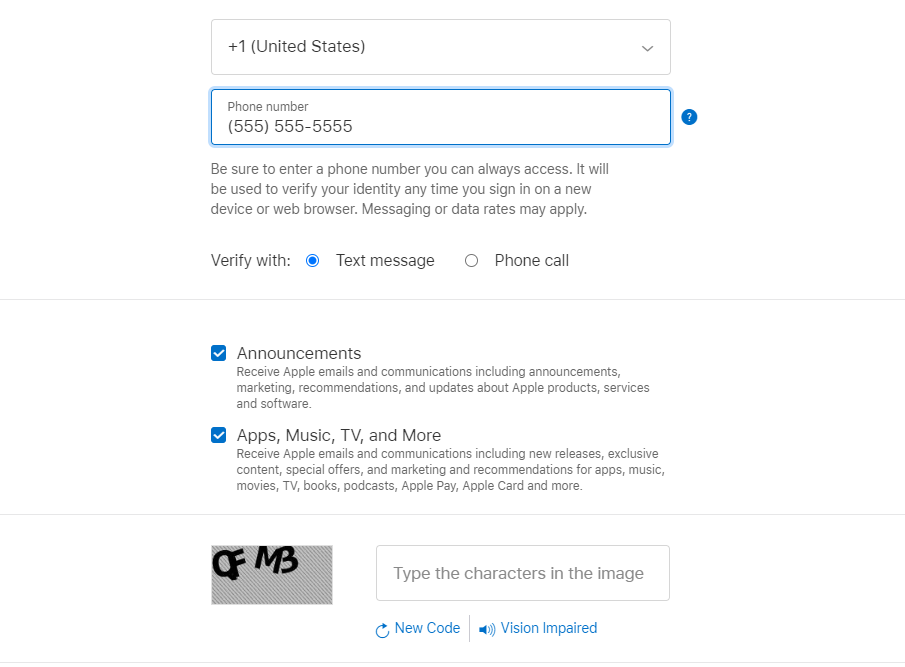
Another way to set up an Apple ID for a child is to either create one through the prompts presented when setting up a new iPhone or iPad or by going to appleid.apple.com. As mentioned above, you will need a unique email address to set up the Apple ID (this email address will also serve as the username for the Apple ID). In the future, you'll need access to this email address for two-factor authentication when logging onto new devices or in case you need to recover the password for the new Apple ID, so keep the email address and password recorded somewhere. Your child won't need the email for anything. (Gmail is an easy and free option for making an Apple ID-specific email address; it's what I've personally used for two Apple IDs for my kids' devices.)
Setting up the iPhone or iPad
Now that you've created an Apple ID, you can set up the iDevice. Apple makes setting up a new iPhone or iPad easy; simply follow the prompts at startup. The device will eventually ask you to log into an Apple account. Use your kid's account that you just set up. The device may send a confirmation code to that email, so you might need to log into the email address to retrieve it and enter it. Once everything is set up, you'll land on the homescreen.
There are a few more things to do before handing the device off. If you have your own Apple device, you should set up Family Share (detailed below). This will allow you to set up and change the parental controls on your kid's device from your own. Whether or not you set up Family Sharing, you'll absolutely want to configure Screen Time on your child's device.
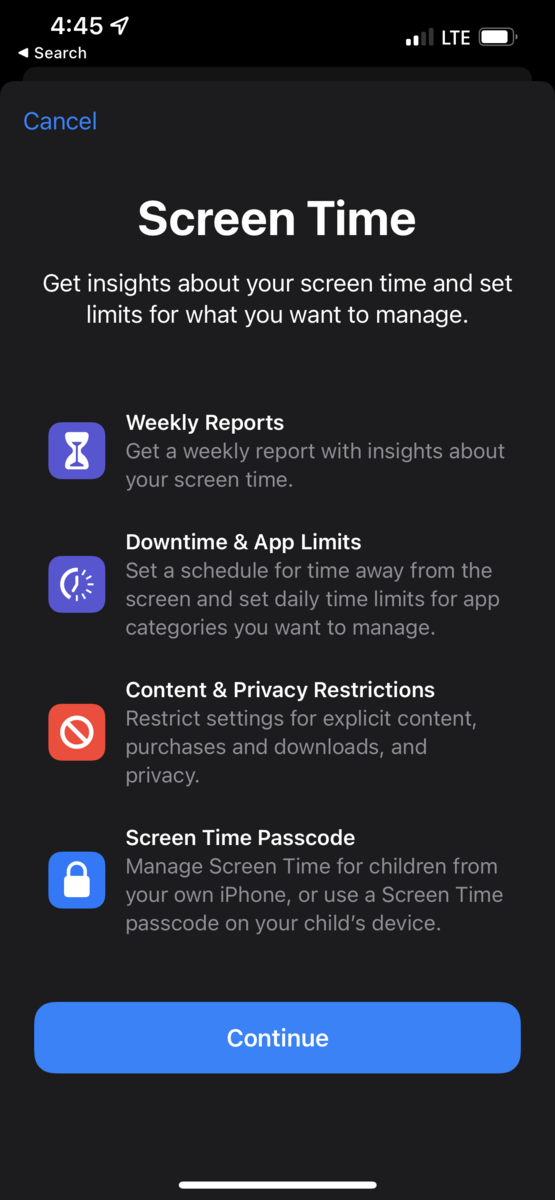
Screen Time is a suite of controls that allow users to monitor and restrict how they use their iDevice. In addition to tracking how much time is spent on the phone (and how long each app is being used), Screen Time also has useful tips for restricting or blocking content.
Setting up Screen Time
Screen Time is a powerful tool that can be used to track how long an app is used, restrict access to certain kinds of contacts, report on phone usage, and much more. The best part is that it is natively baked into iOS.
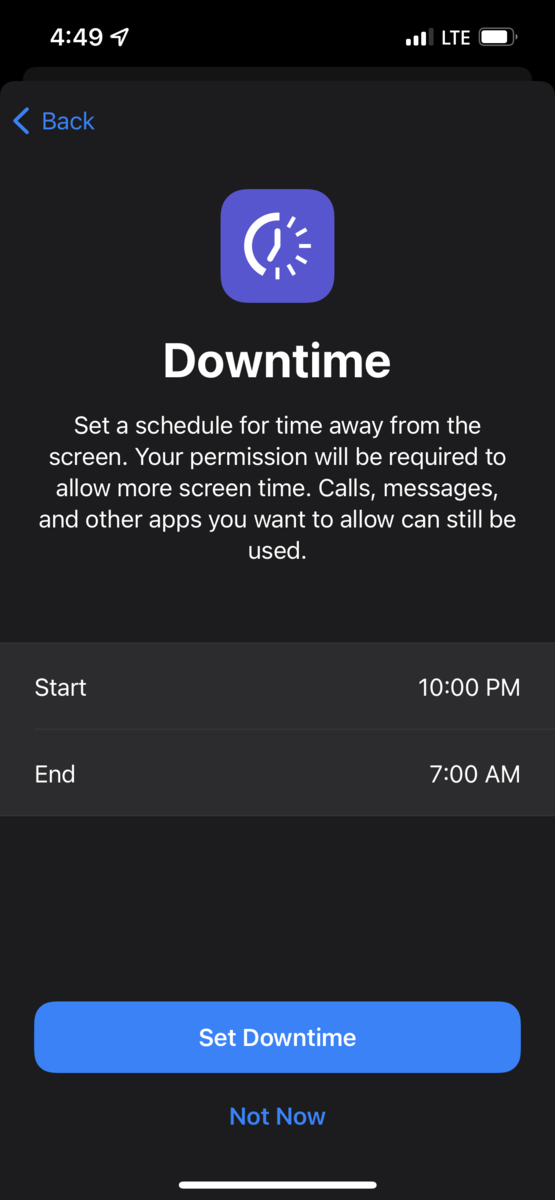
To set up Screen Time, head into the Settings on your kid's iPhone or iPad. Scroll down just a bit until you find Screen Time. Tap it, then tap "Turn on Screen Time." Here, you'll be asked if you're setting Screen Time for you or for a child, so tap on the second option ("This Is My Child's iPhone"). You'll be asked if you want to set up Downtime, which will completely lock the device between certain hours that you set. Keep in mind that even though your child won't be able to use their iPhone or iPad during Downtime, they can still get in touch with contacts you specify. You can also grant access to the device during Downtime using your Screen Time passcode (which we'll discuss below).
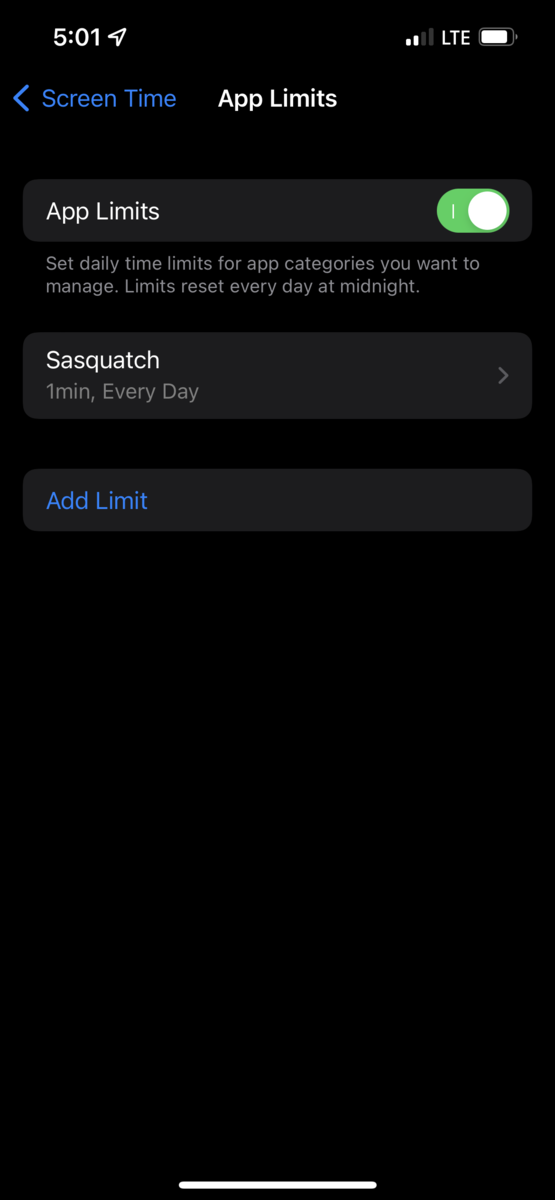
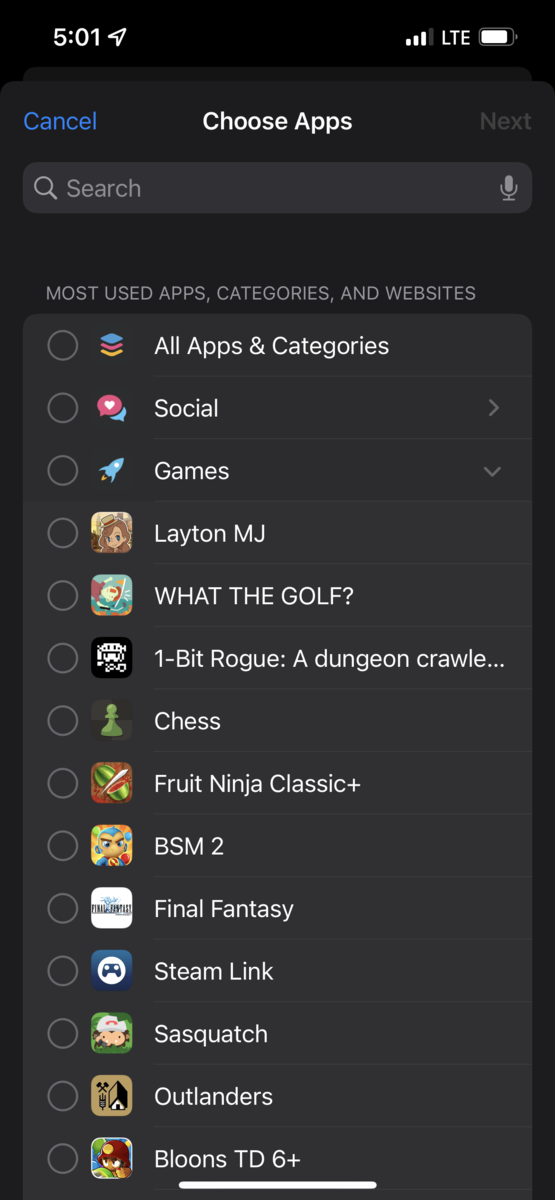
Next, you'll be asked if you'd like to set daily time limits on specific app categories. You can do this for broader categories (such as games, educational apps, social apps, etc.), but you can also set time limits on individual apps later.
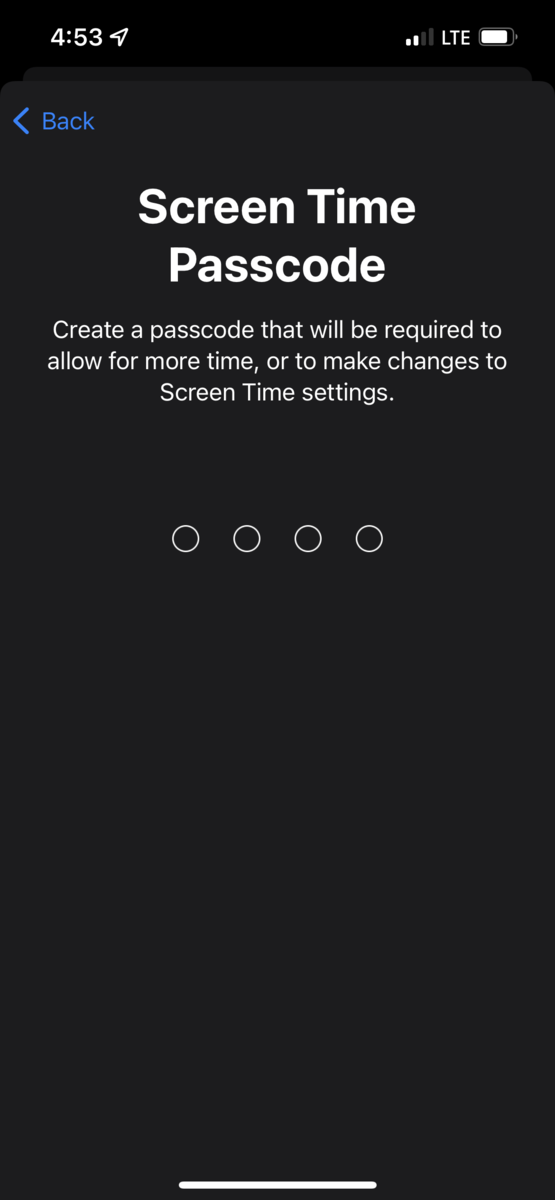
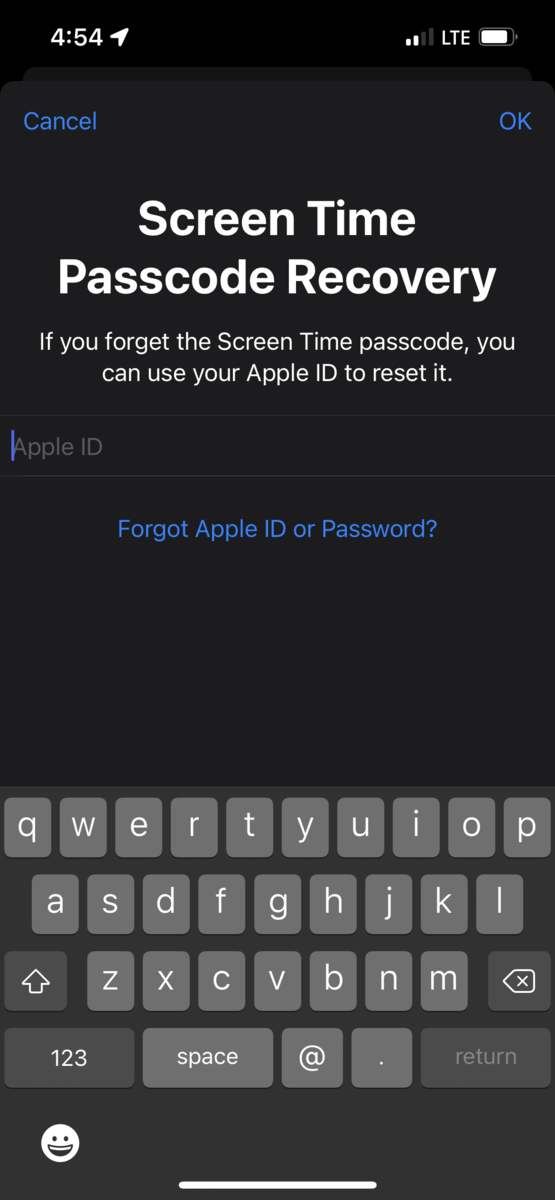
The next prompts will give you some general information about other Screen Time settings. Eventually, you will be asked to enter a Screen Time passcode. KEEP IN MIND that this is a passcode UNIQUE to Screen Time settings. This should not be the passcode for your kid's phone, and it probably shouldn't be the passcode to your phone either. Make sure you choose a passcode that's memorable so you don't forget it; while it is possible to reset a Screen Time passcode, it is quite involved and it will reset all the options you're about to set up. You'll be asked to confirm the Screen Time passcode and to enter an Apple ID that can be used to reset it. To make things simple, this should be your Apple ID.
App Limits, Communication Limits, and other settings
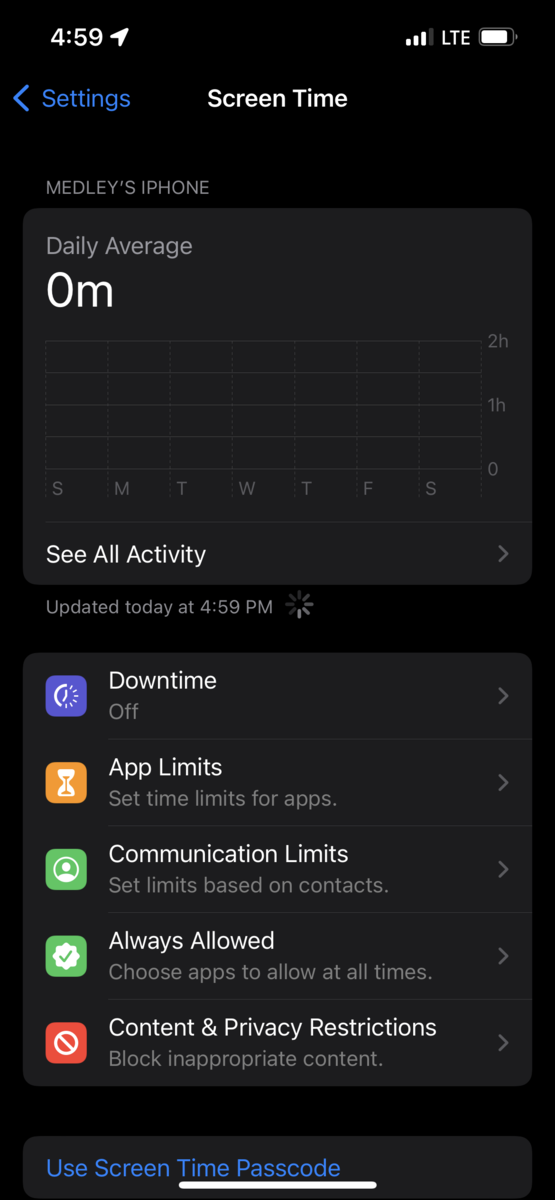
Now that Screen Time is enabled on your kid's iDevice, you have a bevy of options available to fine tune how your kid can use it.
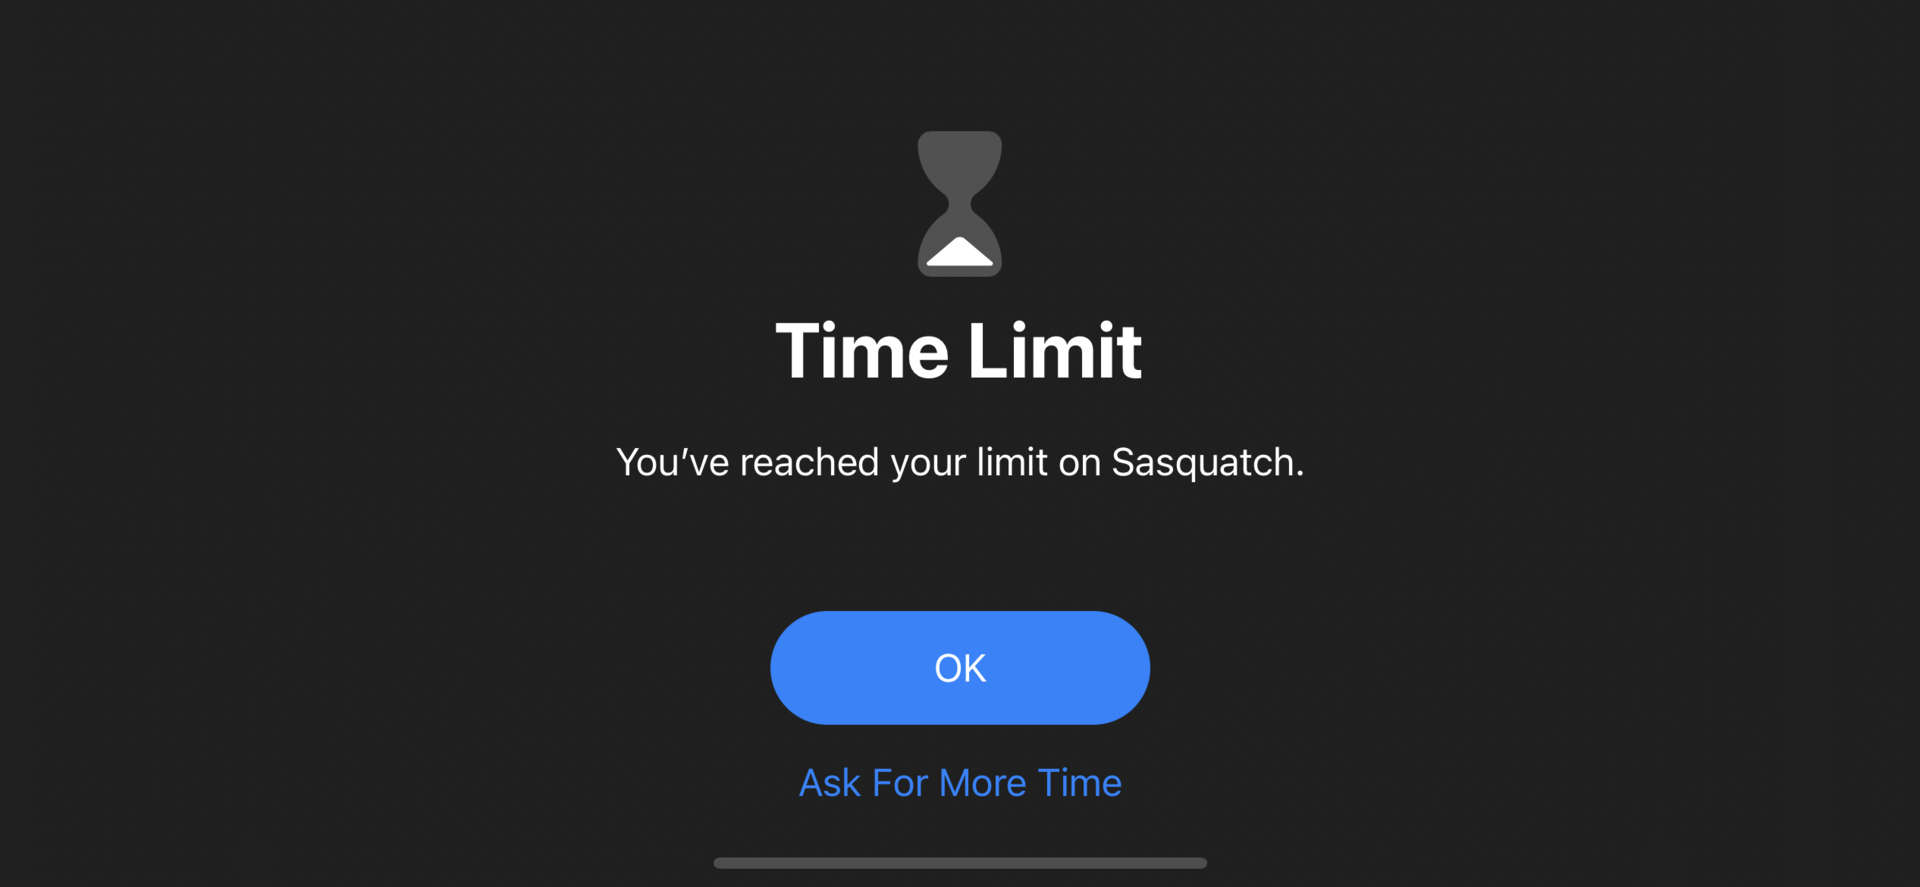
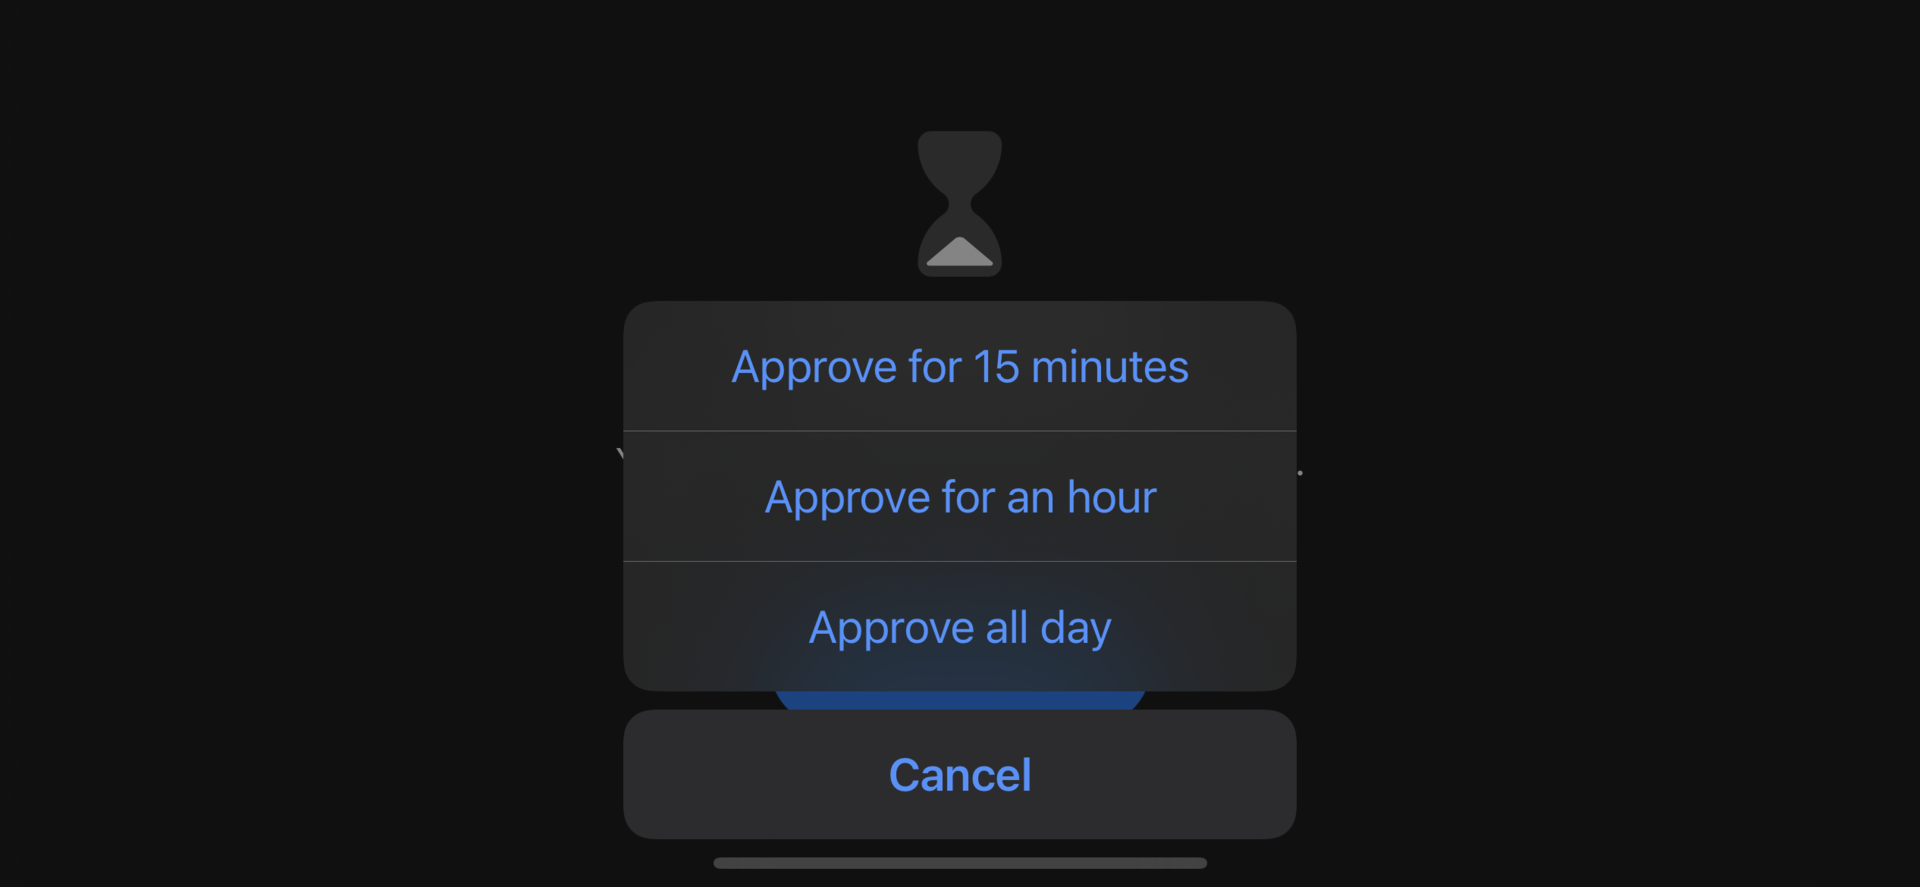
The first option you should explore is App Limits. As mentioned above, you can set time limits for specific apps through this setting. Once that time limit is reached, your child will either get a reminder that they've reached their time limit, or the app will be blocked if you select that option in the limit. Your kid can request additional time or to ignore the limit for the day, but they'll need you to enter the Screen Time passcode. Otherwise, they'll have to wait until the next calendar day to use that app again. You can add limits for every app, or you can add limits for specific apps only.
The next option, which is particularly pertinent for kids with iPhones, is Communication Limits. Here, you can limit which people can be reached via phone calls, FaceTime, and Messages during the day. You can also limit access to specific contacts (such as yourself) during Downtime. Emergency services (as identified by your carrier) can always be reached at any time.
Further down the list is Always Allowed, which lets you set which apps will always be allowed during Downtime. In other words, the apps you select will ignore any Downtime limits you've set up. This may be useful if you'd always like your child to be allowed to use FaceTime. You can also control which contacts can be reached during Downtime from this menu.
Content and Privacy Restrictions
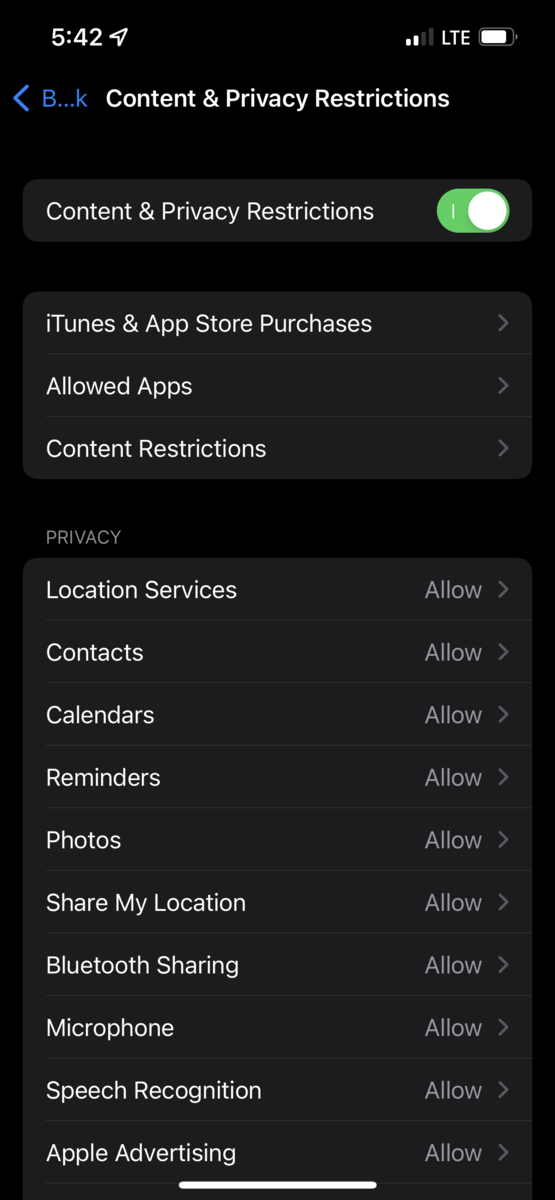
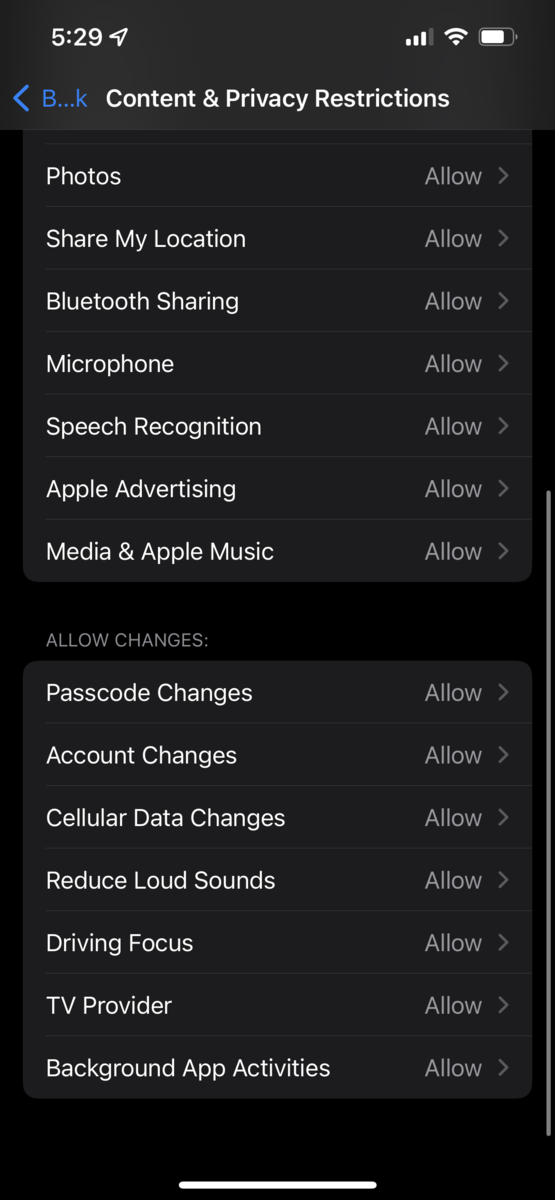
One of the most robust settings is Content and Privacy Restrictions. Here, you can set up controls on the content your child sees or uses on their phone. This includes things like how (or if) they can download or delete apps, which websites they're allowed to visit, which kinds of songs or books they can download through Apple's services, how their phone's location is shared, and much more.
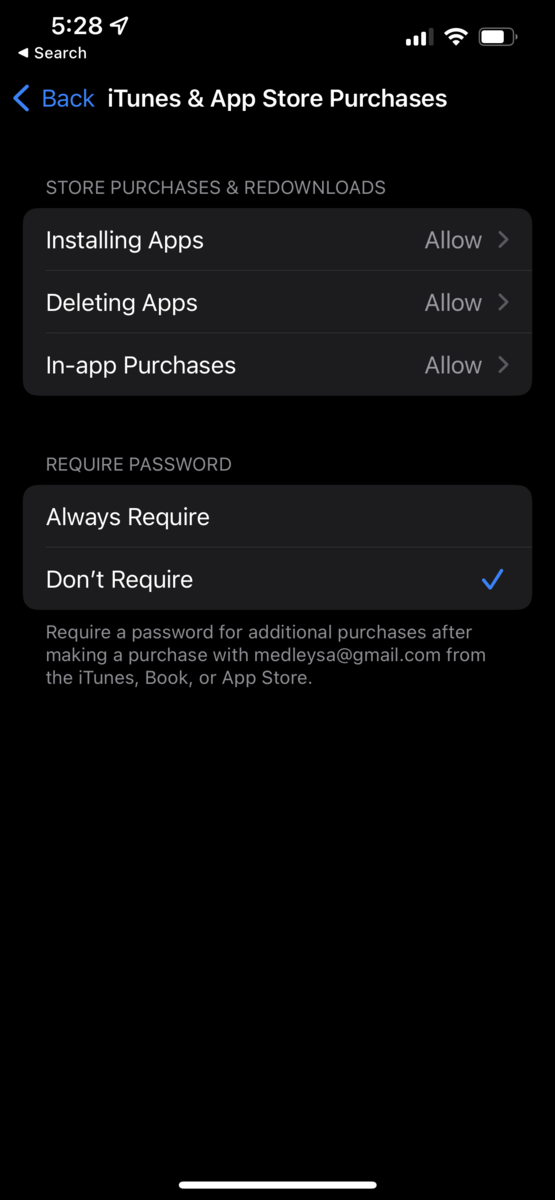
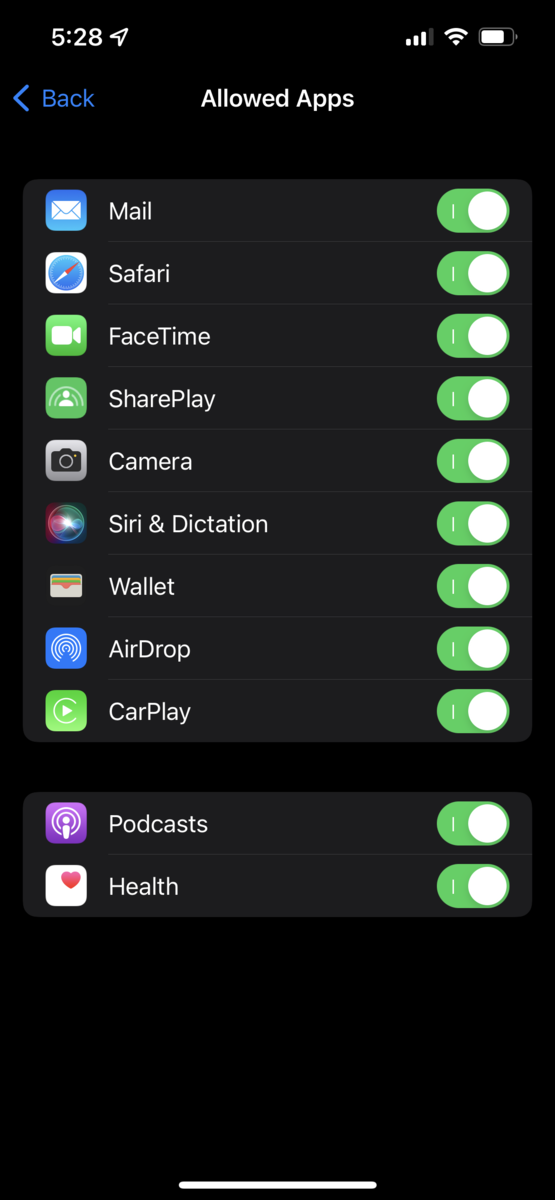
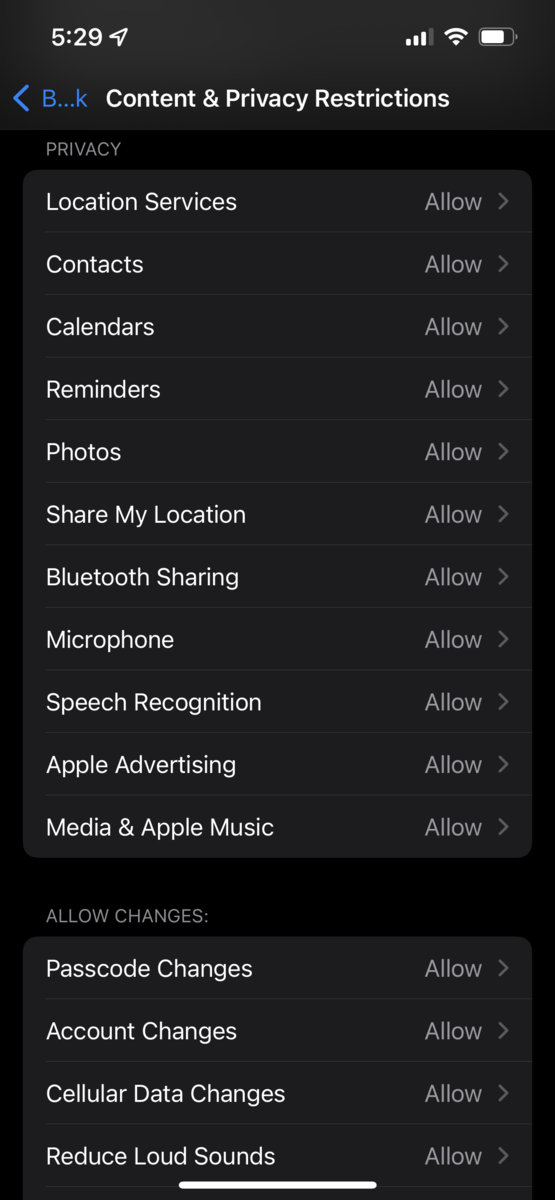
There are a few key menus. Under iTunes & App Store Purchases, you can restrict your child from downloading or deleting apps on their phone and prevent in-app purchases. Allowed Apps will let you disable some pre-installed Apple apps, such as FaceTime, Safari, or Camera, to name a few. The Privacy section allows you to determine which apps can access which features (e.g., contacts, reminders, location, Bluetooth, etc.) and whether or not new apps can ask for these permissions. Parents can also disable changes to the phone passcode, background app activities, and more.
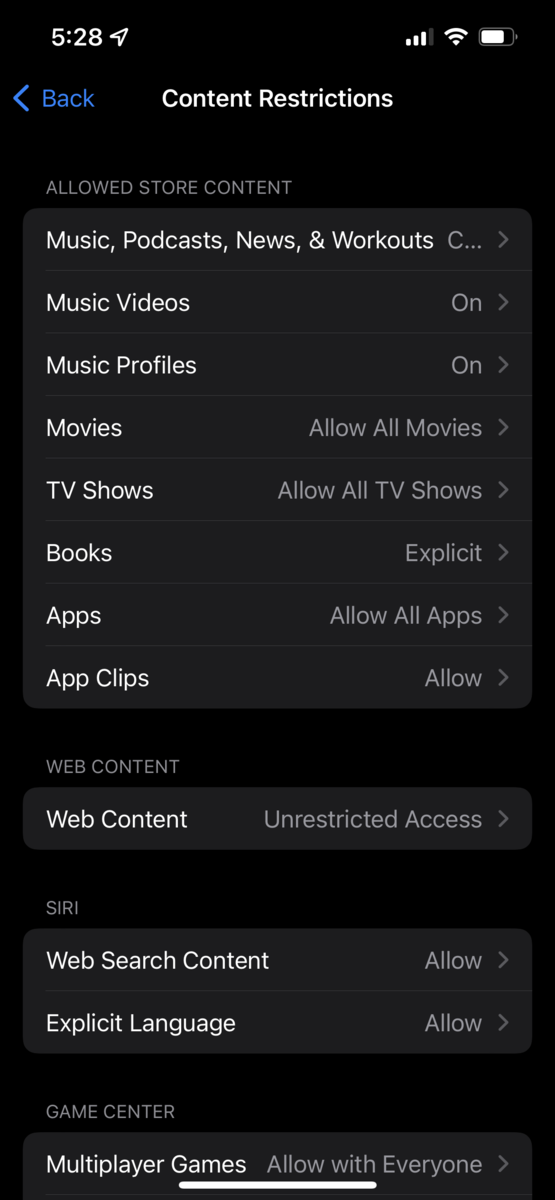
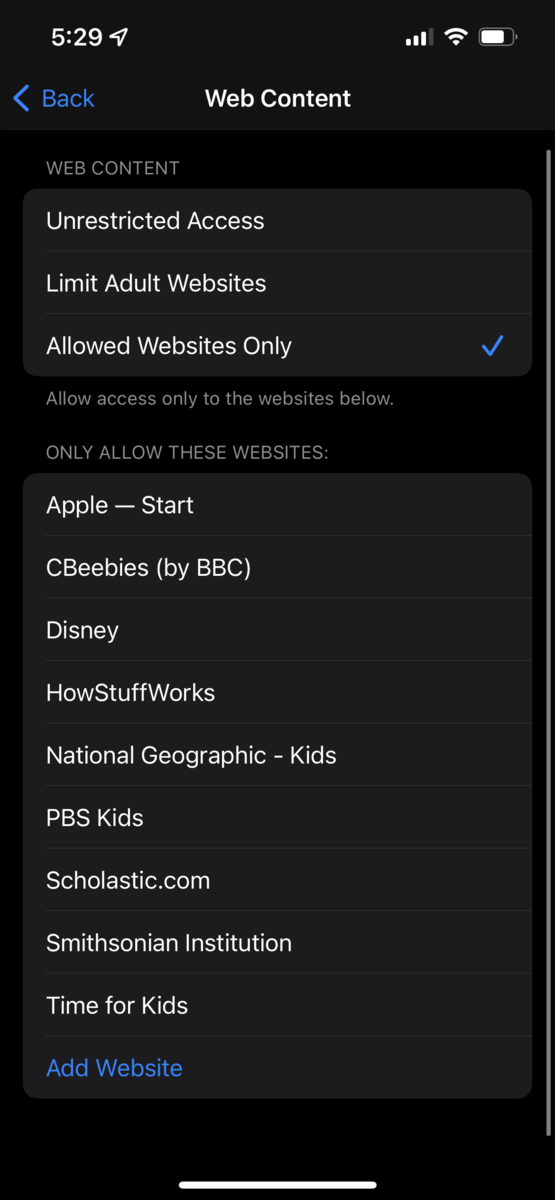
Content Restrictions is perhaps the most important menu for parents. Here, you can set limits on what kinds of content your child can access via Apple's services (based on age rating, such as "Explicit" or "Clean"). You can also allow or disallow various Game Center and Siri settings. The setting that should grab your attention is Web Content. Here, you can prevent your child's phone from accessing adult websites. You can also build a whitelist of websites that the phone is able to access. This means that if a website does not appear on the list you create, the phone cannot access it. In other words, if www.google.com is not on your list, the phone won't be able to access www.google.com.
Keep in mind that no filter is 100% effective. The web content filter only works through web access (i.e., through a browser or app that utilizes a browser), and it only works on a broad domain basis. If a website is not flagged as explicit but has a sub-domain with unwanted content, the phone will not block it unless it is set to specifically blacklist, or specifically block, that domain. For example, apple.com is not an adult website. If, for some reason, Apple puts adult content on a subdomain (e.g., apple.com/bad-stuff), the iPhone or iPad will not know to block this subdomain. The main domain of apple.com would have to be blacklisted.
Again, remember that no filter is perfect. The best guard against your child viewing inappropriate material on the Internet is vigilance on part of the parent and open and regular communication with the child.
Last things to do before handing it over
Now that Screen Time is set up (along with any App Limits or Content Restrictions), there are a few settings some parents may be interested in setting up.
If you'd like to be able to track your child's phone from your device (e.g., to ensure they arrive home from school safely, in case they lose their phone, etc.), you can do so by heading into the Find My settings on your child's phone. Go into Settings and tap your child's name at the top. If your child has not yet been added to your family, do so via the "Family Sharing" option below. Once this is done, tap "Find My." Make sure "Find My iPhone" is on, and enable "Share My Location." Once this is on, tap the family member(s) you'd like to share your child's phone's location with below. This will pull up that contact page. At the bottom, tap "Share My Location." Now, when you go into the Find My app on your phone, you will be able to see your child's phone on the map. (Keep in mind that this only tracks the phone's location; if your child doesn't have their phone, this will not track their location.)
To make sure your kid doesn't accidentally disable this, head into Screen Time. Tap "Content & Privacy Restrictions." Tap "Location Services." Scroll down to "Find My" and tap it. Tap "While Using the App." Tap Back, then Back again. Tap "Share My Location" and make sure "Allow" is selected." Tap Back. Tap "Account Changes." Tap "Don't Allow." This will ensure your child doesn't accidentally change their location sharing with you by accident.
You may also want to take some time and sit with your child before handing their device over. Install some apps they may want to use, and go through the basics of using their new device. This is also a great opportunity to talk with your child about online safety, how to safely use an electronic device, and a broad overview of the Screen Time settings you've set up (so they won't get confused or angry when they hit their first App Limit). Also let your child know that their phone is trackable (if you set that up), and go over how to safely maintain this setting (e.g., not sharing their phone's location with any one you don't specifically approve). Remember that open and regular communication with your child is the best deterrent to them getting into trouble, and that applies to safe smart device usage as well.
Closing remarks

Technology is a wonderful tool, and it can be a source of entertainment and education for youngsters. However, unfettered access to the Internet is not only inappropriate for kids; it can be dangerous. With the proper set up, parents can make their kids' iPhone or iPad much safer. The best first line of defense against the dangers of the Internet and Smart Devices is attentive and communicative parents, but there are several settings and options that can make that job easier.
Hopefully, you will have a better understanding of some of those options available to Apple users. In the near future, we will have a comprehensive guide on setting up an Android device for children. If you have questions or other tips for parents, please leave them in the Comments section below.
Source(s)
Teaser and Cover Photo by McKaela Taylor on Unsplash
Own research
Closing remarks photo by Alexander Dummer on Unsplash
