How to run Linux binaries natively in Windows 10
Windows Subsystem for Linux, explained
When Microsoft announced that they were bringing the Bash shell to the Windows 10 Anniversary Update via the Windows Subsystem for Linux (WSL) along with the open-sourcing of PowerShell, it meant that most of the tools that developers and sysadmins rely on were now non-proprietary and cross-platform. WSL addresses a unique paradigm — most of the web runs on Linux servers while Windows rules the enterprise space. Web developers have always struggled to move between platforms and often had to adapt to seemingly polarizing workflows. WSL aims to address this exact problem. By offering the ability to run native Ubuntu ELF64 binaries in a Bash shell invoked via the Command Prompt, Microsoft and Canonical (the company behind Ubuntu) are making it easy for developers to use familiar Linux-first tools such as apt, ssh, grep, awk, curl, mysql, ruby, perl etc. while still retaining their Windows deployment. It's not just the availability of tools that makes WSL enticing but also the availability of immense literature, expertise, and coding that goes with these tools.
How different it is from Cygwin?
We all know Cygwin, which provides a POSIX API functionality within Windows by running packages that have been specifically recompiled for it. Till the announcement of WSL, this was a popular way of using Linux tools on Windows. Unlike Cygwin, WSL does not require any recompilation and can run a Linux distro and binaries as is.
Is it better than running a Linux VM?
Of course. WSL is neither a Linux virtual machine (VM) nor is it an emulator. Heck, it's not even the actual Linux kernel. It is a Windows layer that translates Linux syscalls into Windows syscalls. In the words of Canonical's Dustin Kirkland, Ubuntu on Windows is "bit-for-bit, checksum-for-checksum Ubuntu ELF binaries running directly in Windows". Think of it as the inverse of Wine in some sorts.
How does it benefit end-users?
While WSL has been made with developers in mind, end users can benefit from it just as well. Since WSL can be enabled even on Windows 10 Home, just about anyone can install and use it. WSL is perfect if you are interested in learning about Linux commands but are still wary of installing a dedicated distro on a partition or using a VM. Also, Linux has some neat free programs for those in education and science. With each iteration of Windows, we will see more and more compatibility of standard Linux programs with WSL.
Does it have any limitations?
It does. For one, you cannot run WSL on a 32-bit Windows machine. Even the Linux packages that can be installed from within the Bash shell are all 64-bit. WSL is intended to be mainly a command line toolset, therefore, Microsoft does not officially support graphics or multimedia output. Some other limitations include —
- WSL also cannot access GPU hardware. That means no support for CUDA or OpenCL frameworks yet. However, there are now ways to get GUI apps and multimedia running by TCP/IP'ing the GPU output from Linux land to Windows land albeit with varying results.
- I/O operations are still on the slower side compared to a Linux VM.
- Since this is not a kernel per se, you cannot run apps that rely on the kernel such as VirtualBox, for example. Also, not all Linux syscalls are supported for translation at this time.
- You still cannot run a server from Bash on Windows.
- There are currently only a few distros available from the Microsoft Store but enthusiasts have found ways of using just about any Linux flavor with WSL (Arch Linux, anyone?).
Now that we've acquainted ourselves with what WSL is all about, let's get down to business.
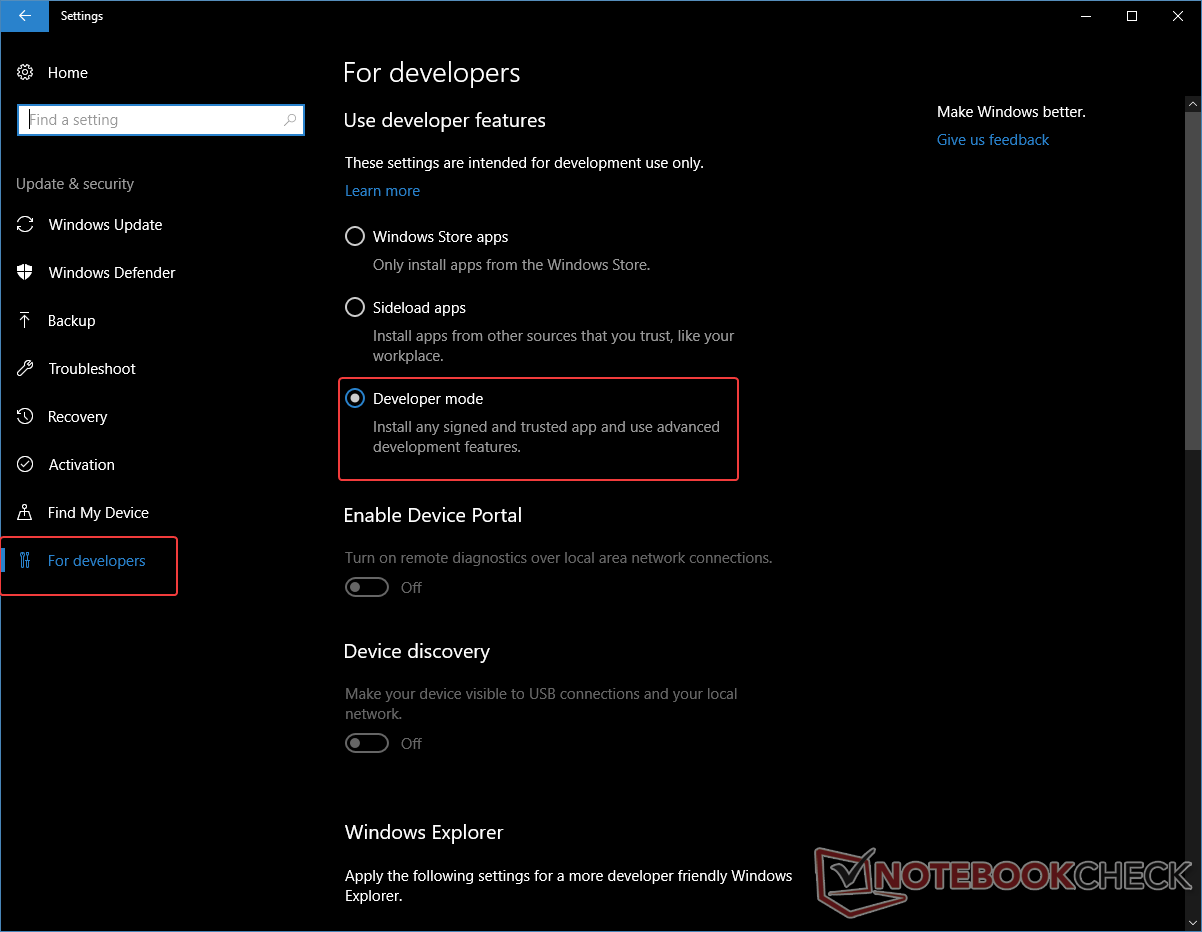
Step 1: Enable Developer Mode and WSL
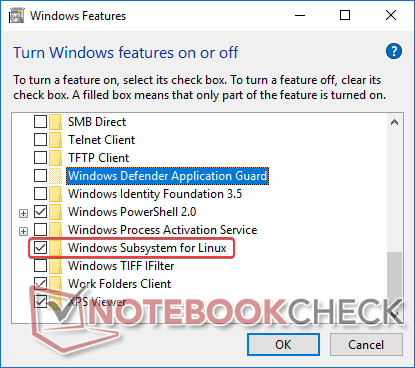
Before you get to tinker with cowsay messages in your terminal, there are some basics that need to be sorted out. Firstly, enable Developer Mode by going to Settings > Update and Security > For Developers. If this is the first time Developer Mode is being turned on, you might have to wait for sometime for the feature to get activated. Then, in the Cortana search box, search for Turn Windows Features on or off (you might require Admin priveleges for this), scroll down and check the box against Windows Subsystem for Linux. You might be prompted to restart the computer for the changes to take effect.
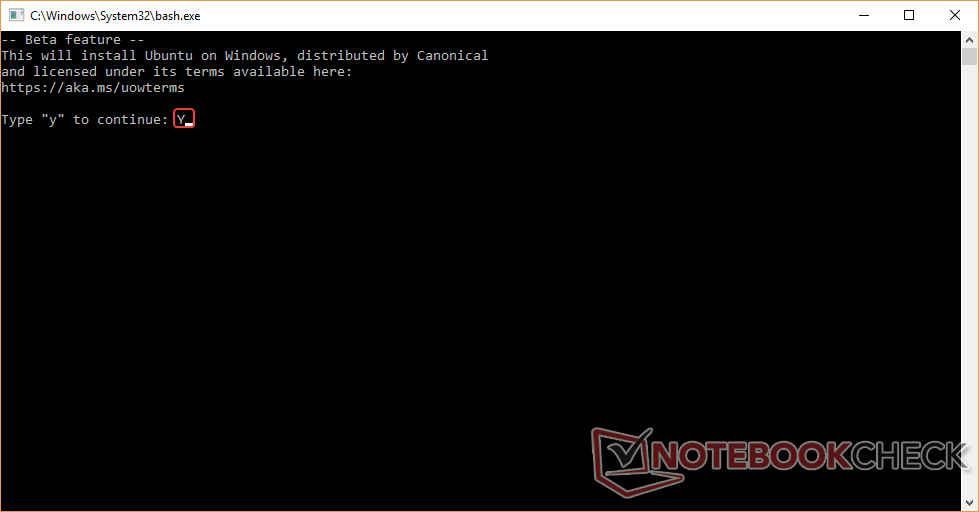
Step 2: Install Ubuntu
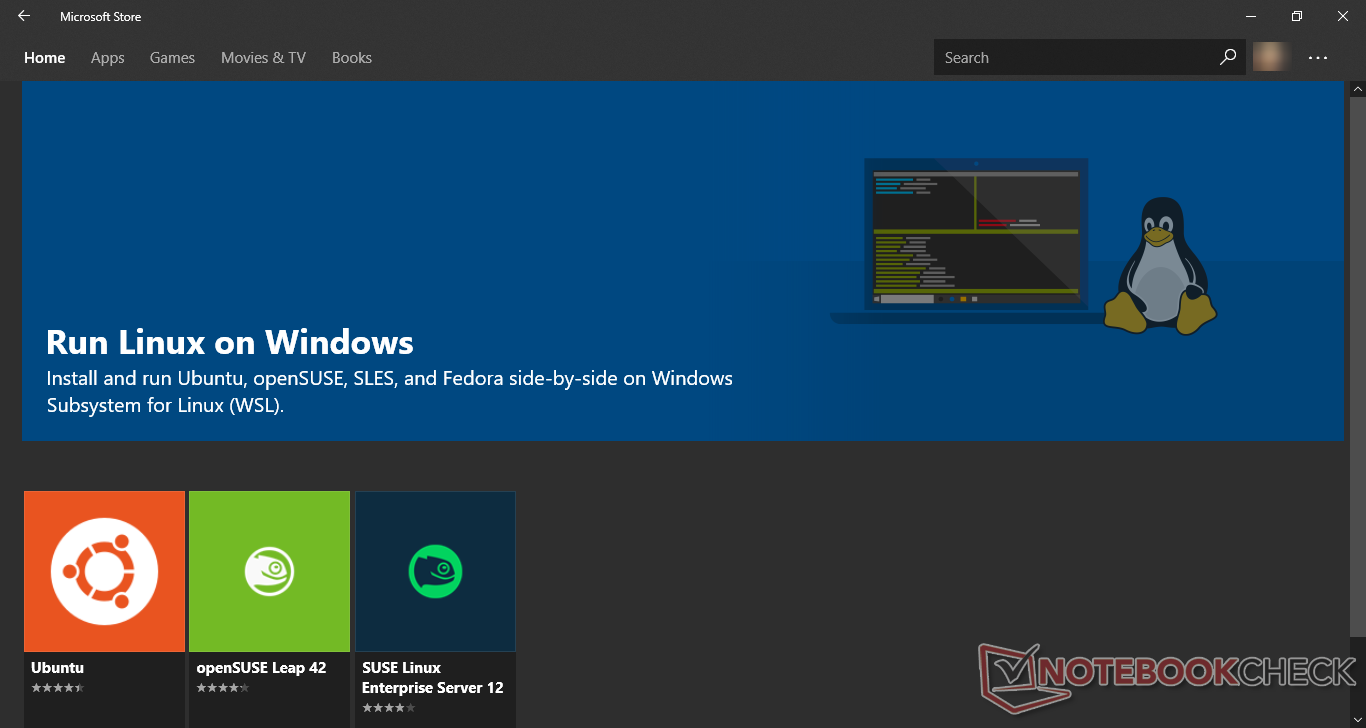
Type bash in the Cortana search box to open a Command Prompt window so that you can install Ubuntu. The installation process is a little different based on the Windows version you have. For versions prior to 1709 (Fall Creators Update), you can simply press Y at the prompt to download the standard Ubuntu distribution (remember WSL is still Beta in Windows 10 versions prior to 1709). In the Fall Creators Update you have more distro options to choose from. You can go to the Microsoft Store and install Ubuntu, openSUSE Leap 42, or SUSE Linux Enterprise Server 42. While these three distros are available readily for integrating with WSL, there are hacks to get the distro of your choice to work with WSL. Either way, select your preferred distro and install from the Store. For this tutorial, we will stick with Ubuntu. The version that is installed is Ubuntu 16.04 LTS.
Step 3: Create a default UNIX user account
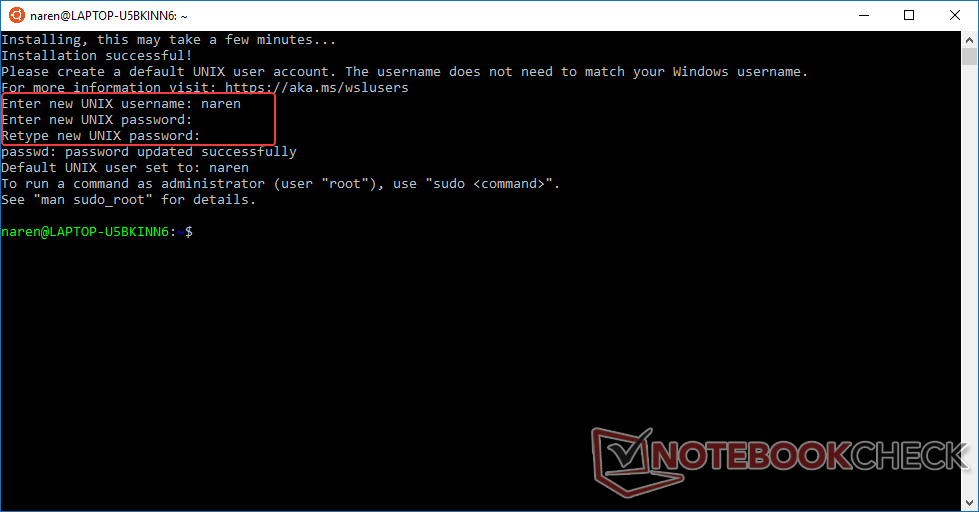
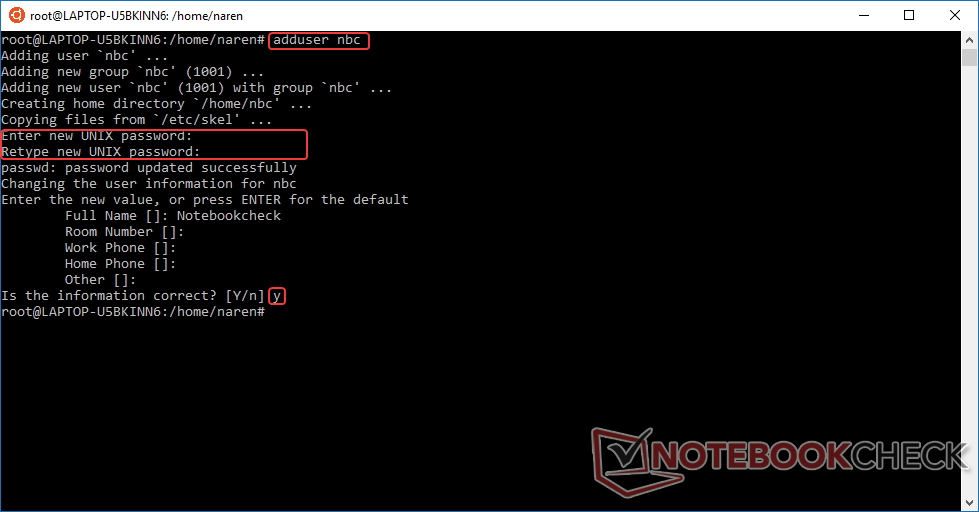
Once you have installed Ubuntu, you will be asked to create a default UNIX user account. This will be the account that Ubuntu will login to by default. Of course, you can create multiple user accounts as well or use root all the way. Enter a username and password (twice) to create the default user account. This will be the account from which you can run sudo commands. There is also a root account that allows full system access but it is not recommended for regular use due to security concerns. Certain installations will login as root by default. In that case, you can manually add a normal user by typing adduser <username>. The root account can be identified by the # prompt while the $ prompt implies a normal user account.
Step 4: Update Ubuntu packages
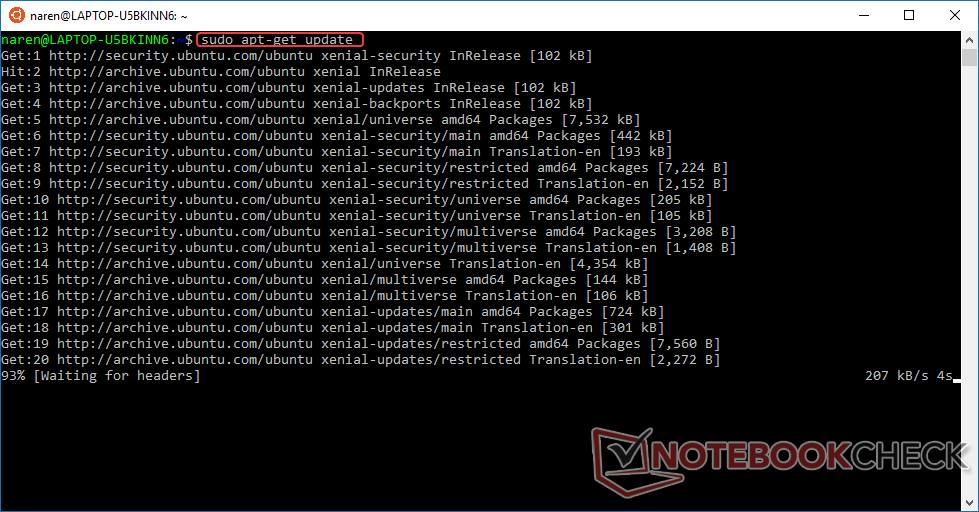
After creating the default account, it helps to check for updates to the existing installation. Type sudo apt-get update in the bash prompt to update the list of available packages followed by sudo apt-get upgrade to actually install the updated packages. This might take a while so be patient till it finishes. If you skip this step, you might have trouble in connecting to Ubuntu repositories to download additional software. It is also a good idea to periodically check for package updates using the above commands. You can also do a sudo apt-get dist-upgrade to update the kernel, although, it is not very critical.
Step 5: Explore
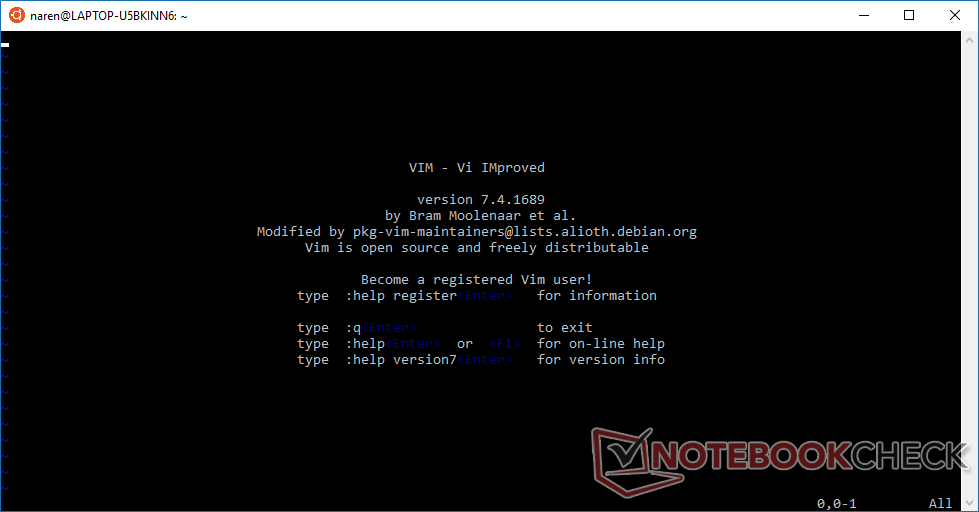
Now that you have installed Ubuntu and updated its packages, feel free to try out various Bash commands such as ls (for listing directory contents) or pwd (to show the present working directory). You can also open programs such as Vi — the default text editor for Linux. Type vim at the $ prompt to open the text editor.
TIP: You can also run bash commands from the Run dialog box. For example, to open the Vi editor from Windows, open the Run dialog box and type bash -c "vi". This will open a new Bash console window running the Vi editor.
Also, in traditional Linux fashion, you can mount external directories and work with the files in them. With WSL, you can mount Windows folders in Bash and conversely browse Bash files in Windows. For example, to mount the C drive in Bash, type cd /mnt/c and then type ls to view the list of files in your C:\ drive. One important thing to note here is that files that require Administrator access in Windows cannot be simply accessed by using sudo in Bash. To work with files that require Admin access, open Bash as Administrator similar to how you open the Windows Command Prompt as Administrator.

Step 6: Create and run Bash scripts
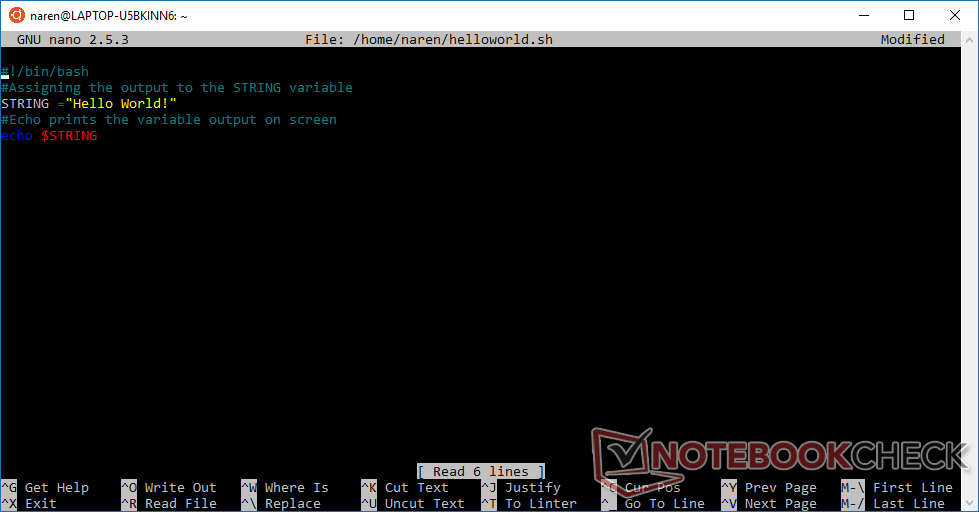
The best part about working with a command line shell in any OS is scripting. WSL being primarily a developer environment, supports scripting in the Bash shell. While you can create scripts in Windows and mount the directory in Bash to execute them, it makes sense to create the script from within Bash itself as Linux uses different End-of-Line (EOL) characters than Windows. Let us create a sample script in the nano text editor that prints out the message, "Hello World!". At the $ prompt type nano ~/helloworld.sh. This will open the nano editor with the file helloworld.sh created in the home directory (in Linux, the ~ represents the home directory).
Enter the following lines in the nano editor —
#!/bin/bash
#Assigning the output to the STRING variable
STRING="Hello World!"
#Echo prints the variable output on screen
echo $STRING
Press Ctrl+O to save the text file at the path and filename indicated earlier (/home/username/helloworld.sh) and press Ctrl+X to exit nano.
If you're new to Bash scripting, note that the very first line of any script should start with a shebang (#!). The shebang points the path to the interpreter shell for the rest of the script. If a different shell is being used to run the script, the shebang points to the location of that shell. A # indicates a comment line and is usually included just for reference. Outputs can be assigned to variables, in this case the STRING variable. Echo displays the output of the variable on the screen.
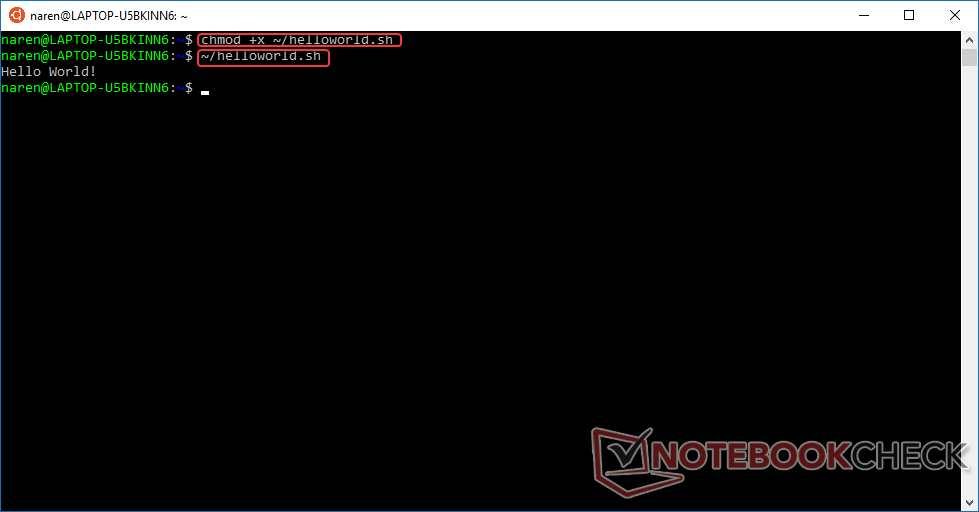
Now that we have created our first script, we need to execute it. As a security measure, Bash does not allow directly executing scripts unless the script is explicitly marked as executable. To mark a script as executable we need to change its attributes. Type chmod +x ~/helloworld.sh to change the attribute of the script to an executable. Finally execute the script by typing ~/helloworld.sh. If the script is located in the same working directory, you can also type ./helloworld.sh.

Step 7: Run GUI Linux programs in WSL
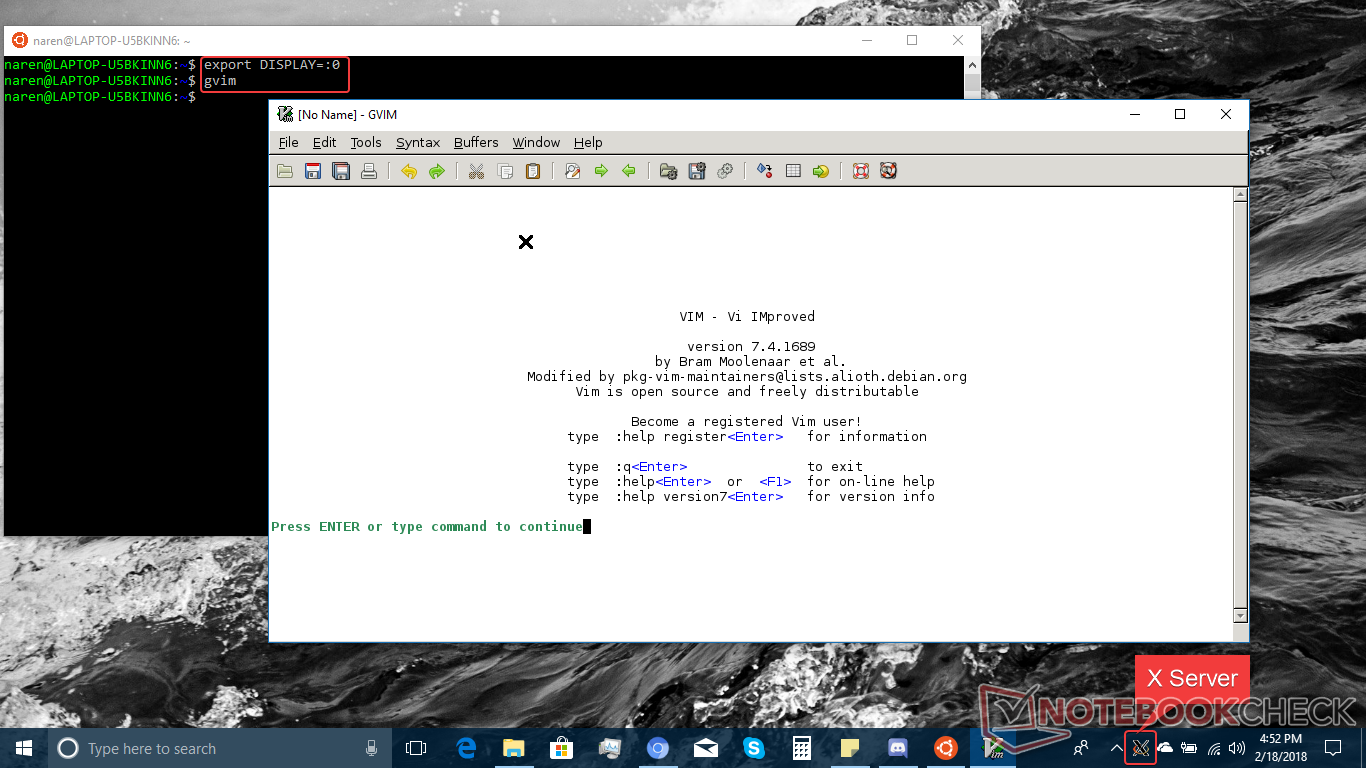
WSL was originally intended to be a command line-only environment as it focused on integrating the Linux developer tool-chain directly within Windows. However, there are some workarounds to get simple GUI programs running from within Bash. Linux uses an X server to display the desktop environment and draw windows on screen. Since WSL does not ship with an X server, we need to get an X server running within Windows and direct the GUI output over ssh. To do so, download an X server program for Windows — Xming and VcXsrv are good options, although, Xming is somewhat outdated but lightweight. Download either of the setup programs and install. This tutorial uses VcXsrv. Open the program from the Start menu or the desktop. You will notice a tray icon with an X. Now that an X server is installed on Windows, let us try to install a graphical program and see how it works. As an example, let us try gvim — the Vi editor with a GUI.
At the $ prompt, type sudo apt-get install vim-gtk and enter your password if needed. This will install gvim. After the installation process is completed, the GUI output should be directed to the X server installed earlier. To do so, type export DISPLAY=:0 and press Enter. Now type gvim at the $ prompt and press Enter. Voila! You've successfully executed a Linux GUI program in WSL.
Note: The export DISPLAY command is valid only for the current session and must be run each time Bash is started. Also, not all GUI programs play nice with this method so your mileage may vary.

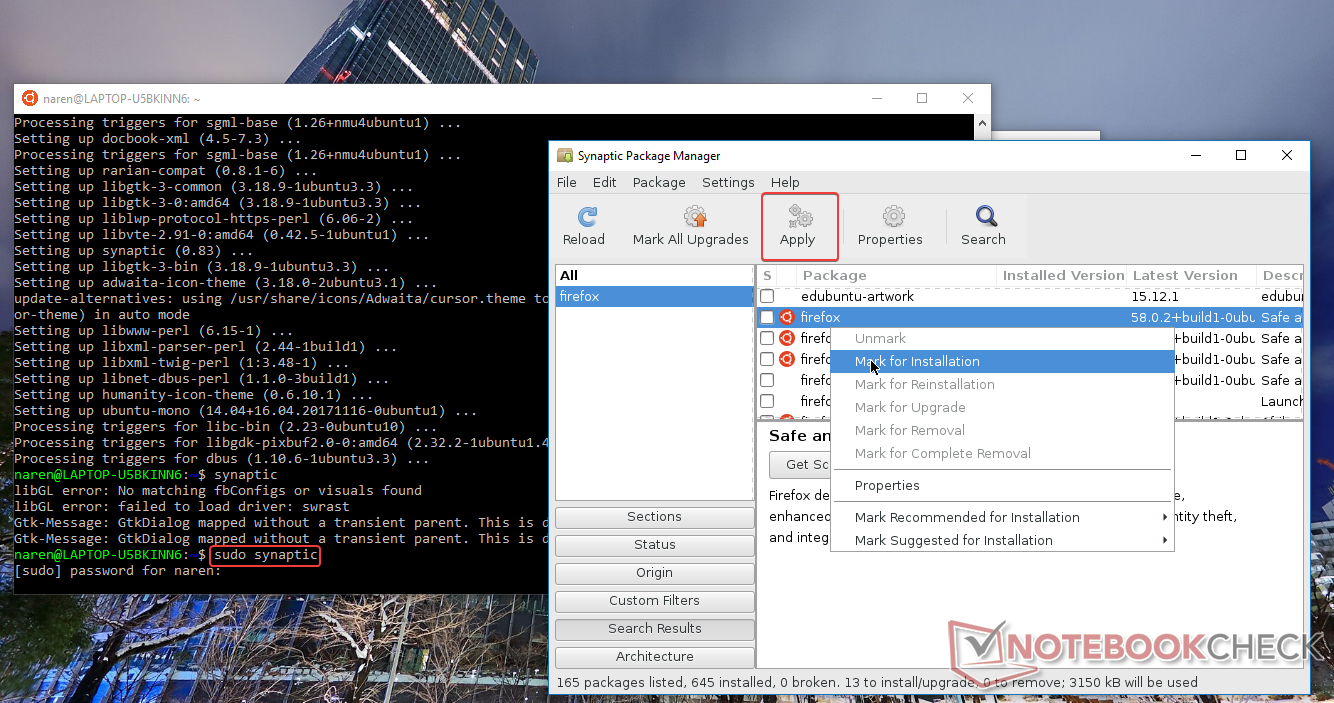
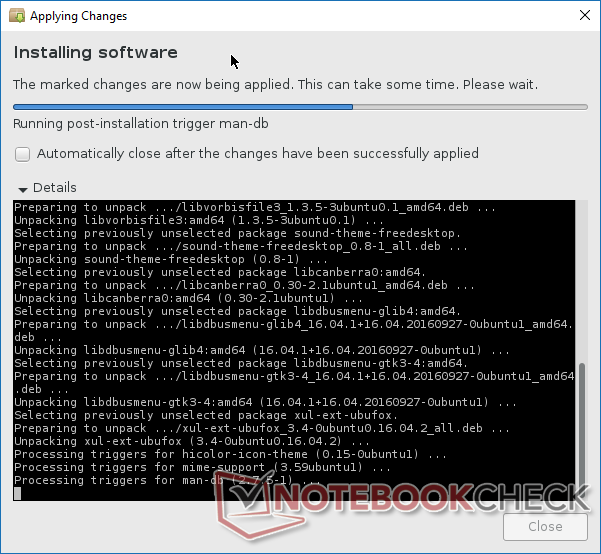
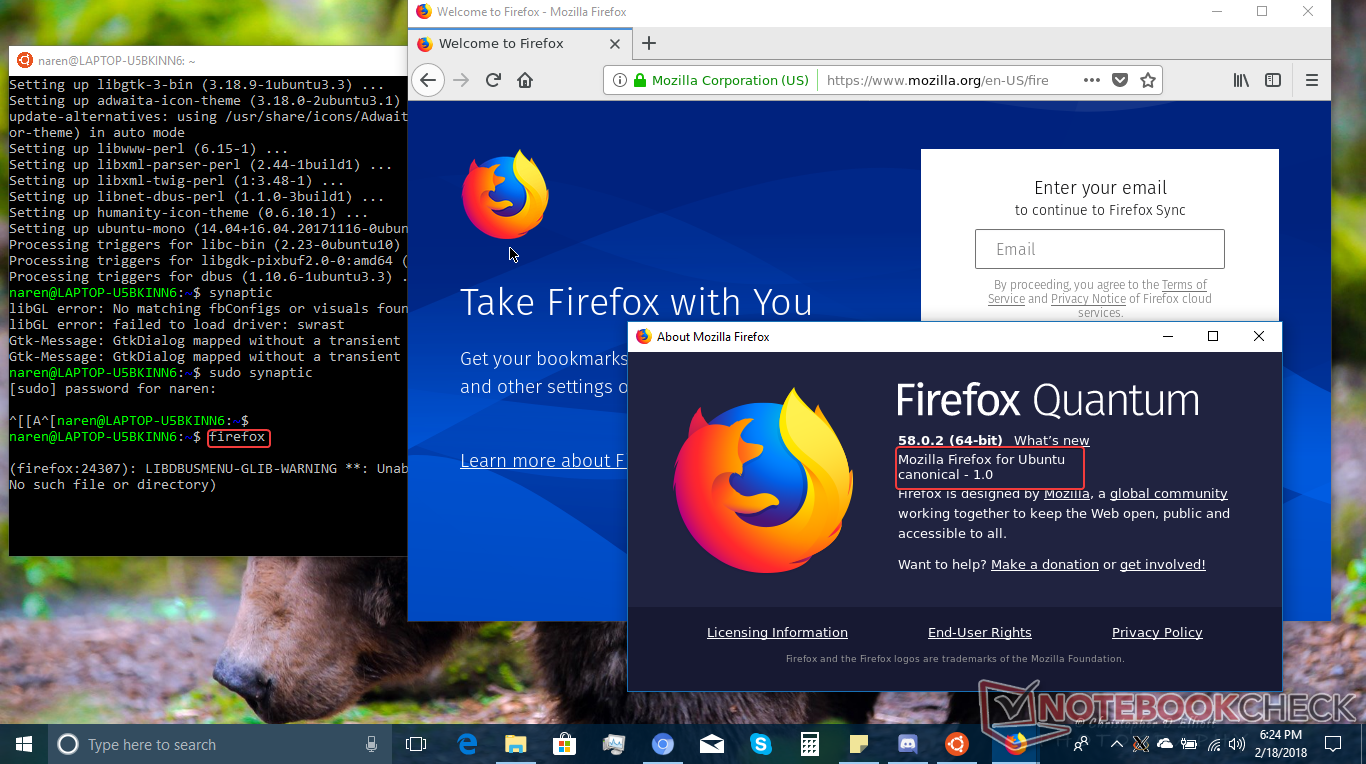
Now lets try to take things up a notch further. How about installing Synaptic — Ubuntu's package manager so that you can search and install Linux programs with ease. To install Synaptic, at the $ prompt, type sudo apt-get install synaptic. Accept the prompt and wait till the installation finishes. Type sudo synaptic at the $ prompt to open the Synaptic Package Manager GUI. Let's try and install the Firefox browser from this. Search for firefox in the Synaptic Package Manager in the list of results, tick the firefox checkbox. You will be offered additional packages and dependencies as required. Click on Mark in the dialog box and finally click on Apply in the Synaptic window. The required files will be downloaded and installed. Now just type firefox at the $ prompt and relish the good feeling.
Conclusion
What we've seen so far is, honestly, just scratching the surface. Linux being Linux, there is a whole community out there comprised of enterprising developers looking for ways to harness this new feature in Windows 10. Now, developers need not run multiple VMs to test their programs and users need not risk partitioning hard drives for a full Linux install. WSL is a great feature for those interested in learning the ropes of Linux without the need to leave a familiar Windows environment. While some of the tricks described above, such as running GUI apps, are not officially supported by Microsoft and can suffer from performance hits (depending on the app), for most command line workflows, WSL is hard to beat. It is continuously developing with each Windows 10 iteration, therefore, expect Microsoft to add more features based on user feedback. The upcoming Windows 10 'Redstone 4' update is slated to bring enhanced configuration options, interoperability between Windows and Linux programs, and even case-sensitive file operations.
The great thing about WSL is that there are now ways to not just run GUI programs, but also full blown desktop environments (DE) such as Xfce, LXDE, and even Unity directly from the Bash shell. Now that Windows 10 natively supports virtual desktops, how about running a Windows desktop on one and a full Linux DE on the other and switch easily between them with a keyboard shortcut? And it doesn't stop at desktop environments either. How about multimedia? We'll visit all those and more in a separate tutorial. For now, take the above tutorial for a spin and let us know your experience in the comments.
