

How to check if your PC is protected from Meltdown and Spectre

Meltdown and Spectre — The Basics
A lot of concern was voiced on the internet when Google's Project Zero disclosed two seemingly clandestine vulnerabilities that, while not seemingly taken advantage of, exposed inherent flaws in the way CPUs have been executing code for the past 20 years. From Intel's CEO selling off a major chunk of his shares to China getting to know of the exploits before the USA, there was hardly a day that passed by without these exploits being in the news. So what are these vulnerabilities really and why should you be concerned?
At a very fundamental level, Meltdown and Spectre are bugs that can allow a hacker to steal information from programs that the CPU is working upon. Note that they are not malware as such but the bugs can be used maliciously if exploited. While all attention was focused initially on Intel, it was found that even ARM and AMD chips were affected — albeit at different levels. When Google's Project Zero team discovered the bug last June, they set an embargo date for January 9, 2018. But the information leaked earlier and this made software and hardware vendors rush patches out. In technical parlance, Meltdown and Spectre are identified by the Common Vulnerabilities and Exposures (CVE) listings. They include the following:
CVE-2017-5754 — Rogue Data Cache Load a.k.a Meltdown
This is a CPU vulnerability that allows a user-mode program to access kernel-mode memory. It exploits a flaw in something called as speculative execution — a fancy term for the manner in which CPUs try to predict upcoming instructions and execute them ahead of time to speed up processing. In essence, a malicious program can use this exploit to access sensitive information in memory and by extension, of other programs and the OS itself. This bug affects all Intel processors manufactured since 1995 with the exception of Itanium and older Atom CPUs. Some ARM chips are also affected while AMD CPUs are immune due to architectural differences. Meltdown can be mitigated by OS updates and is comparatively easier to fix than Spectre but the mitigation does pose a performance hit depending on the CPU.
CVE-2017-5753 — Bounds Check Bypass a.k.a Spectre Variant 1 and CVE-2017-5715 — Branch Target Injection a.k.a Spectre Variant 2
Spectre also exploits speculative execution. Spectre variants are potentially more dangerous than Meltdown as they can allow hackers to fish out information from running processes. If your PC is not patched for Spectre, a hacker who has local access to your computer can steal sensitive information that you enter in a browser form, for example. All CPUs from Intel, AMD, and ARM are affected by both Spectre variants. OS and browser updates only help to mitigate the vulnerabilities to a certain extent and the only true fix is to redesign CPU architecture from scratch.
While both Spectre and Meltdown are local attacks, researchers have shown that Spectre indeed be exploited using browser-based JavaScript. One more fact is that these are read-only attacks, implying that hackers can only read the information being executed but not force anything on their own. Still, the possible sensitivity of the information that can be leaked warrants that these vulnerabilities be addressed quickly.
Due to the flaws being an inherent part of hardware design, there's not much that can be done other than mitigate the risks using a combination of microcode and OS level software updates. Microsoft, Intel, AMD, Google, and Apple have all released security patches over the past month to ensure that the risks are mitigated as much as possible. The rushed nature of these updates meant that some patches negatively impacted Intel processors, causing repeated reboots, and some AMD-based machines reportedly got bricked by a Windows patch. While the patches themselves are getting stable with time, it is a good idea to check what is the protection status of your computer and the steps you can take to mitigate the risks as much as possible.
Time to get some elbow-grease on.
Checking the security status using Windows PowerShell
For this tutorial, we will use Windows PowerShell (PS) to check the security status of your PC against Meltdown and Spectre. PowerShell is the evolution of the classic command prompt in Windows that allows for enhanced shell scripting and Windows administration. It has been a part of every version of Windows since Windows 8.
Step 1: Check and install necessary Windows Updates
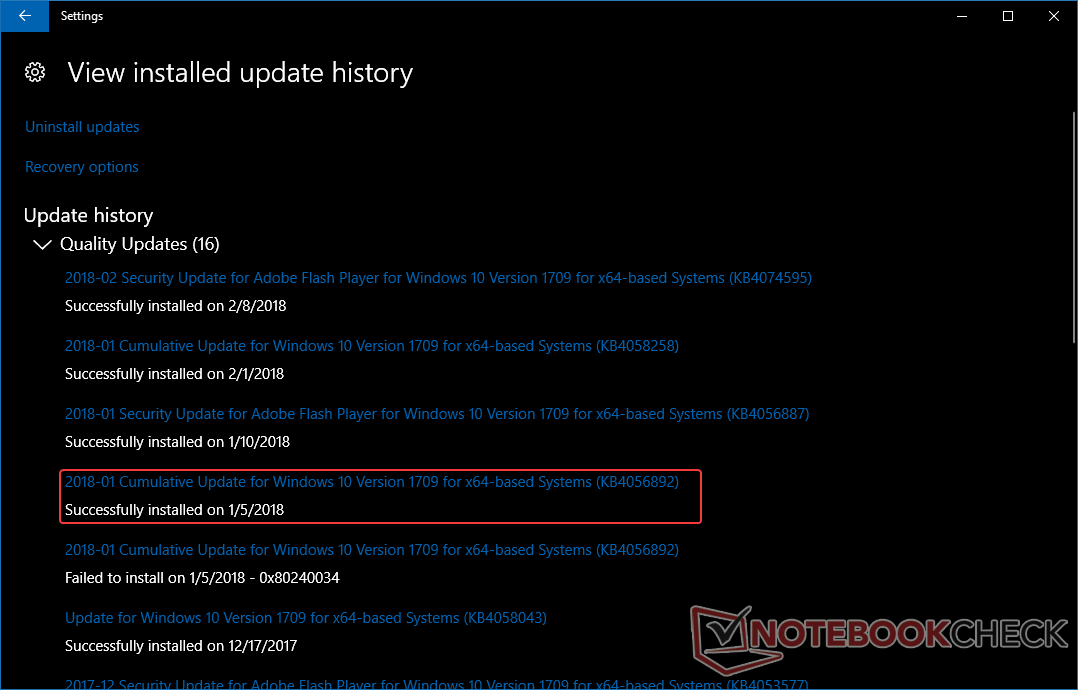
As a prerequisite, check for the latest Windows updates by going to the Settings app and clicking on Update and Security. For the Meltdown and Spectre mitigation to work, the following security update should be installed depending on the Windows 10 version.
- KB4056892 — Windows 10 version 1709 (Fall Creators Update).
- KB4056891 — Windows 10 version 1703 (Creators Update).
- KB4056890 — Windows 10 version 1607 (Anniversary Update).
- KB4056888 — Windows 10 version 1511 (November Update).
- KB4056893 — Windows 10 version 1507 (Initial Release).
Verify the installation of the appropriate update package and proceed to Step 2 to verify the mitigation status.
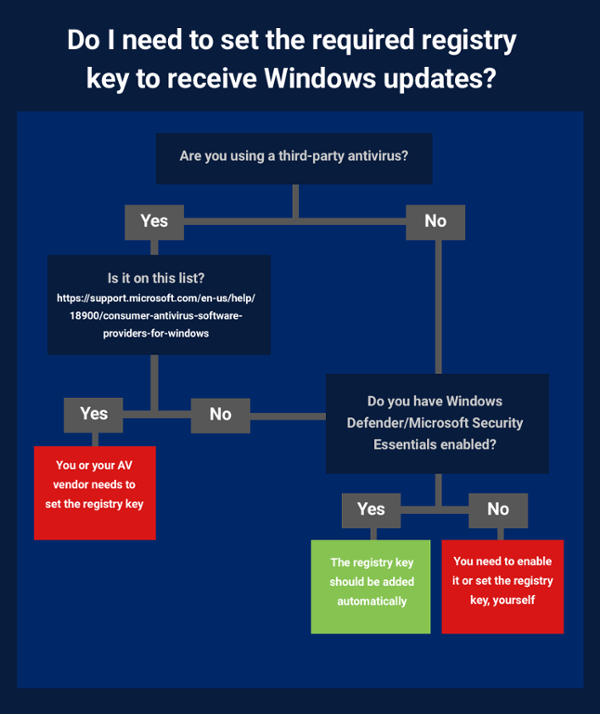
Caveat: For the above security update to be delivered, your antivirus software must be configured to set a registry key in Windows. This is because Microsoft has found that some third-party antivirus programs do not play well with the patch and can cause instability. Therefore, before the above update is installed, Windows Update first checks for the presence of this key and only then proceeds towards installation. While some antivirus vendors have automatically enabled the key, others said they won't. You can find the list of antivirus software that play nice with the patch here. If your antivirus vendor does not seem to comply, you can manually add the registry key as follows —
Note: The below step involves editing the registry. Be extremely careful while editing the Windows Registry. It helps to take a backup of the registry or create a system restore point before proceeding.
Copy the following registry information into Notepad and save the file as a .reg file —
Key="HKEY_LOCAL_MACHINE" Subkey="SOFTWARE\Microsoft\Windows\CurrentVersion\QualityCompat" Value="cadca5fe-87d3-4b96-b7fb-a231484277cc" Type="REG_DWORD”
Double-click the file to merge the values into the registry. You can also navigate to the above hierarchy using the Registry Editor (regedit.exe) and create the above key. Windows Update should now be able to download the security patch for Meltdown and Spectre. Do remember that you need to ensure that your antivirus software is compatible with Microsoft's patch before adding the key. Check with your antivirus vendor regarding this. Those using Microsoft Security Essentials or Windows Defender need to worry about adding the above key.
The flowchart below will let you know if you need to make changes to your registry.
Step 2: Start Windows PowerShell
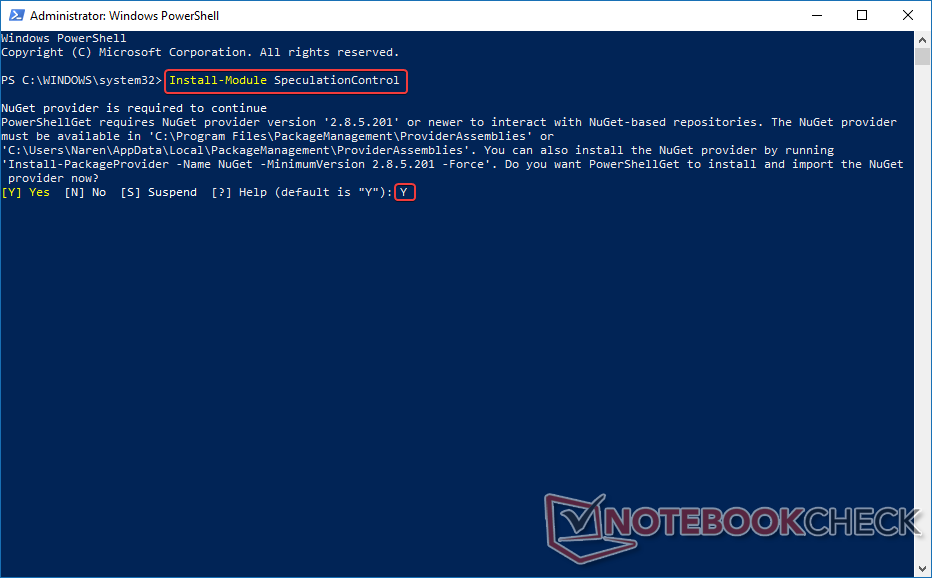
Once you have verified the update installation status, it's time to start working with PowerShell. Microsoft has created a PowerShell script to check your PC status for Meltdown and Spectre vulnerabilities. To access the script, open PowerShell by typing the same in the Cortana search box, right-click and select Run as Administrator. At the PS prompt type —
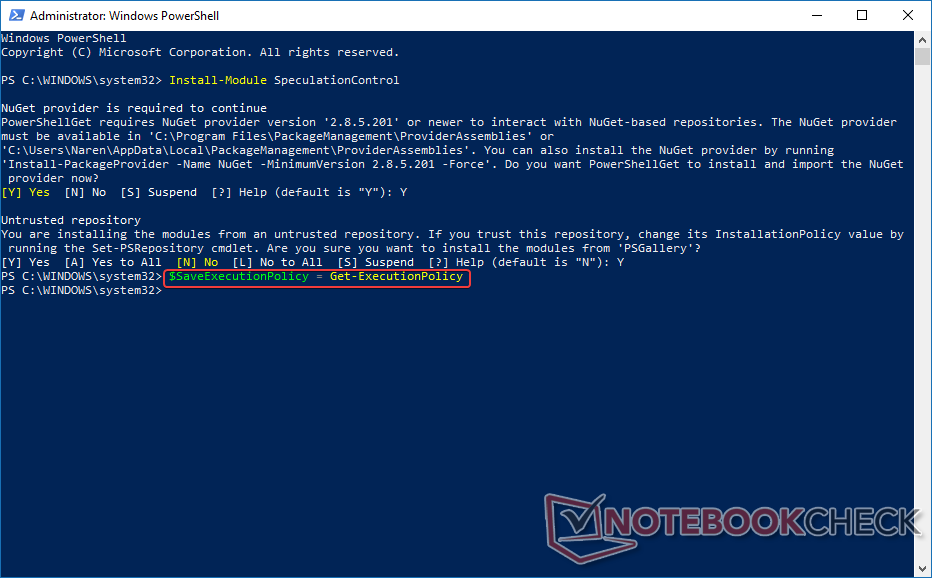
Install-Module SpeculationControl and press Enter.
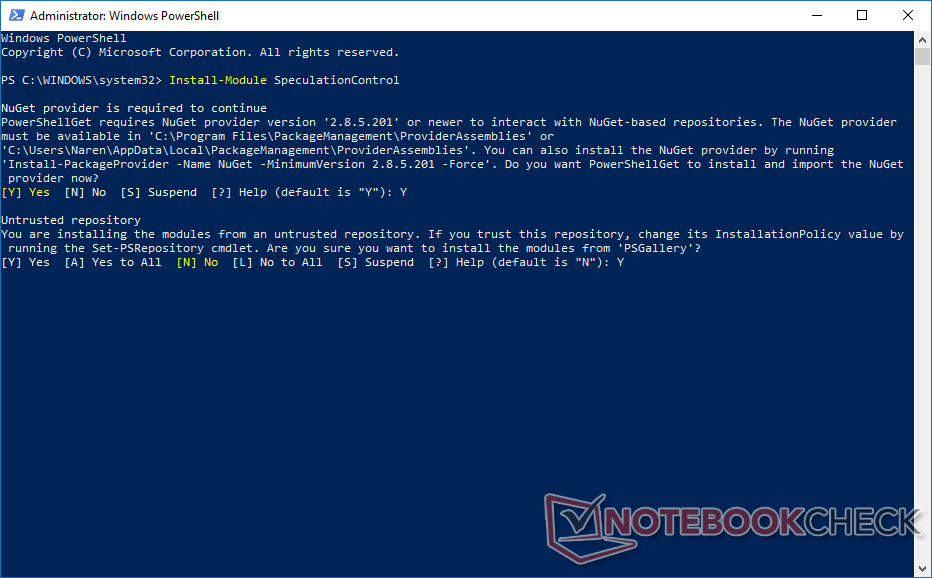
You will get a prompt to install the NuGet provider. Press Y to continue to download and install the NuGet provider. You might get a prompt indicating that you are trying to install modules from an untrusted repository. Press Y again to continue.
Step 3: Set the execution policy
Since you're working with Administrator privileges, it is important to be able to save and revoke execution policies in the interest of security. The execution policy determines whether PS can run scripts or load configuration files. Enter the following command to save the current execution policy to a defined variable. Here, we are saving the Get -ExecutionPolicy to a variable, $SaveExecutionPolicy. All variables in PowerShell are preceded by a $ sign.
$SaveExecutionPolicy = Get-ExecutionPolicy
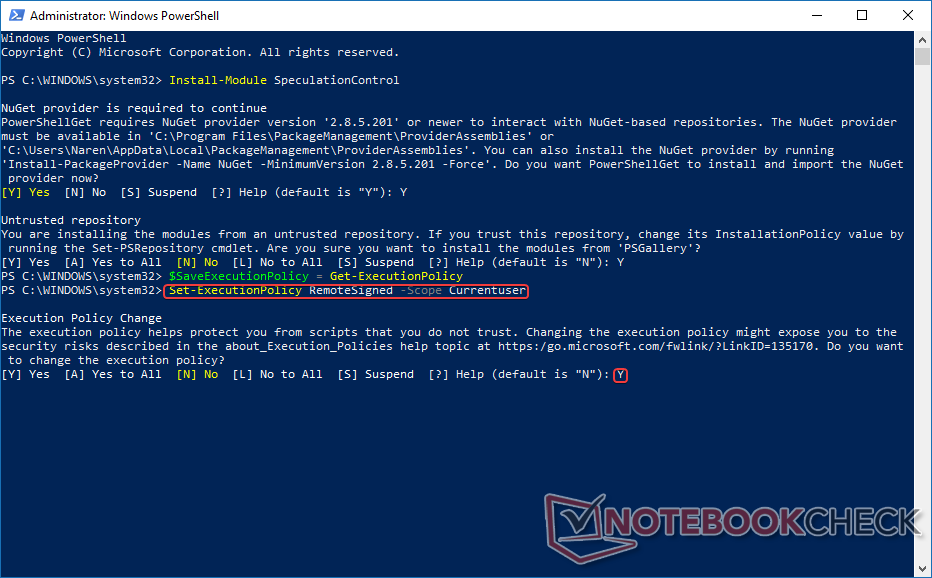
Now that you have assigned the Get-ExecutionPolicy function to a variable, you should now set the execution policy for the current session so that you can import the PS script that you've downloaded in Step 1 into the current user space. To do so, type the following command at the PS prompt —
Set-ExecutionPolicy RemoteSigned -Scope Currentuser
Alternatively, you can also bypass the current execution policy and directly proceed on to the next step by typing Set-ExecutionPolicy Bypass at the PS prompt.
Step 3: Import the PowerShell module
Now, import the PS script downloaded in Step 1 into the current user space. To do so, type the following command at the PS prompt —
Import-Module SpeculationControl

Step 5: Execute the PowerShell module
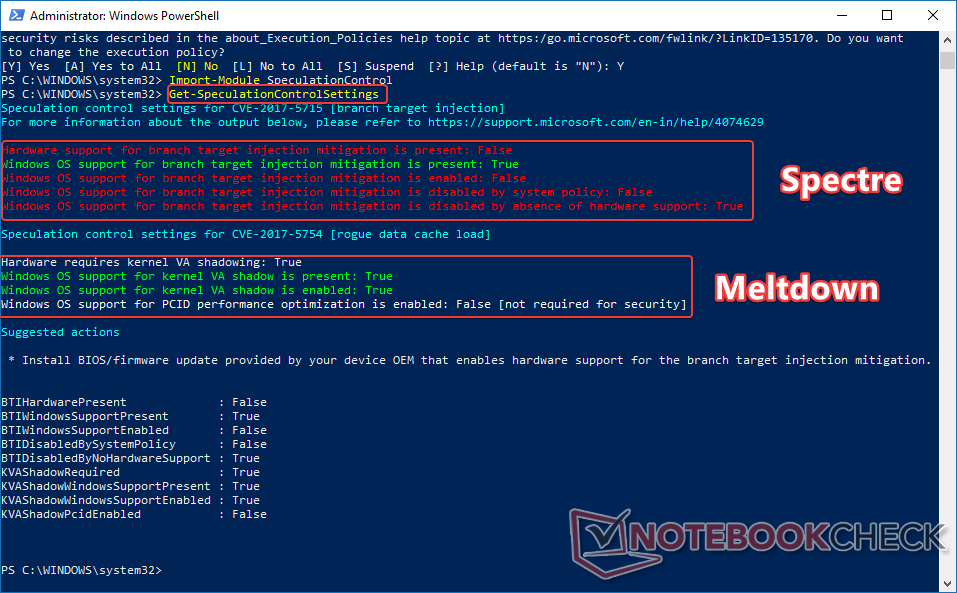
Execute the PS script by typing Get-SpeculationControlSettings at the PS prompt. You will see two sections — one for CVE-2017-5715 (Spectre Variant 2) and the other for CVE-2017-5754 (Meltdown). If your motherboard OEM has issued microcode updates for Spectre mitigation, you will see most of the entries labeled 'True' in green. In my case, Acer has not yet released any BIOS/UEFI updates for the Pentium N4200 'Apollo Lake' CPU in my Aspire ES1-533 laptop so all the entries are labeled 'False' in red. However, since I have received Microsoft's update for Spectre mitigation, the Windows OS entry shows 'True' in green. If your OEM has released a BIOS patch, you should see all entries here as 'True' as well. Admittedly, mitigating Spectre is not a trivial task — it is harder to exploit but also harder to patch.
Meltdown, on the other hand, can be patched at the OS level. If you have kept Windows up to date, you should see all entries under CVE-2017-5754 (rogue data cache load) show 'True' in green. The script also advises you to install the necessary firmware updates for Spectre Variant 2 (branch target injection) mitigation. From the above result, it can be seen that my PC has Meltdown mitigation in place but is not fully protected against Spectre. There's not much that can be done here other than wait for the OEM to push out BIOS/UEFI microcode updates. Also, note that there is no specific information about Spectre Variant 1 shown — it is supposed to be addressed along with the Meltdown mitigation.
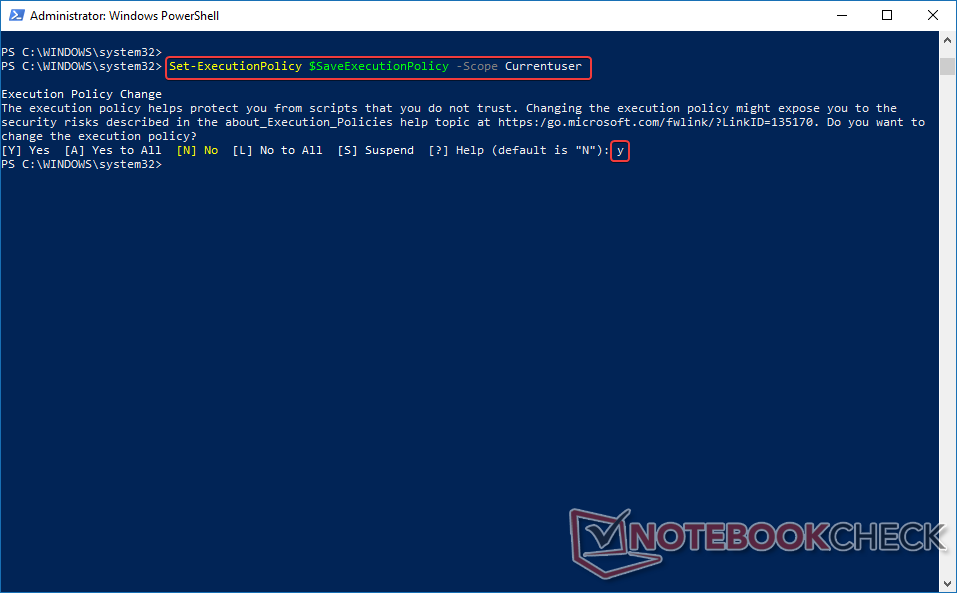
Step 6: Reset the execution policy
After checking the mitigation status, it is important to reset the PS execution policy as a security measure. To do so, type Set-ExecutionPolicy $SaveExecutionPolicy -Scope Currentuser at the PS prompt. Press Y to reset the execution policy.
Conclusion
The initial rushed release of some of these updates have caused more headaches than the vulnerabilities themselves. Do note that 32-bit Windows still does not have the mitigation in place. Things are getting better though and vendors are trying to deploy stable updates as much as possible. While some of you might choose not to install these updates given the expected performance drops, in this age of fast paced malware evolution, it helps to be prepared.
Ask yourself this — are you willing to sacrifice some performance for risk mitigation or is squeezing out the maximum performance till the last clock important? While customers expect they get the full performance advertised for their money, given the current situation, it is advisable to sacrifice a bit of speed to ensure data integrity. OEMs and OS vendors will continue to polish these updates in the coming days so do watch out for those. Most importantly, do not panic or spread FUD; instead understand, assess, and deploy the right updates at the right time to ensure security both at home and at the office.


