Intel Extreme Tuning Utility (XTU) Undervolting Guide
Introduction
What is Intel Extreme Tuning Utility (XTU)
Intel Extreme Tuning Utility (XTU) is a Windows-based program that Intel promotes as a way to overclock and performance-tune your system. Many enthusiasts prefer to handle this via BIOS, but Intel XTU provides options for modifying metrics such as core voltage, clock speed multiplier (on supported CPUs), and turbo boost power limits (if the manufacturer has enabled this option).
However, most of us own laptops that aren’t capable of overclocking, both because of the change Intel processors underwent when moving from a traditional FSB to a BCLK setup several years ago, and because our cooling systems aren’t able to handle that thermal output. Fortunately, some of the settings available to us — like the core voltage — aren’t just used for overclocking, they can also be used to reduce the thermal load on our systems.
So to add to Intel’s description regarding overclocking, we’d say that Intel XTU is a tool that lets us adjust settings that can lower the temperatures that our system hits under load, potentially cause the fans to run quieter, and maybe even extend battery life. Intel XTU functions similarly to the third-party ThrottleStop utility, a fan favorite in the mobile computing community. If you already use ThrottleStop and are wanting to give Intel XTU a go, then you need to reset any changes back to default, uninstall ThrottleStop, and then reboot your computer before installing Intel XTU. The two programs modify many of the same registers and it can get a bit messy.
Basics
Layout
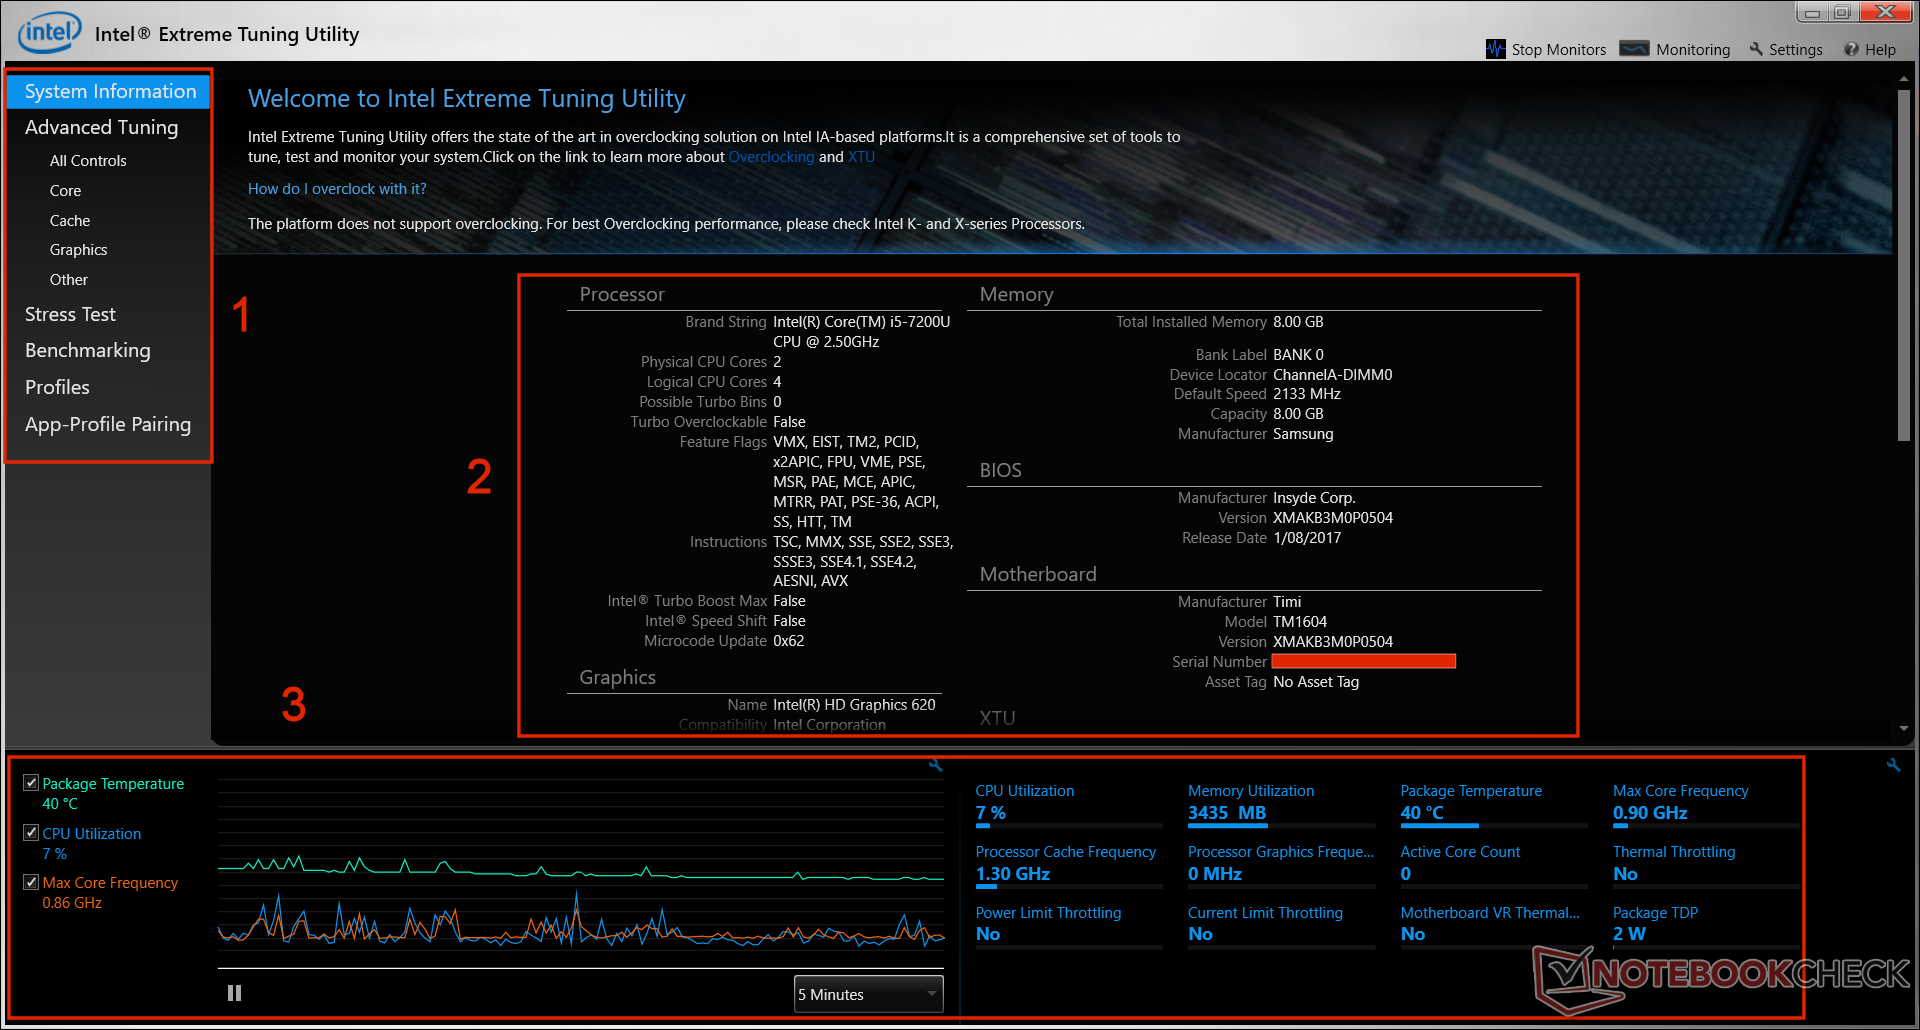
When you first open Intel XTU, you are greeted by a screen which shows detailed information about your hardware, such as the processor, memory, motherboard and so on. This data can be useful for people who are trying to help with troubleshooting via a forum but remember to hide any serial numbers. They aren’t likely to be of any use to anyone, but why risk it?
On the left-hand side is the navigation menu where you will flick through the various functions needed for undervolting or overclocking. Along the bottom, you will see a line graph and a table showing output data from the hardware and associated sensors inside your notebook. The default settings display data such as temperature, utilization, and throttle state, but the little spanner/wrench icons allow you to add or remove monitor items from here to adjust the setup to show what is important to you.
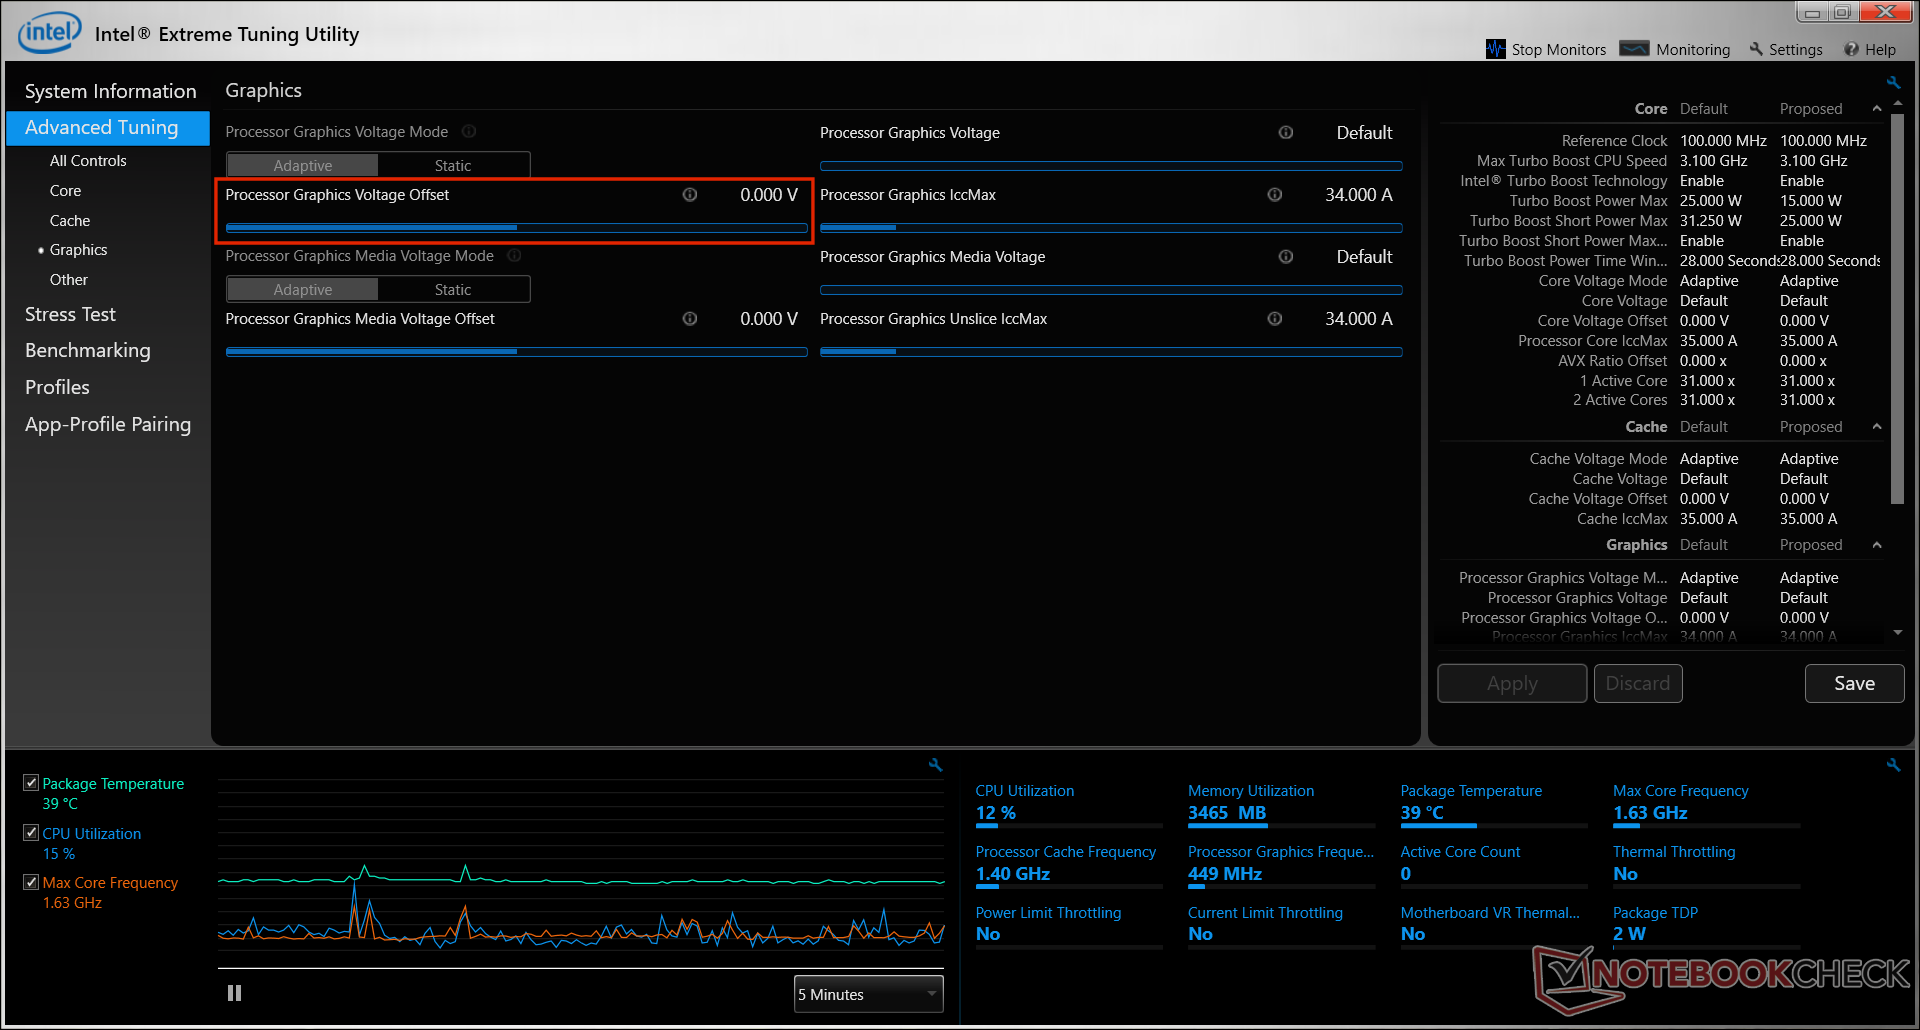
Panels: Advanced Tuning
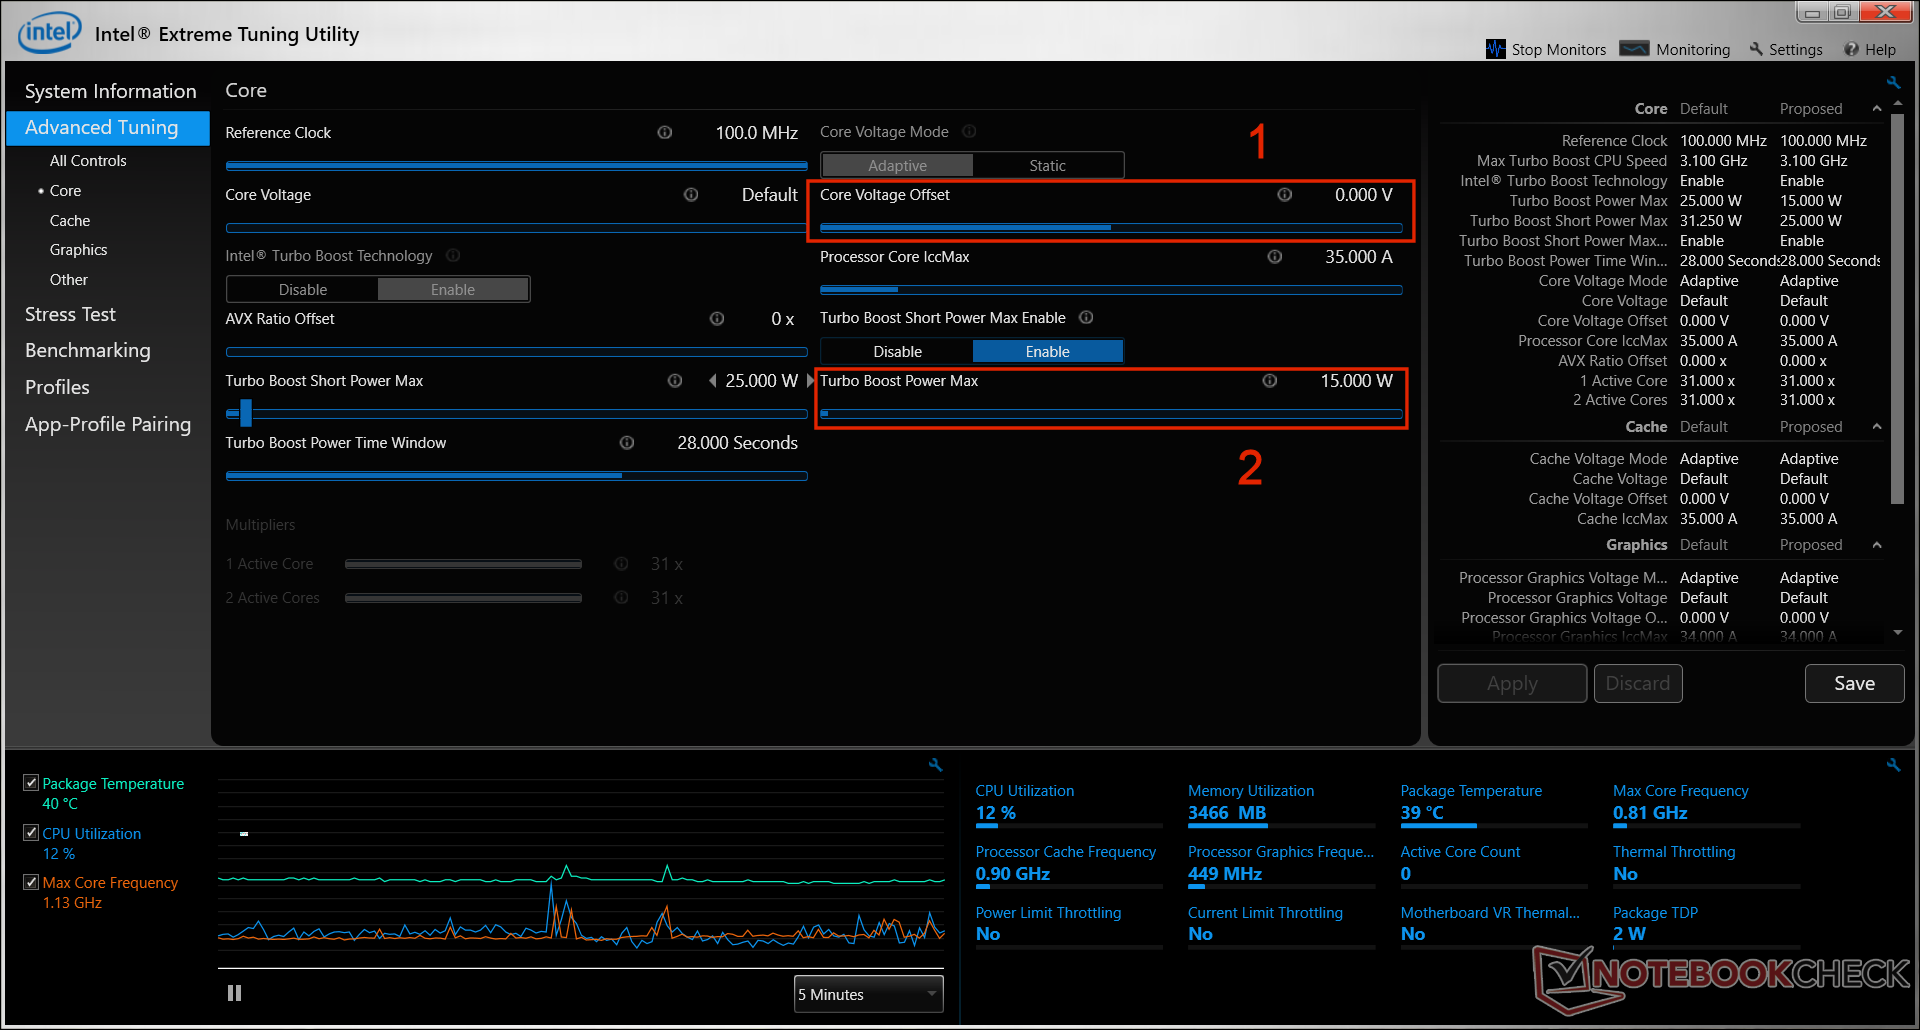
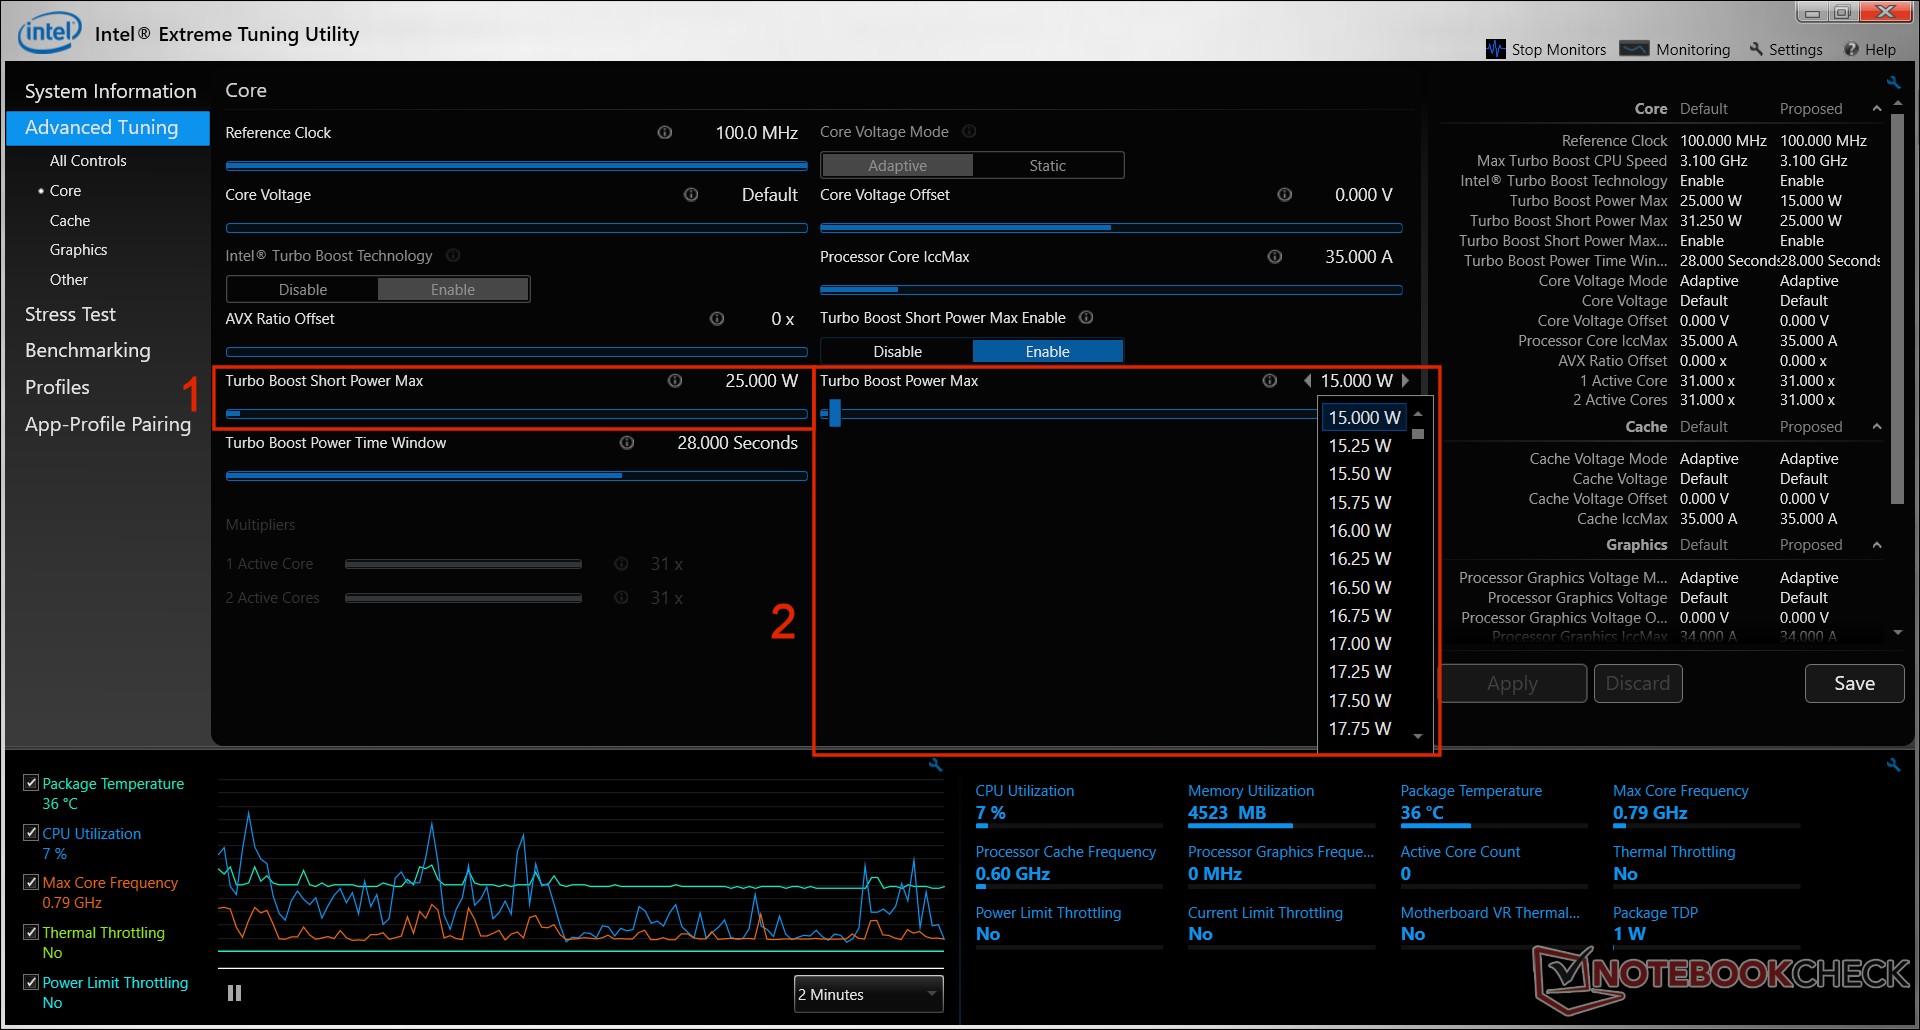
With the scope of this guide, we will focus on the ‘Core’ section here (referring to the CPU cores). The only two settings we’re concerned with today are ‘core voltage offset’ and ‘turbo boost power max.’ When overclocking desktop systems it is common to set a static voltage to improve stability, but on mobile devices this can lead to reduced battery life. Instead, we will adjust the offset, which allows the processor to dynamically change the voltage to match the task, i.e., lower when idling and higher when working hard. This offset works by taking the level that the CPU would have adjusted to and then increasing or decreasing it by the level of the offset. The turbo boost power max setting controls how many watts the chipset (including GPU) can draw, and several manufacturers lock this setting.
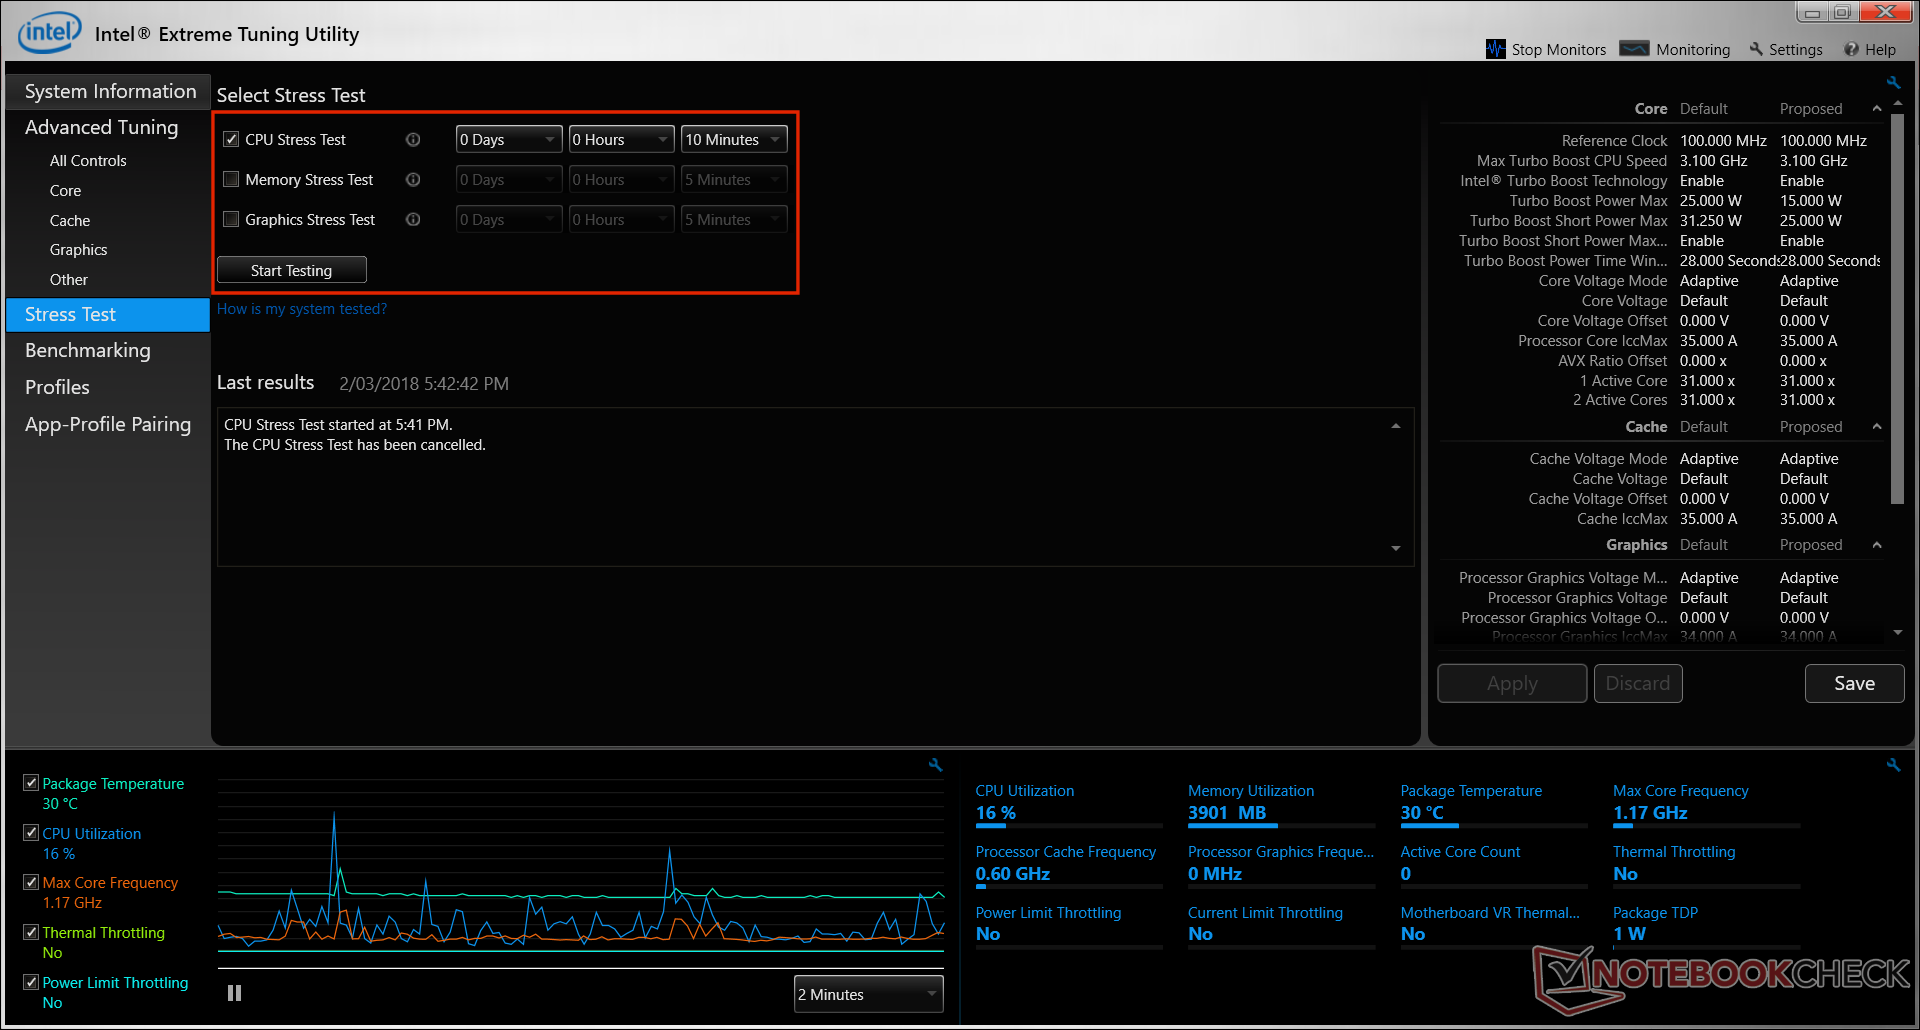
Panels: Stress Test
The built-in stress tests aren’t particularly stressing compared to fan favorites such as Prime95 or AIDA64, but they are suitable for our initial testing. You can set a custom length for the stress test to run for, and each test tries to create a full load without creating the workload saturation that the two previously mentioned stress tests cause. The inbuilt tests are useful for assessing stability during the undervolting (or overclocking) process, while Prime95 or AIDA64 can be used to validate stability once you have finished tweaking your 'long-term' setting.
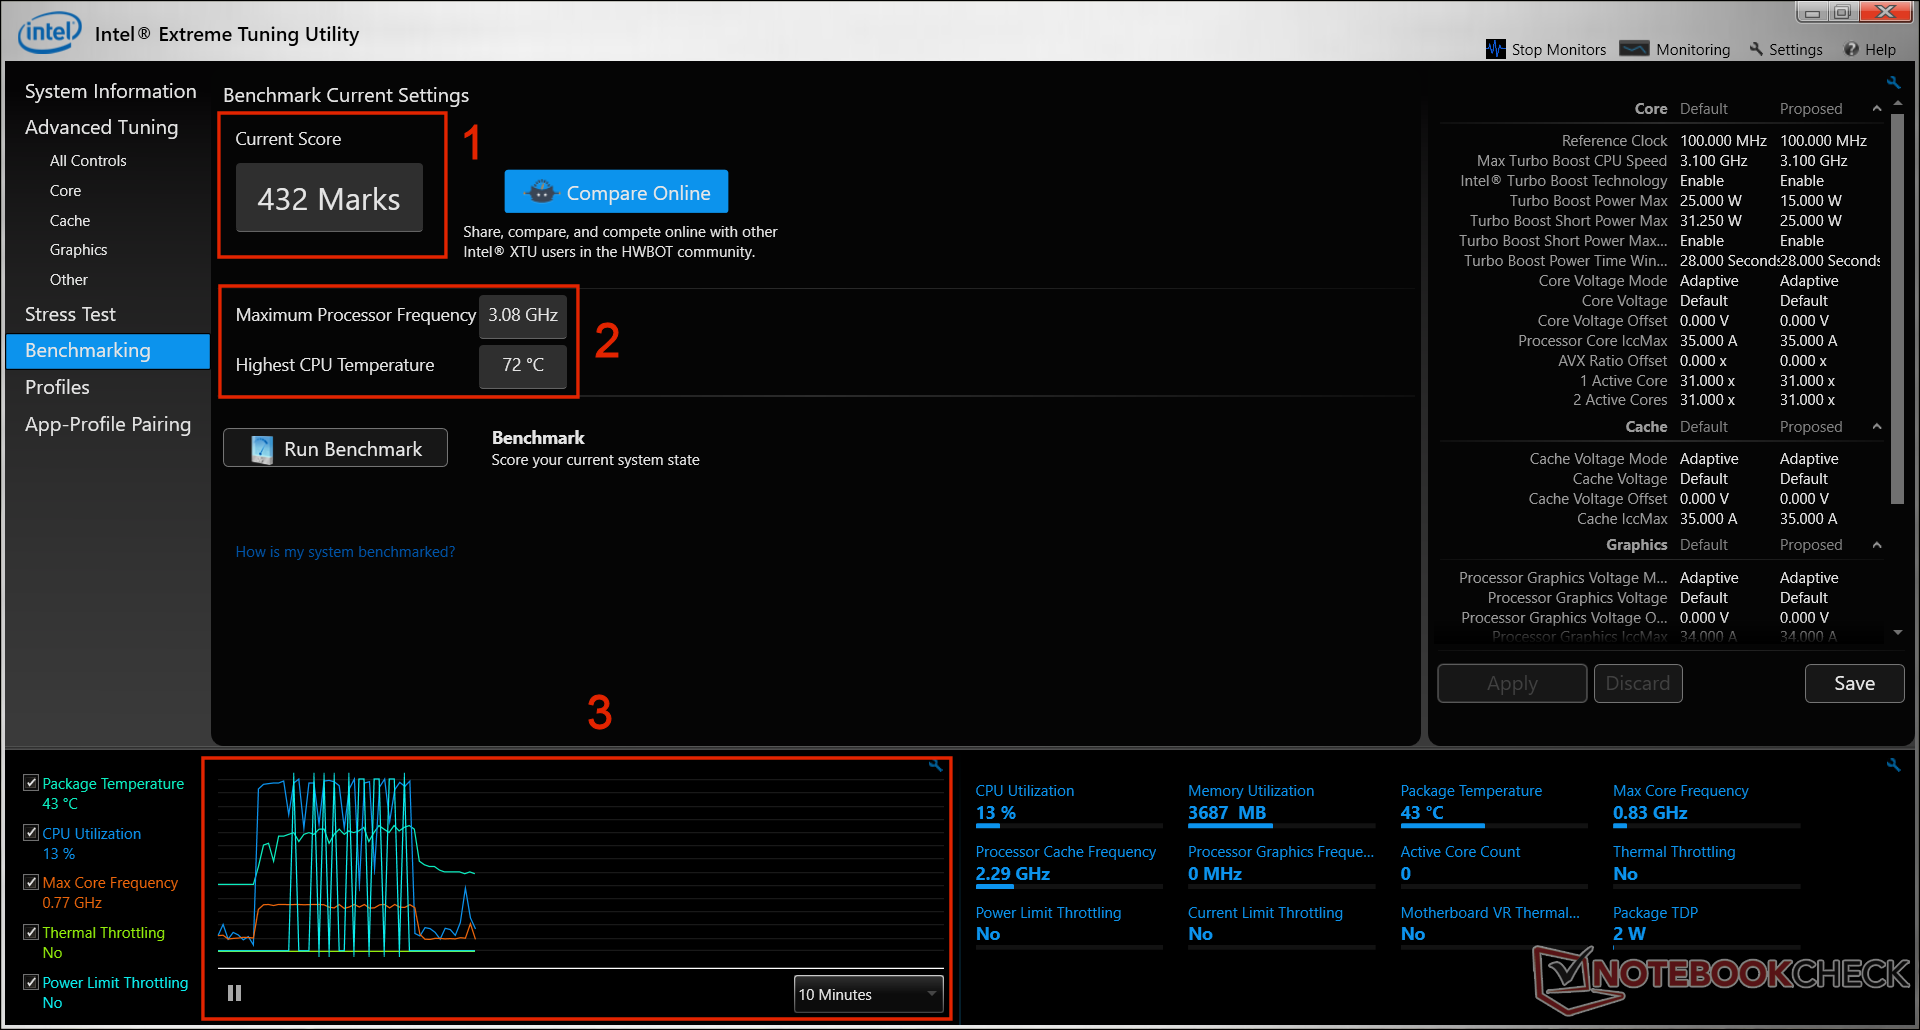
Panels: Benchmarking
It is worth running the benchmark prior to tweaking any settings since it can be used as a reference point to assess any gains we achieve. However, we do need to point out that just like the stress tests, this benchmark isn’t very comprehensive compared to a third-party alternative like a Cinebench R15 loop to assess performance over time to see any temperature and power draw improvements from undervolting. It is our experience that if you see a noticeable difference in benchmark score within Intel XTU, then your system is throttling in a comparatively short period. The most common result we achieve is for the 'before' and 'after' benchmark scores to be within a few points of each other when undervolting.
To be fair to Intel, this utility is their recommended software (i.e., non-BIOS) method of overclocking K-series processors, so this benchmark is designed to measure the performance gain from increasing clock speed.
So while this benchmark can help indicate a CPU that was severely throttling, we’re most interested in the highest CPU temperature that it reports. Achieving the same benchmark score while reaching a maximum temperature that is 5oC (~9oF) lower than before any settings were changed shows that the goal of making the laptop run cooler has been achieved.
To improve readability, we suggest changing the displayed time period to something lower than 10 minutes using the drop down in the bottom right.
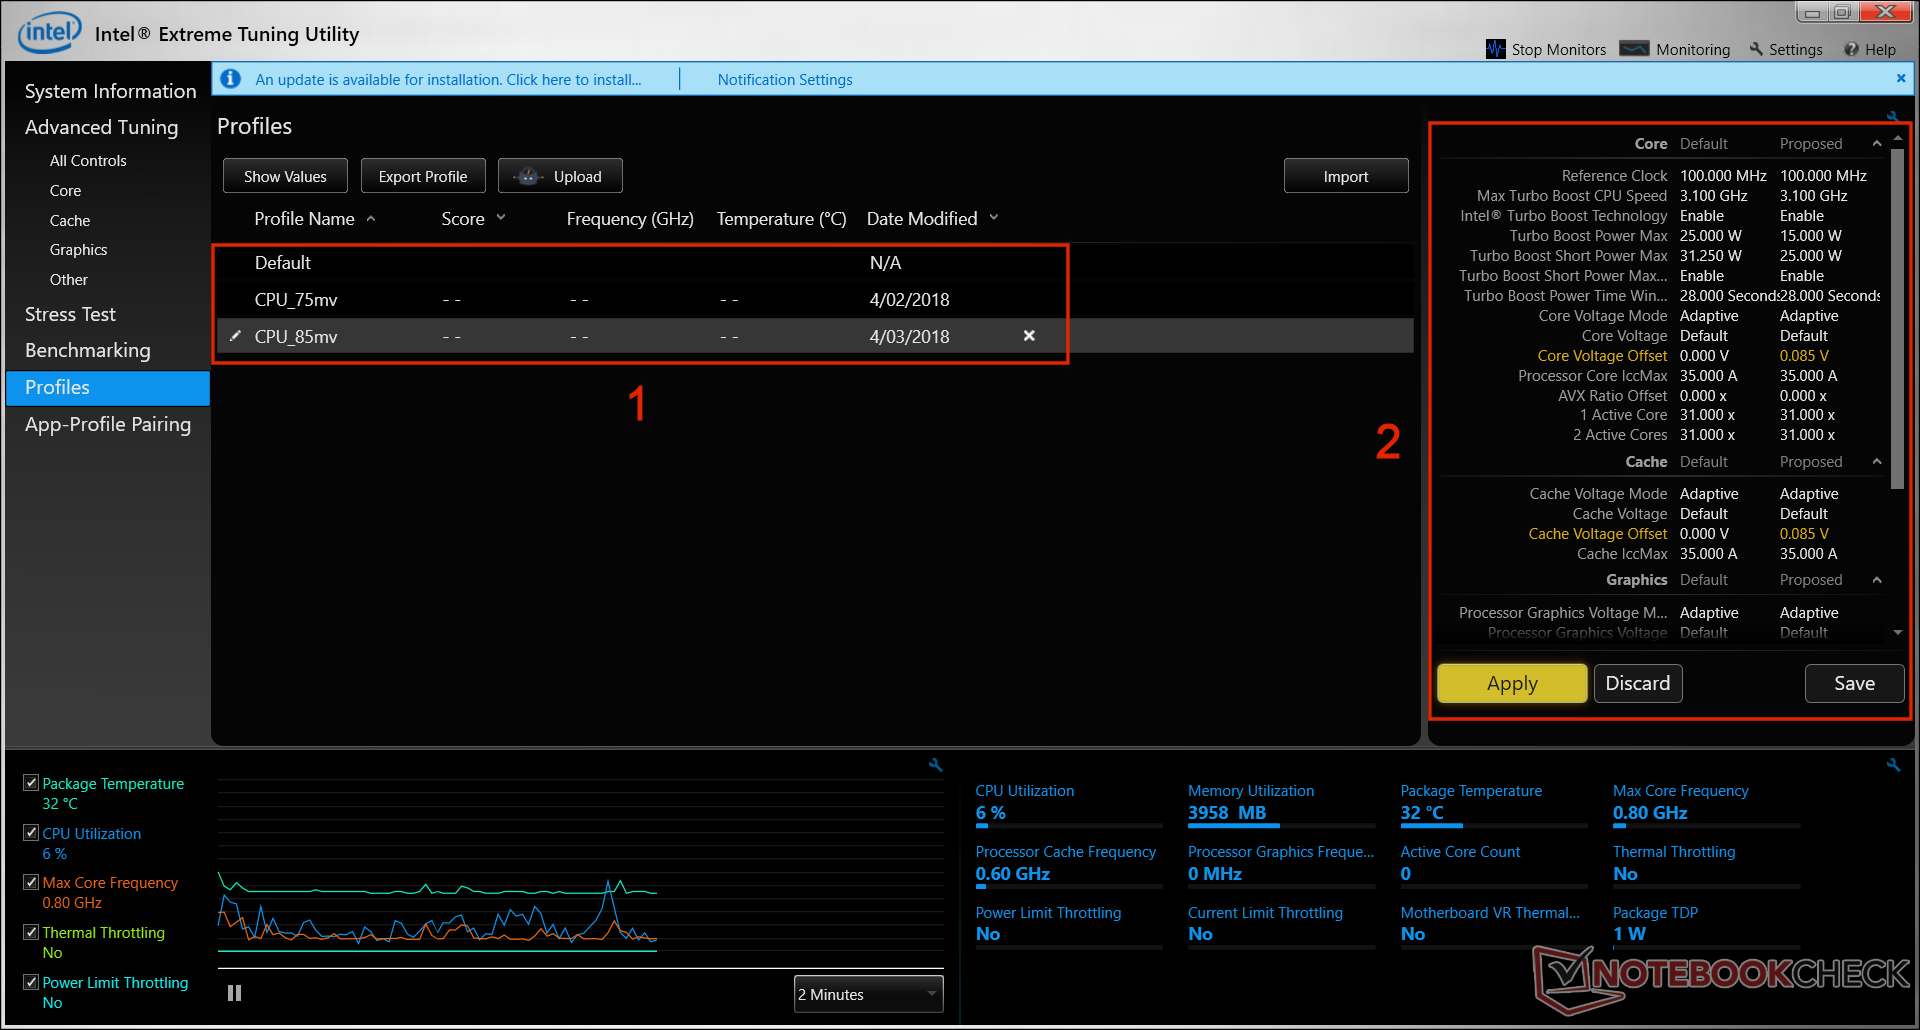
Panels: Profiles
Intel XTU lets you create multiple profiles of various tweaks which you can switch between quickly. For most readers, this feature won’t get much use, because once you have found the best stable undervolt your system can handle, you will run like that for months at a time. However, if you have a CPU capable of overclocking, then you may create an overclocked profile for tasks such as gaming or video editing, and an undervolted profile which you run during regular computing for improved thermals and battery life.
Panels: App->Profile Pairing
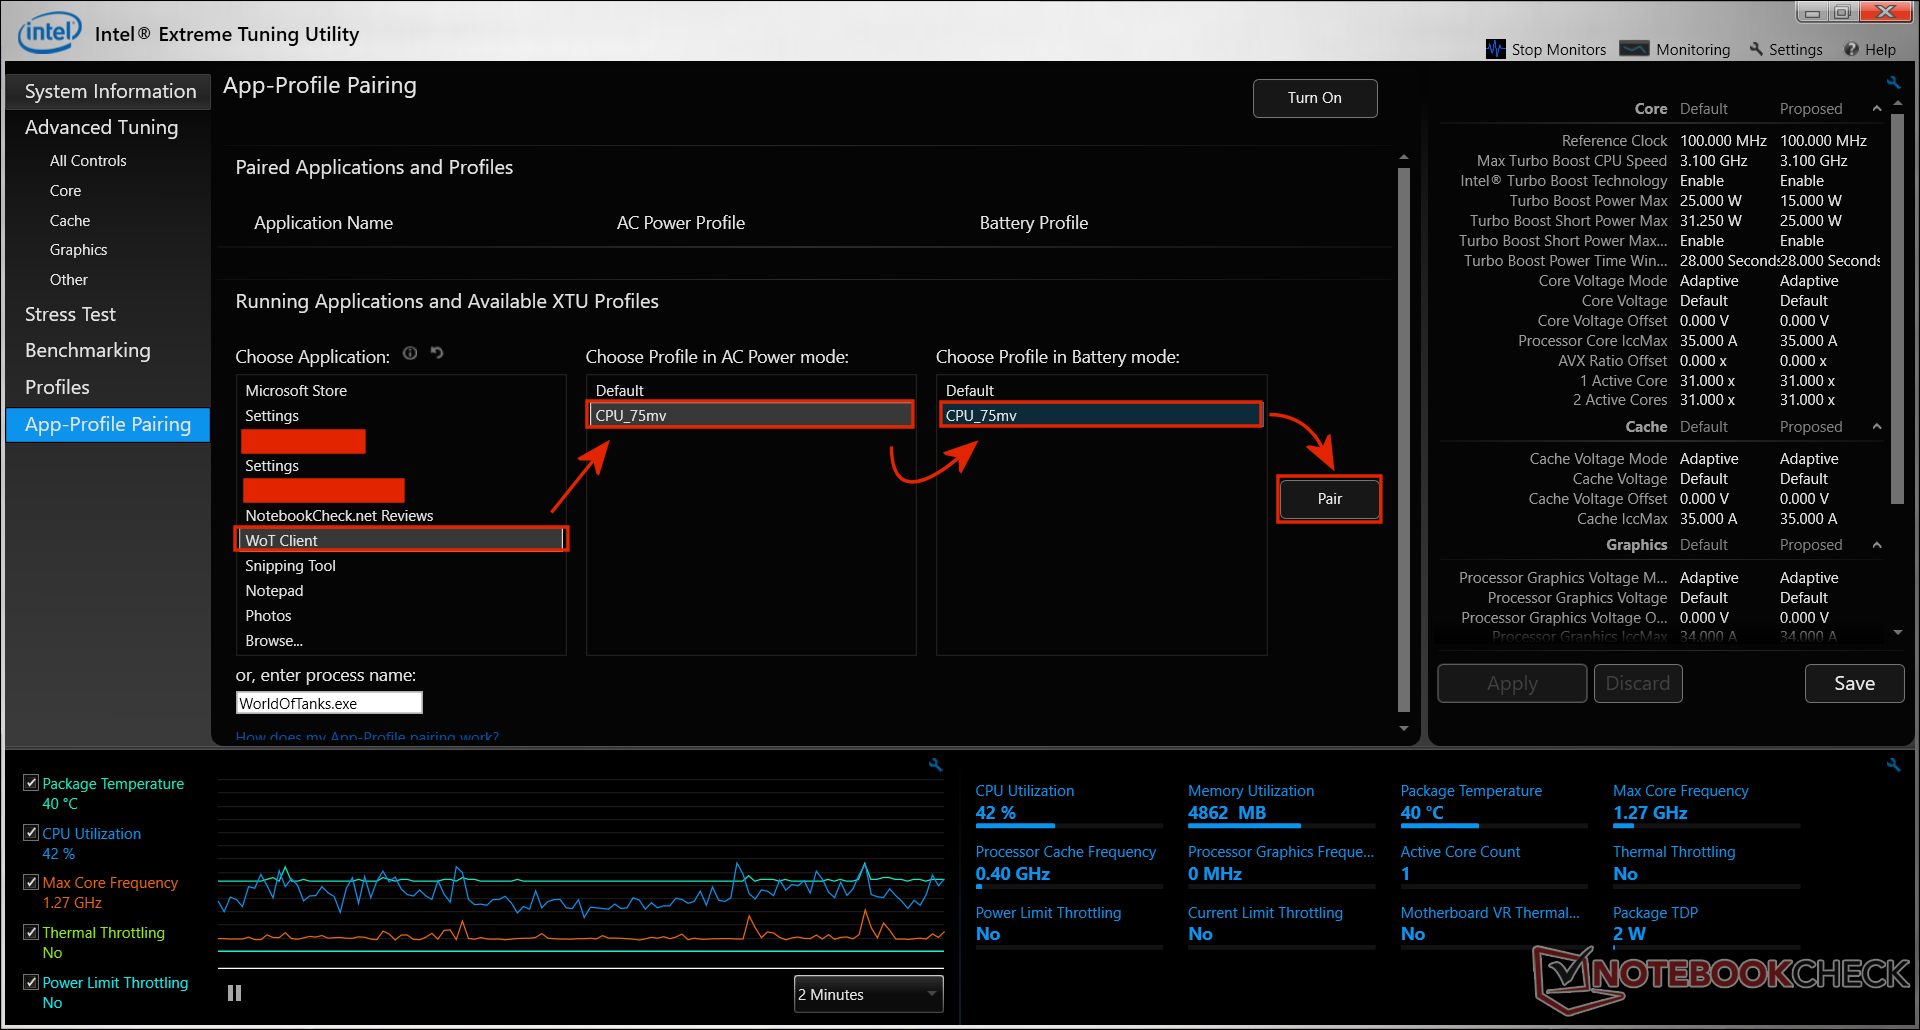
Finally, there is App->Profile pairing. It works by using a program or process to trigger Intel XTU to switch between pre-set profiles automatically, such as changing from the daily-use 'undervolt profile' to the 'overclocked profile' when it detects that a pre-selected game is launching. The pairing works by selecting from a list of running software (or by typing the name of a .exe process or browsing your system for the desired .exe) and then choosing which profiles to use for AC power and on battery. This pairing is a powerful feature and is the most useful way to use profiles.
How to Undervolt
Benchmark and Measure
The first step is to run the in-program benchmark to provide us a baseline to compare against. As we mentioned before (See Main Window – Benchmarking), this benchmark won’t show any significant improvement from the undervolting process unless the notebook was severely lacking in its ability to dissipate heat. The information displayed along the bottom of the screen is where most of the value is for undervolting. We recommend having the following options showing on the graph:
- Package temperature
- CPU utilization
- Max core frequency
- Thermal throttling
- Power limit throttling
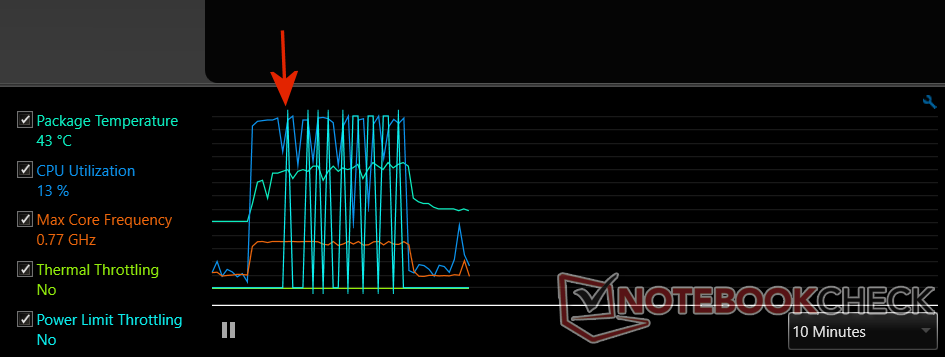
Looking at our test run, we can see that this laptop was throttling due to hitting the power limit before it reached the thermal limits when running a CPU-only workload. We’d like to mention that this thin-and-light notebook was the candidate of an earlier test to reduce hardware temperatures and lower fan noise by using thermal pads to form a connection between the heatsink and heat pipes with the metal bottom panel, it also had the factory thermal paste replaced at the same time. This influences the thermals shown here, but it doesn’t change the process we follow.
If you really want to be thorough about measuring temperatures, then switch to the ‘stress test’ tab and select a longer test time or load a heavier benchmark (e.g., Prime95, AIDA64). Then monitor temperatures — or the thermal throttle flag — using the graph function in Intel XTU which continually monitors while the software is open.
If you’re performing this on a gaming laptop, then running a synthetic graphics benchmark during testing will help to imitate the dual CPU/GPU loads experienced during gaming. The more extreme Furmark is an option for those who want to check the results with maximum GPU temperature.
Tweak and Test
Now is where the fun begins. We will start adjusting the CPU core voltage offset, which moves in increments and decrements of 0.005 volts (5 mV) for each step up or down. A CPU needs a particular voltage to switch on and to maintain normal operation over time. Because there is a level of variation in every chip, they are shipped from the factory with a safety margin in their default operating voltage. What we are doing here is slowly removing that safety margin until we find the point where our individual processor is no longer receiving enough voltage to maintain itself under load, and then backing off slightly to maintain stability.
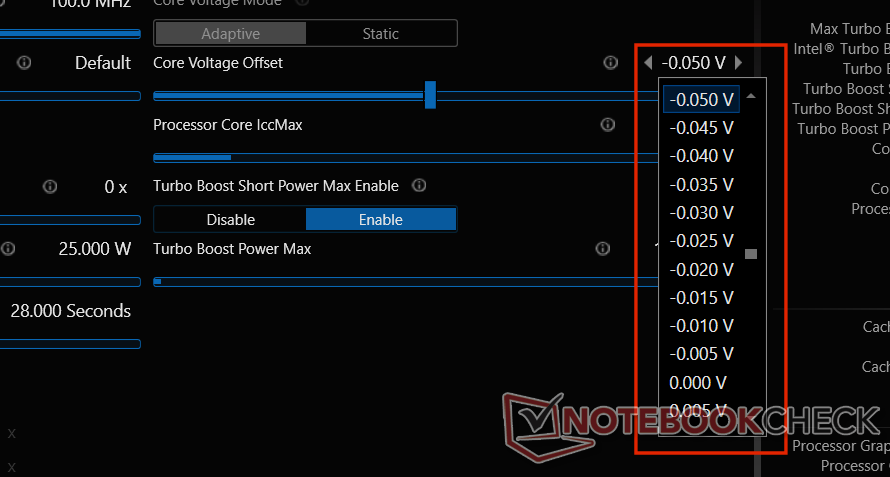
Proper procedure is to start making small increments of 5 – 10 mV and testing each setting. Since we want to save time we are going to pick a start point based on our experience, and the experience of others online, where we know it should be safe to start with an offset of -0.050 (50 mV) on our Kaby Lake i5-7200u. Have a look online by googling your CPU model + ‘undervolt’ to see what levels others are achieving, then pick a starting point a few steps lower than theirs. As a generalization, many Skylake Core U-series mobile processors seem to find their upper limit between -0.060 to -0.080 volts (-60 to -80 mV), while Kaby Lake U-series is more around -0.070 to -0.100 (-70 to -100 mV). When it comes to quad-core processors, Skylake HQ/HK often achieves better undervolt levels than Kaby Lake HQ/HK. Begin your testing several steps below those levels.
Now change to your starting offset using the arrow buttons or the dropdown list and hit apply. If your system hasn’t frozen then it has passed the first step — it is stable at idle. If your computer freezes at this stage and doesn’t restart automatically, then hold the power button to reset and boot back into Windows. Your computer will have managed to override the new offset you tried to set and will be back to default voltage, but as a matter of caution make sure your starting point is within a realm of possibility.
It is time to test stability under load using the built-in CPU stress test. For our testing, we’re only going to set it to run for 10 minutes during these early stages. The reason for this is we want to quickly find the point where it is unstable under any load whatsoever, and 10 minutes is long enough to show this. Later, we will refine our settings and run a more extensive stress test to test stability properly.
Keep repeating this process using increments of 0.005 or 0.010 volts (5 to 10 mV) until you find the level where the stress test fails, often shown by the system crashing and restarting itself. Once this happens, drop back 0.005 to 0.010 volts (5 to 10 mV) depending on your preference for how tight you want to squeeze the safety margin, and run the stress test for one to two hours. Those who run right on the knife's edge with undervolting or overclocking prefer to run software such as Prime95 or AIDA64 for half a day, but this is more than we need for our purpose.
Setting Profiles (Optional)
Once you are happy with the undervolt achieved, hit the save button on the right side and give it a descriptive name. Any saved profiles you create will live under the ‘Profiles’ tab, where you can quickly select one to load. This area is more useful when using a CPU that allows overclocking because the user can set various levels of overclock and quickly switch between those and an undervolted profile, based on the task at hand.
Setting Automatic Profile Switching (Optional)
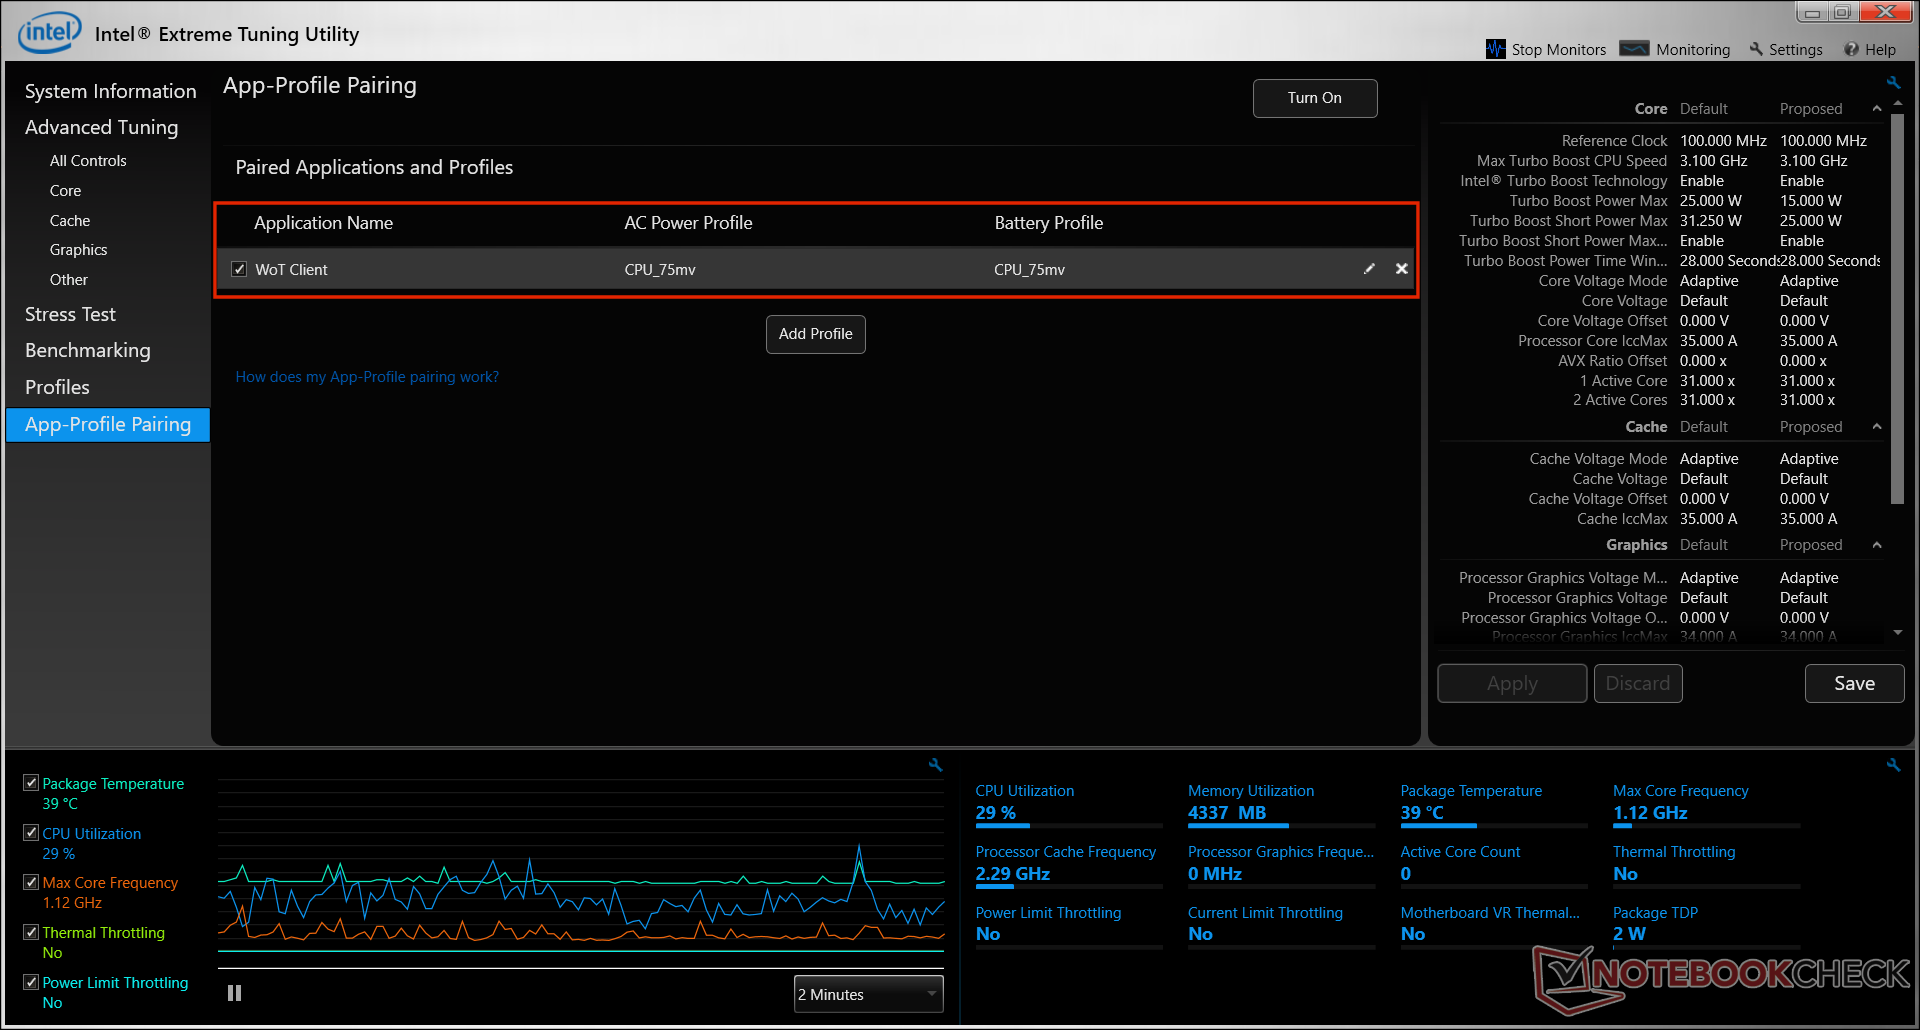
You can set profiles to automatically apply when Intel XTU detects certain programs/processes running. To do this, click ‘Add Profile,’ then either select an already running application or browse for an 'exe' (executable) or type the name of the process, choose a profile for when on AC power and for when on battery, and click ‘Pair.’ This is most useful for notebooks which allow over- or underclocking, where an overclocked profile can automatically kick in when you launch your favourite game or video editing software, and an undervolted profile can be run the rest of the time. Don't be tempted to tie a profile to a process that always runs, such as explorer.exe, since this can cause problems if an unstable profile keeps loading when the notebook restarts. If you are having problems getting profiles to automatically load after a restart, then this guide by 'ThatOldGuy' on the NotebookReview forums should help.
Note: This is one area of the program that doesn’t always function as expected for some users as shown by threads on the Intel Community Forums and other online portals. Problems include the app pairings taking several minutes to register that the target process is now running, or app pairings no longer functioning after a system restart.
Cache and Integrated GPU
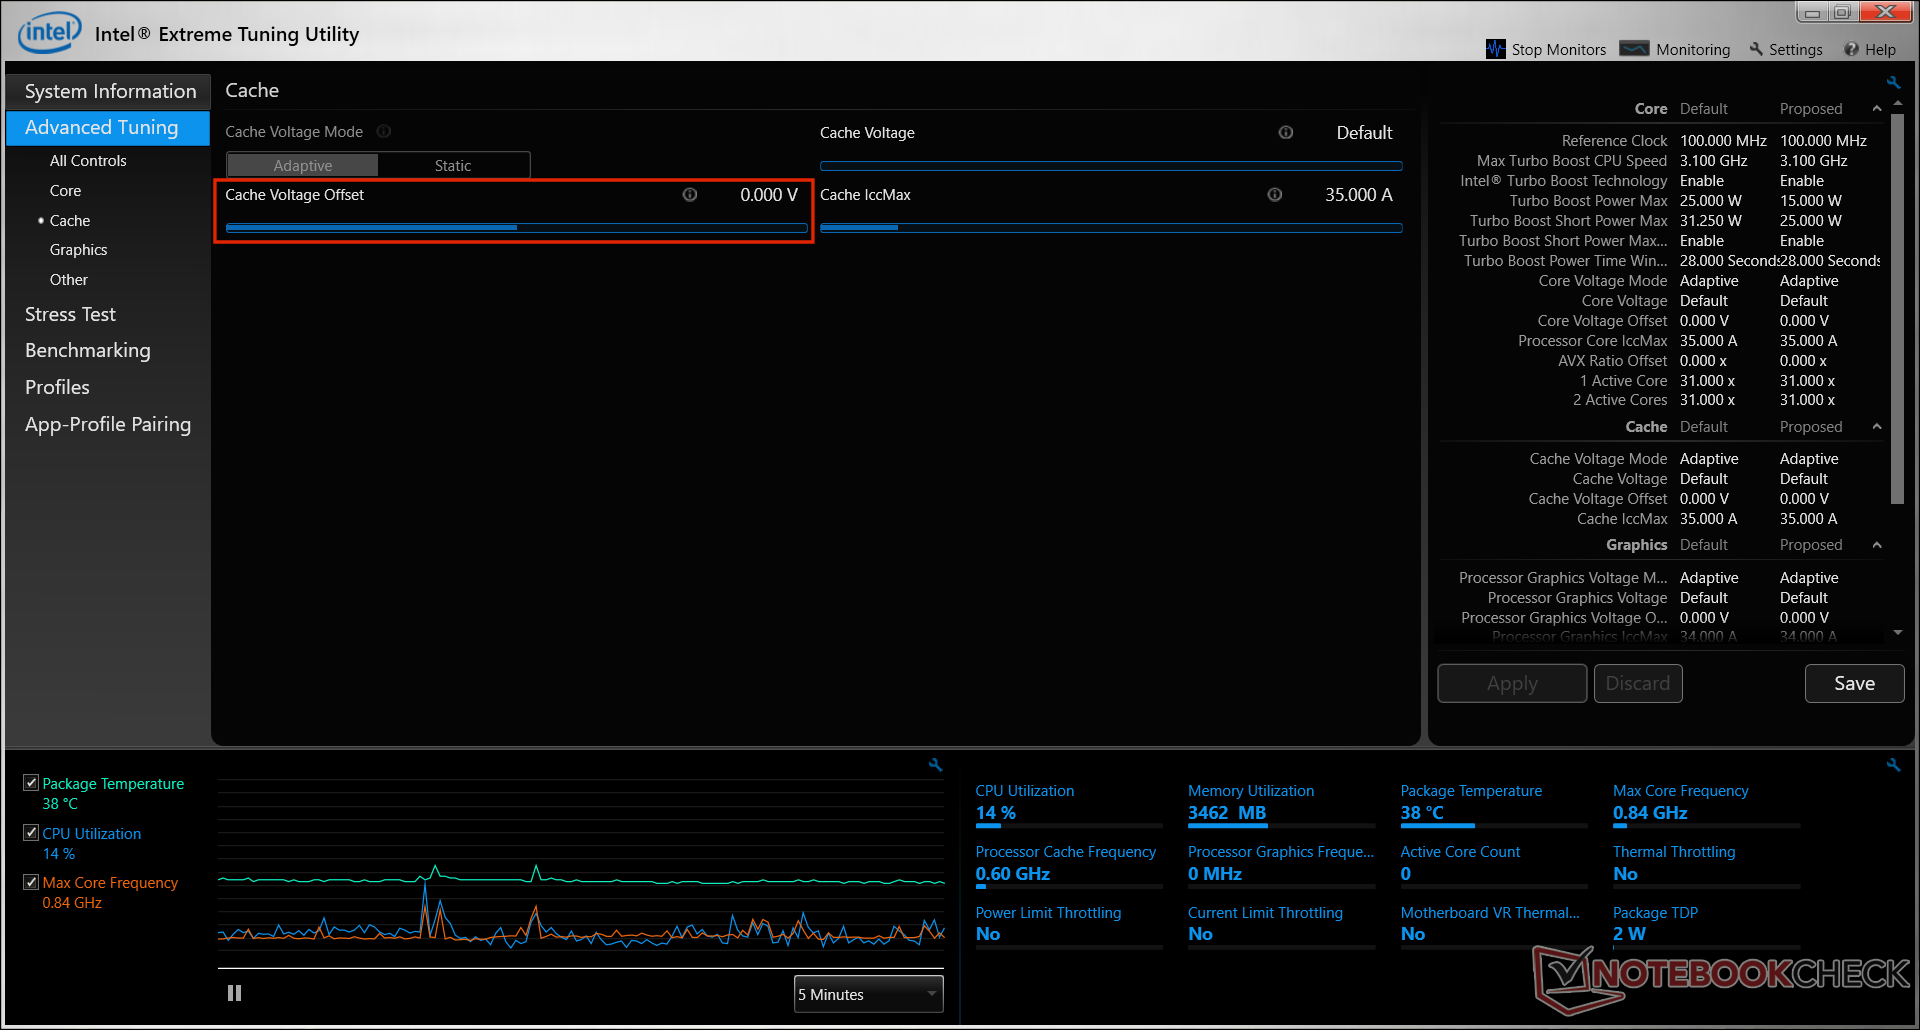
The best undervolting results can be obtained by taking the same principles used for the CPU cores and applying this process to the cache and integrated GPU voltage offset. This will have a cumulative effect that leaves a greater portion of the power envelope available for sustained performance. This effect is likely to be most noticeable when trying to perform some light gaming on an ultrabook or other devices that rely on integrated graphics since the CPU + GPU combined power requirements can exceed the sustained TDP.
Generally, the cache voltage offset will normally be stable at the same level as the CPU core, while Intel HD Graphics normally hit their limit at a lower offset.
TDP Modification (Advanced Users Only)
The TDP (Thermal Design Power) is a wattage figure that each CPU product line is manufactured to consume in sustained usage, and cooling solutions must be designed to dissipate that level of heat. The TDP is around 15 watts for the U-series processor family typically found in many ultrabooks but will be lower for Celeron, Pentium, and Y-series, or higher for HQ and HK processors. We suggest looking up your processor model on the Intel ARK database to confirm the TDP specification (use the search).
Some manufacturers will modify the TDP allowance to be higher (performance) or lower (quietness) than the stock value prior to the laptop leaving the factory. However, most will lock this value to stop consumers adjusting these and potentially creating longevity issues that result in higher warranty claims.
For models with an unlocked TDP, you can go to the ‘Advanced Tuning – Core’ page and increase the ‘turbo boost power max’ by a few watts (moves in increments of 0.25 watts). This will help in situations where the CPU is throttling due to hitting the power limit, either due to a sustained CPU plus iGPU workload or during overclocking. The 4-core/8-thread Coffee Lake U-series is a particularly strong candidate for this treatment due to its low base clock speeds, but only in systems with a suitable cooling system (often a 15-inch notebook).
Note: You risk damaging your computer over time if you exceed the thermal capacity of your cooling solution. Performance can be reduced if this action results in more frequent thermal throttling.
Conclusion
When it comes to adjusting hardware settings, you start going down one path and then it branches out into multiple use cases and scenarios. Our short guide was quickly growing into something more substantial than our intended scope, and we had to be briefer in areas outside of our core intention of undervolting the CPU. Other areas include the ability to undervolt the integrated Intel HD GPU to free up some of the power limit for the CPU cores in power-limit-based throttling. We also weren’t able to go into much detail about the monitoring trendline down the bottom, but we encourage you to click the little spanner/wrench icon and play around with the different display options.
There are some parting thoughts we want you to keep in mind. Intel XTU safety measures should protect you, but don’t change anything you don’t understand and keep any changes to reasonable levels because some settings have the potential to cause real damage. The impact that Intel XTU has on thermal throttling might not be immediately apparent since it might only be delaying the point that the throttling starts or reducing the amount that the CPU throttles. This also applies to power limit throttling where the CPU may run faster but still below its turbo speed. Intel XTU isn’t magic so don’t expect drastic changes, the impacts here are iterative and combine with reapplying thermal paste, strategic placement of thermal pads, and laptop cooling stands to improve the situation.
Using this combination, we took a 13.3-inch ultrabook (i5-7200u + MX150) where the metal body between the keyboard and screen would reach around 50oC (122oF), and improved its long-term performance. The same device now handles a couple of hours of gaming with the CPU and GPU both running at turbo frequencies — although the power limit sometimes drops the CPU to 100 MHz below max all-core turbo.
