CheckMag | How to host your own AI image generator with Invoke AI and Stable Diffusion
There are a whole load of reasons why you might want to host your own AI image generator. Whether you want to avoid the watermarks and advertising, generate multiple images without the subscription, or push your image generation beyond what is allowed ethically by the service, hosting your own instance and using the training data from a company like Stable Diffusion allows you to retain ultimate control over whatever your AI generates.
To get started, you need to download the Invoke AI community edition from here. Under Windows, almost all of the installation process is now automated, with all the required dependencies being installed. However, this may not be the case with the Linux and macOS versions, so your mileage may vary. For our experiments, we used a virtual machine running Windows 11, with 8 cores from a Ryzen 9 5950 allocated, an RTX 4070 (available on Amazon) passed through to the VM and 24GB RAM running on a 1TB NVMe SSD. AMD GPU's are supported, but only under Linux.
Once you have gone through the installation process, launch Invoke AI to generate the config files and then shut it down. The reason for this is that it is recommended to make a couple of changes to various parts of the system to activate "Low-VRAM mode".
While Invoke AI doesn't specify what constitutes low VRAM, the 12GB RAM on the RTX 4070 probably isn't going to run a 24GB model. To do this, you have to edit the invokeai.yaml file found in the installation folder with a text editor and add the line:
enable_partial_loading: true
Once edited, for Windows users running Nvidia GPU's you need to set CUDA - Sysmem Fallback Policy to "Prefer No Sysmem Fallback" in the Nvidia control panels global settings. You can customise the amount of cache you want to allocate to VRAM, but for most people, just turning on "Low-VRAM mode" should be enough to get started.
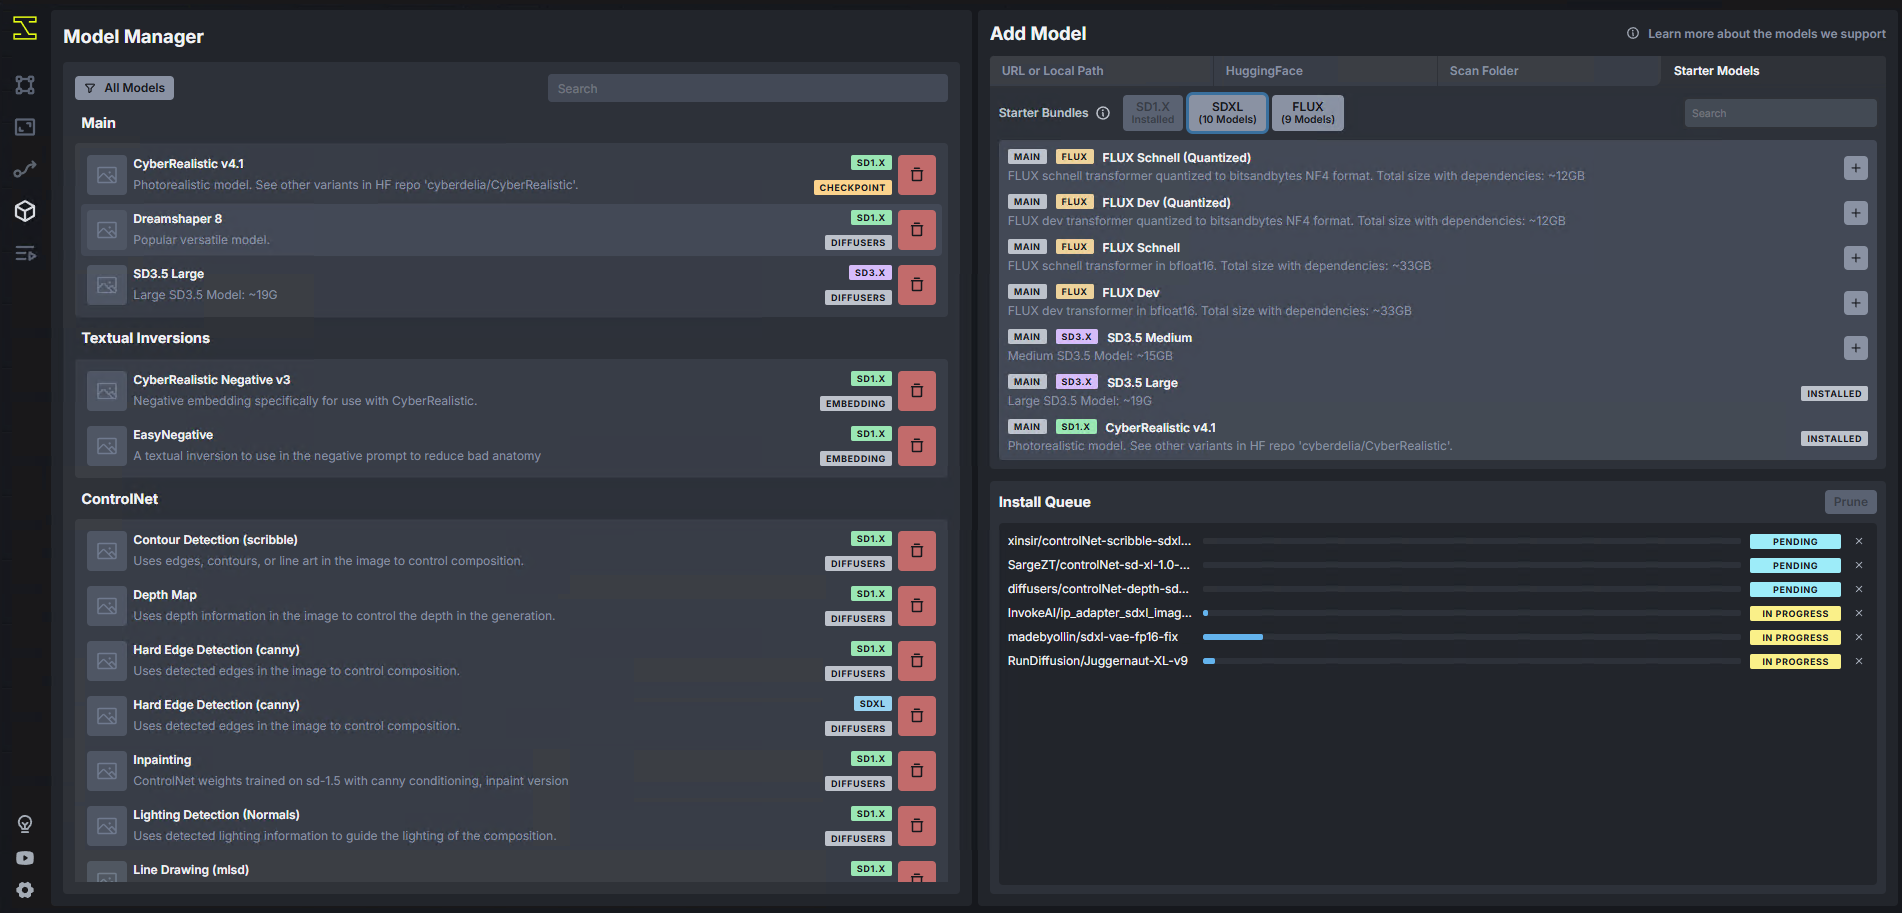
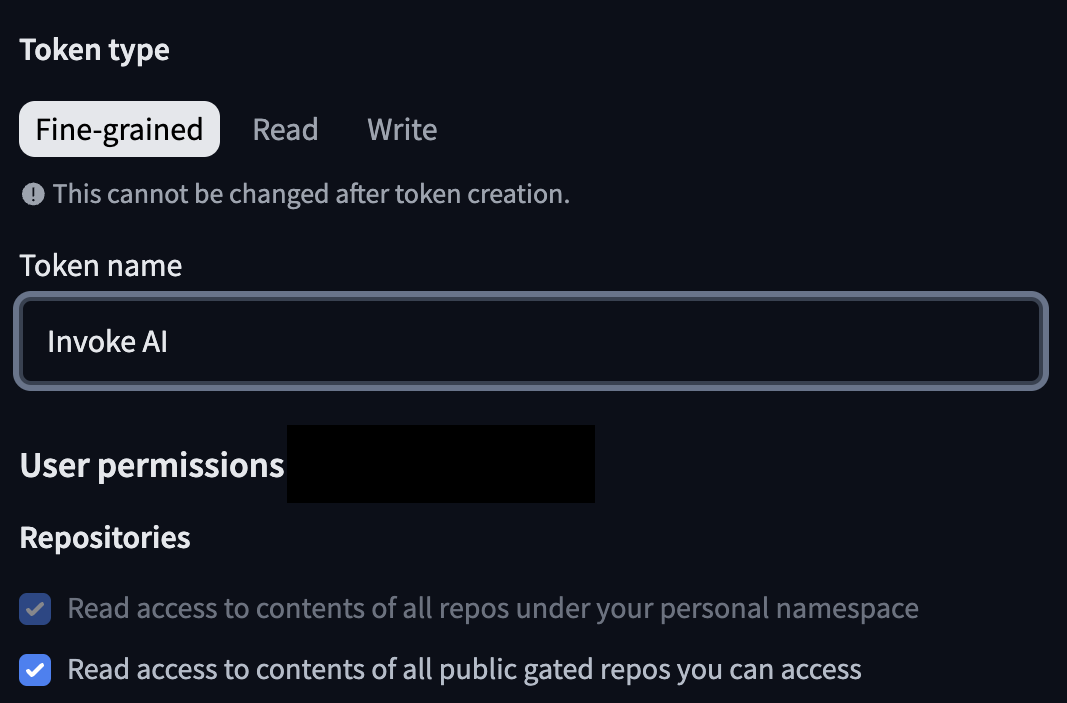
Some models can be downloaded immediately, such as Dreamshaper and CyberRealistic, but to use Stable Diffusion, you will need to create a Hugging Face account and generate a token to allow Invoke AI to download the model. However, there are ways to add models via URL, local path or by scanning a folder. To create the token, click in your account avatar in the top right and select "Access Tokens". You can call the token whatever you like, but you need to give access to the following:
Copy the token and paste it into the box in the Hugging Face section of the models tab. You may need to allow access with a confirmation on the website. You don't have to sign up for updates, and Invoke AI should prompt you when you need to grant access.
Keep in mind that various models will take a fair chunk of storage depending on what you choose to download. Stable Diffusion 3.9 clocks in at around 19 GB.
If you've got everything set up correctly, you should be good to go. You can access the interface through a web browser on the host machine by going to http://127.0.0.1:9090. There is nothing to stop you making this available to other machines on your local network.
On the "canvas" tab, you can type a text prompt to generate an image. Just below that you can set the resolution of the image you want to generate; keep in mind that the higher the resolution the longer the process takes, though you can generate in a lower resolution and use one of the upscale tools to produce a higher resolution. Below that, you can select the model you want to use. Of the 4 models tested, Juggernaut XL, Dreamshaper 8, CyberRealistic v4.8 and Stable Diffusion 3.5 (Large), Stable Diffusion produced more photorealistic images, though had trouble interpreting the text prompts, while the others produced images akin to cut scenes in games.
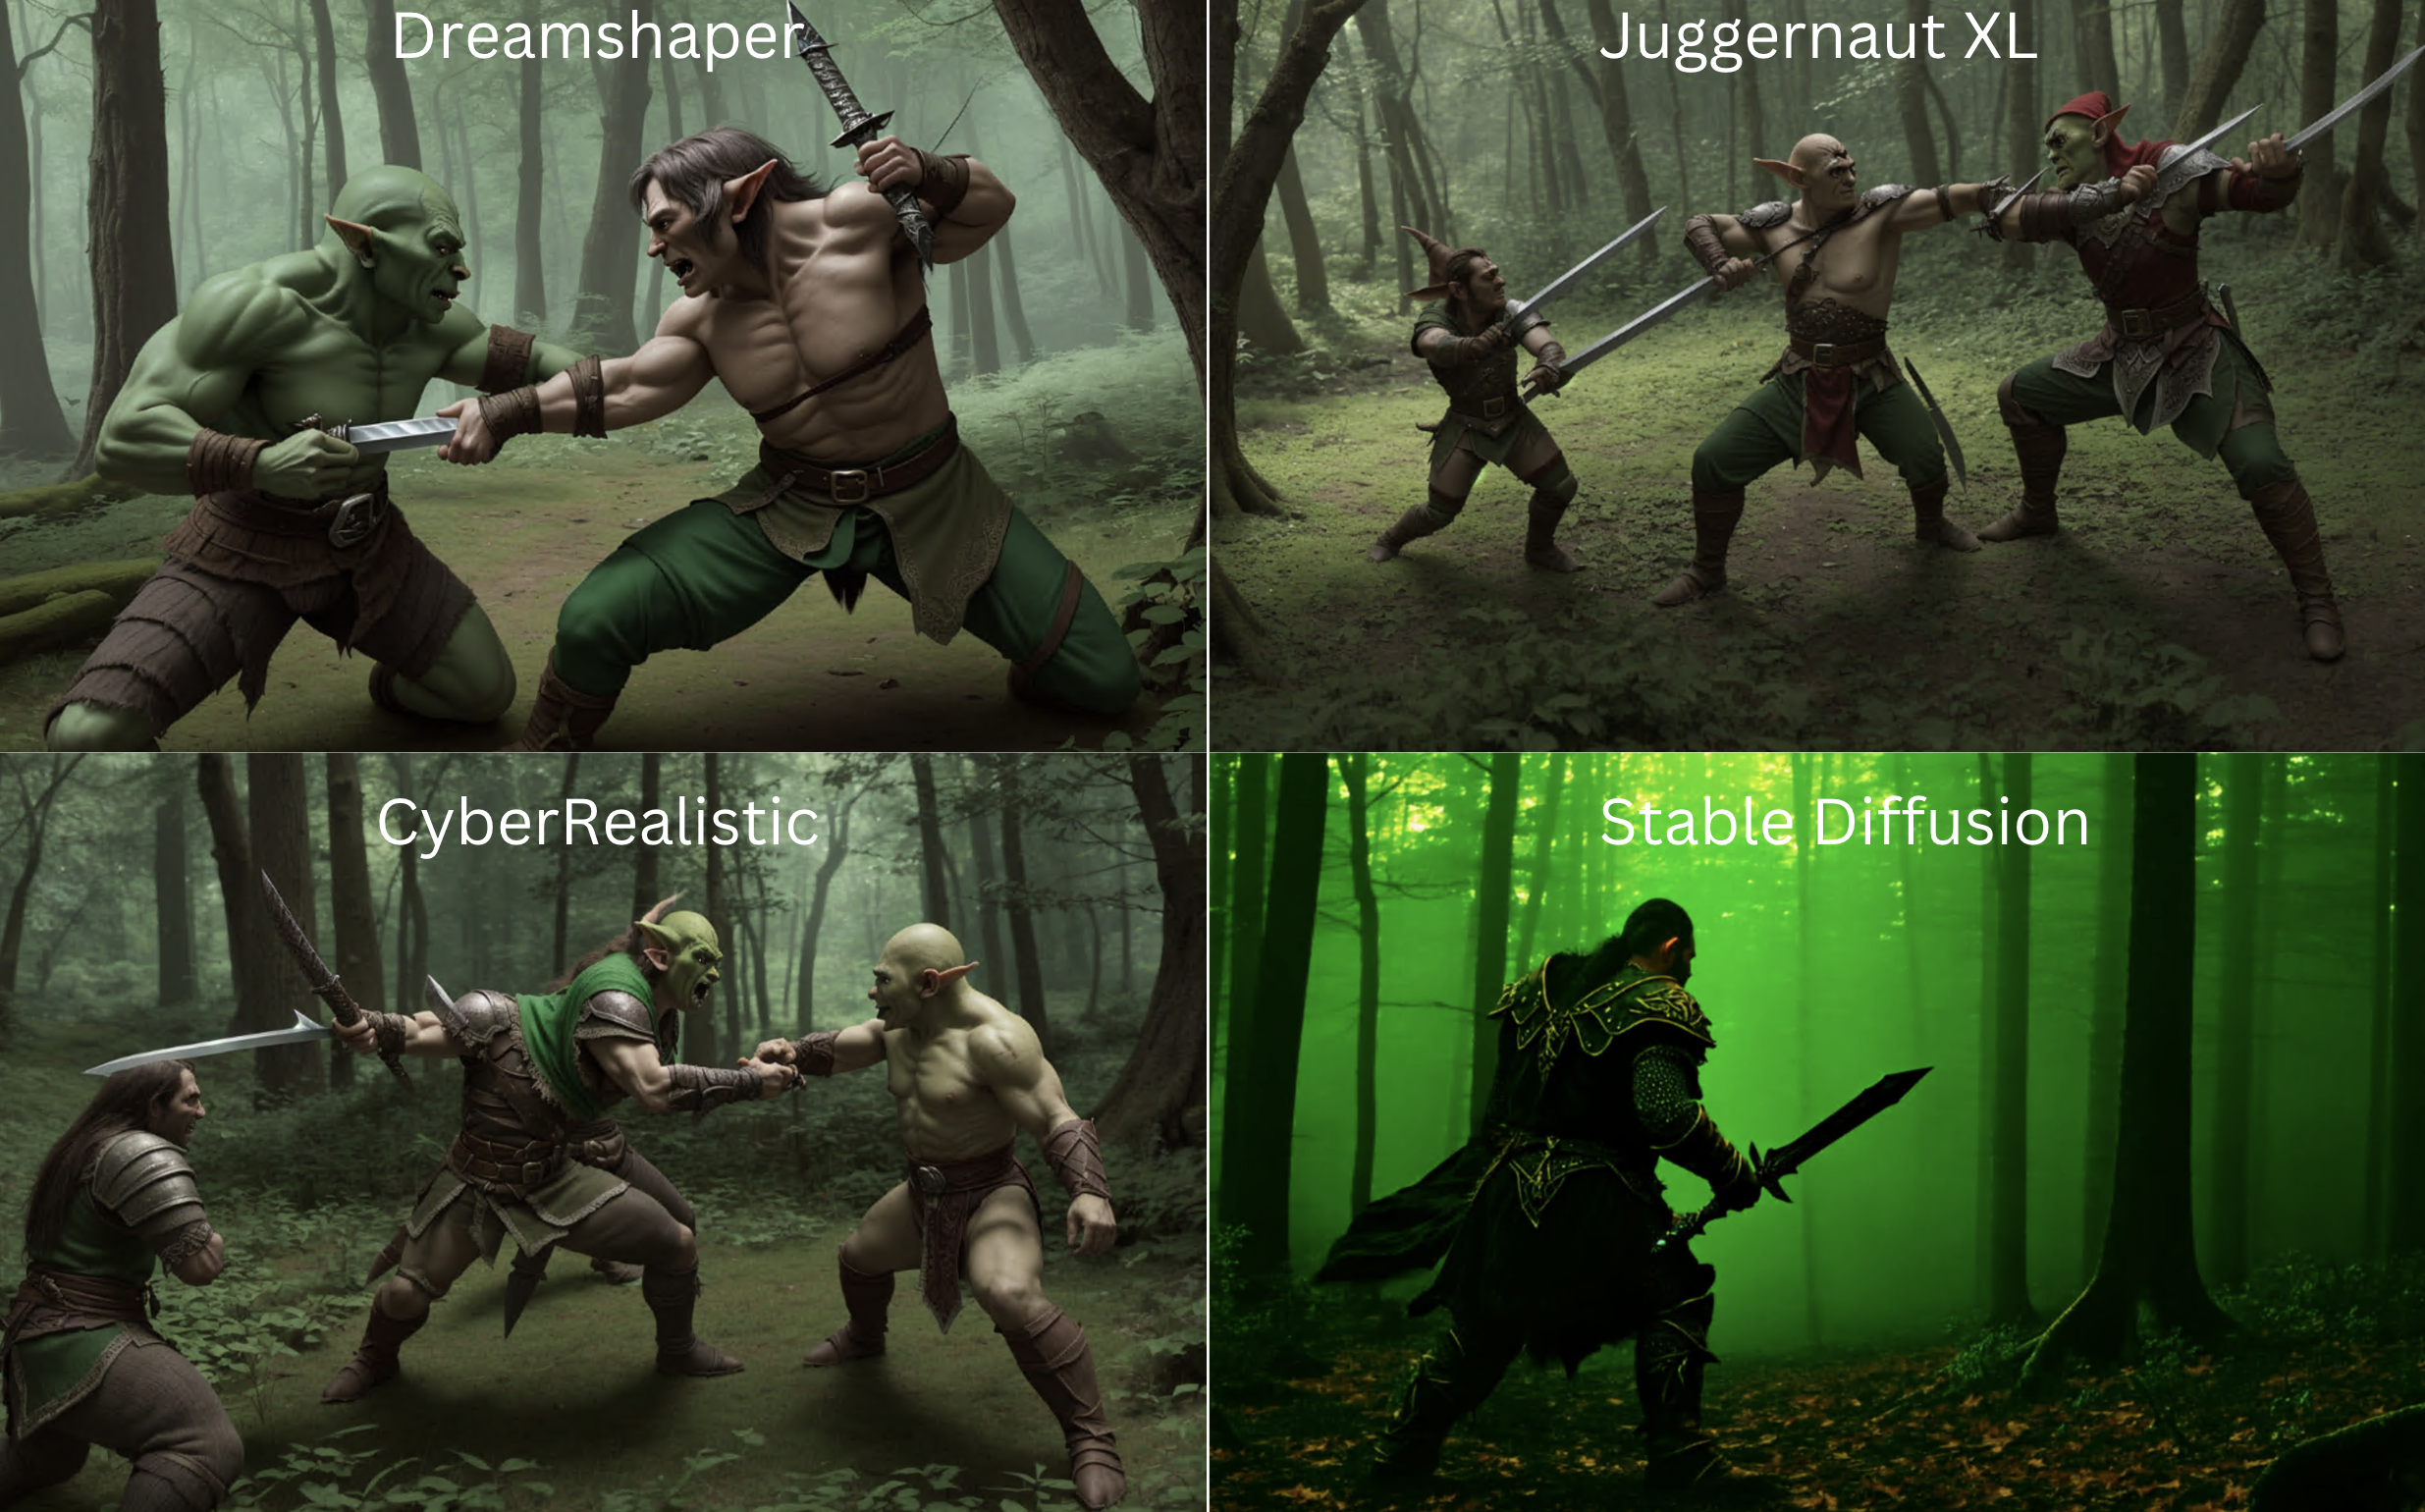
Obviously, the best model is the one that gives you the best results for your use case. Stable Diffusion was by far the slowest, taking around 30 to 50 seconds to produce an image, but the results certainly seemed to be the most realistic and pleasing of all 4 models tested.
Prompts:
- Top left: A smart woman walking down a street looking back at the camera with traffic on the left side
- Top right: A pug dog licking a banana
- Bottom left: A toy spaceman sitting in half an egg shell on the surface of the moon
- Bottom right: A girl with blonde hair and blue eyes at home eating popcorn

There is still a lot to discover with Invoke AI. The tool enables you to re-work parts of an image, produce iterations, refine images and create workflows. You don't need excessive hardware to run it, the Windows version will run on any 10xx series Nvidia GPU or later, although you can expect things to be somewhat slower when generating images. While there are mixed feelings around the training of AI models and the energy consumption required, running AI locally on your own hardware is a great way to produce royalty-free images for a range of purposes.
Source(s)
Invoke AI (via GitHub), Hugging Face
