CheckMag | Guide: How to dual boot Bazzite on your gaming handheld of choice and why you would want to
It is generally accepted that Windows on handhelds is a fairly terrible experience, however, it provides a number of features such as Game Pass and anti cheat compatibility to make people accept its quirks. And yet, dual booting your gaming handheld with something like Bazzite can give you the best of both worlds. Steam OS builds from Valve are already out, but running the official beta of Steam OS comes with its own issues. RGB doesn't work, in some cases the TDP controls don't either, not all buttons are mapped, and running a dual boot system has yet to be documented properly.
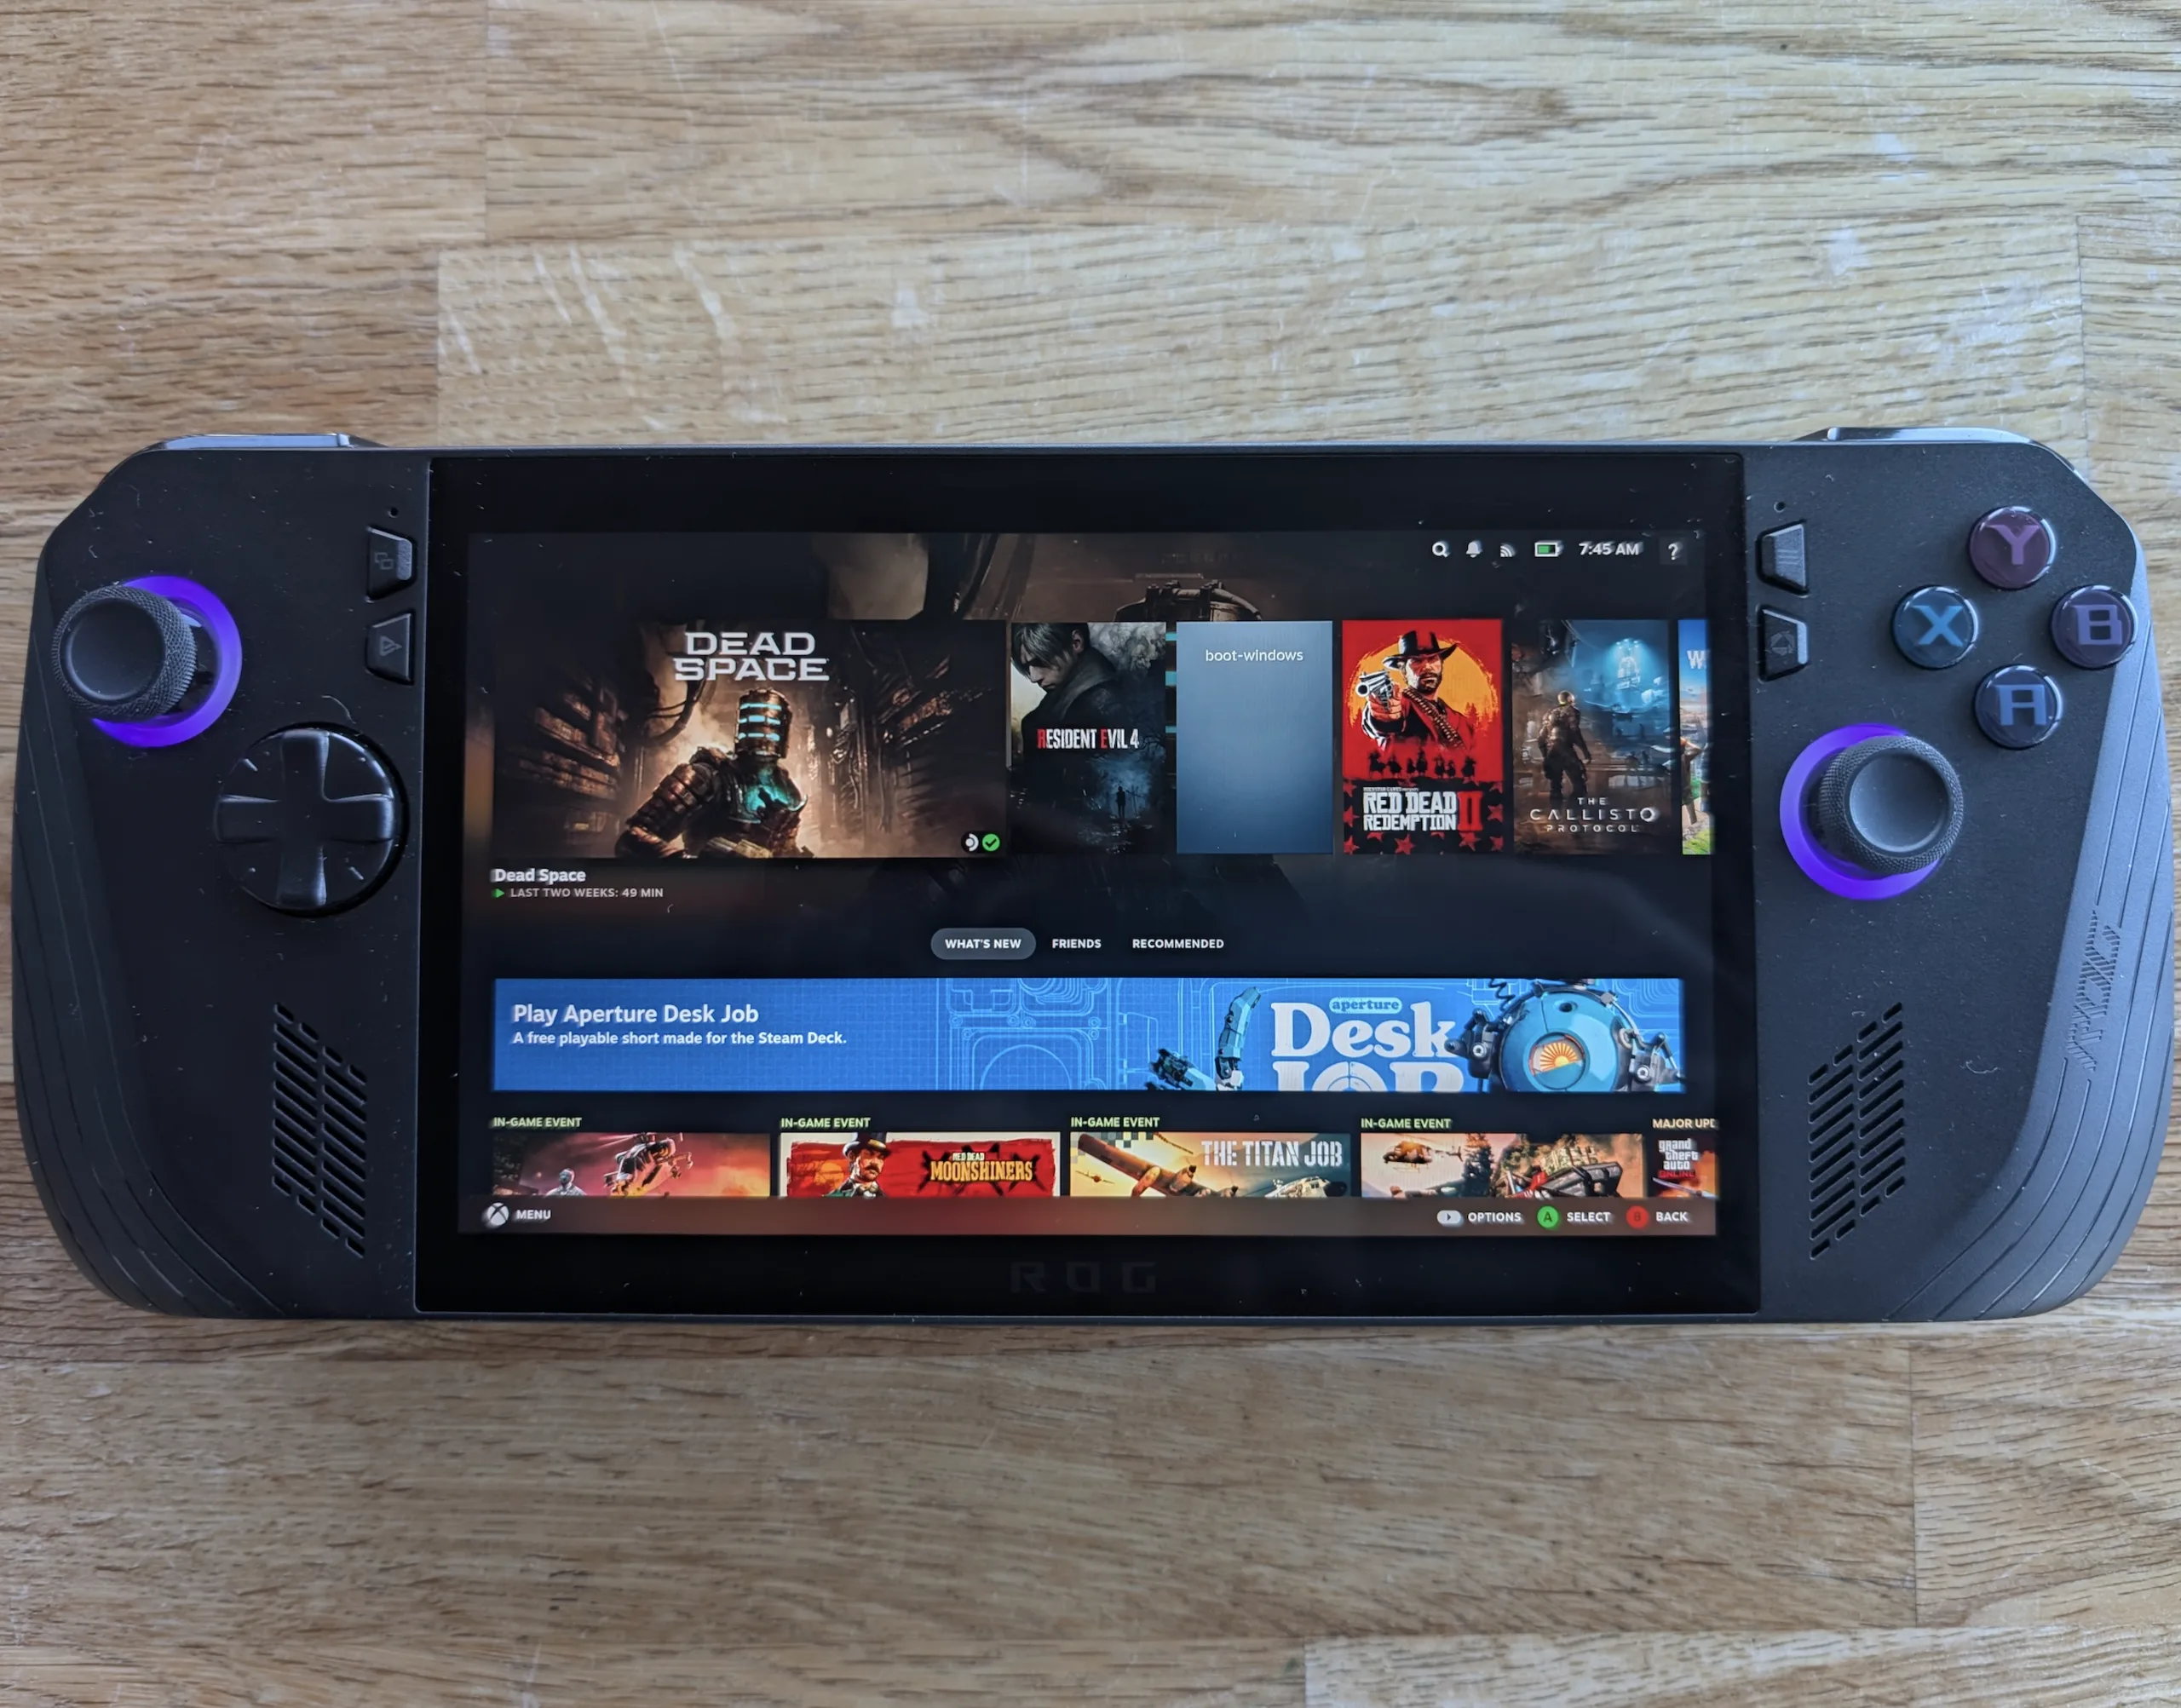
There are none of these issues with Bazzite, and it's surprisingly easy to get set up in a dual boot configuration, making switching between the 2 operating systems incredibly easy. Bazzite also supports pretty much every handheld out there, including devices from GPD, the ROG Ally (Available on Amazon) and Ally X, Legion Go, OneX and AYN. The process for dual booting Bazzite is more or less the same across all of these devices.
What you'll need
It's worth keeping in mind that doing this on systems with only 512 GB of storage will effectively split your storage between the 2 operating systems leaving fairly little space for either one. However, a 1 TB drive is more than enough for dual booting and still having a decent amount left for games either under Windows or Bazzite.
To get started, you'll need a few bits of hardware and software:
- A USB keyboard
- A USB memory stick (at least 8 GB in size)
- A USB A to C adapter or dock with 2 USB ports
- Balena Etcher or another USB image writing tool
- Possibly a partitioning tool such as Easus Partition Master (More on that in a moment)
Writing the image to USB and partitioning your device
Start by downloading the Bazzite image for your device from here, and writing it to the USB using Balena Etcher or another USB image writing tool such as Rufus. Once you have the USB prepared, it's time to move to Windows to partition your drive.
Depending on how much space you want to dedicate to Bazzite, you may need to uninstall some existing software from your Windows partition. I was aiming for around half of a 1 TB drive, so make sure you have at least 600 GB of free space. Once you have the space available up, open "Computer Management" in Windows and click "Disk Management" in the left pane. (Alternatively, you can press Win + R and type diskmgmt.msc)
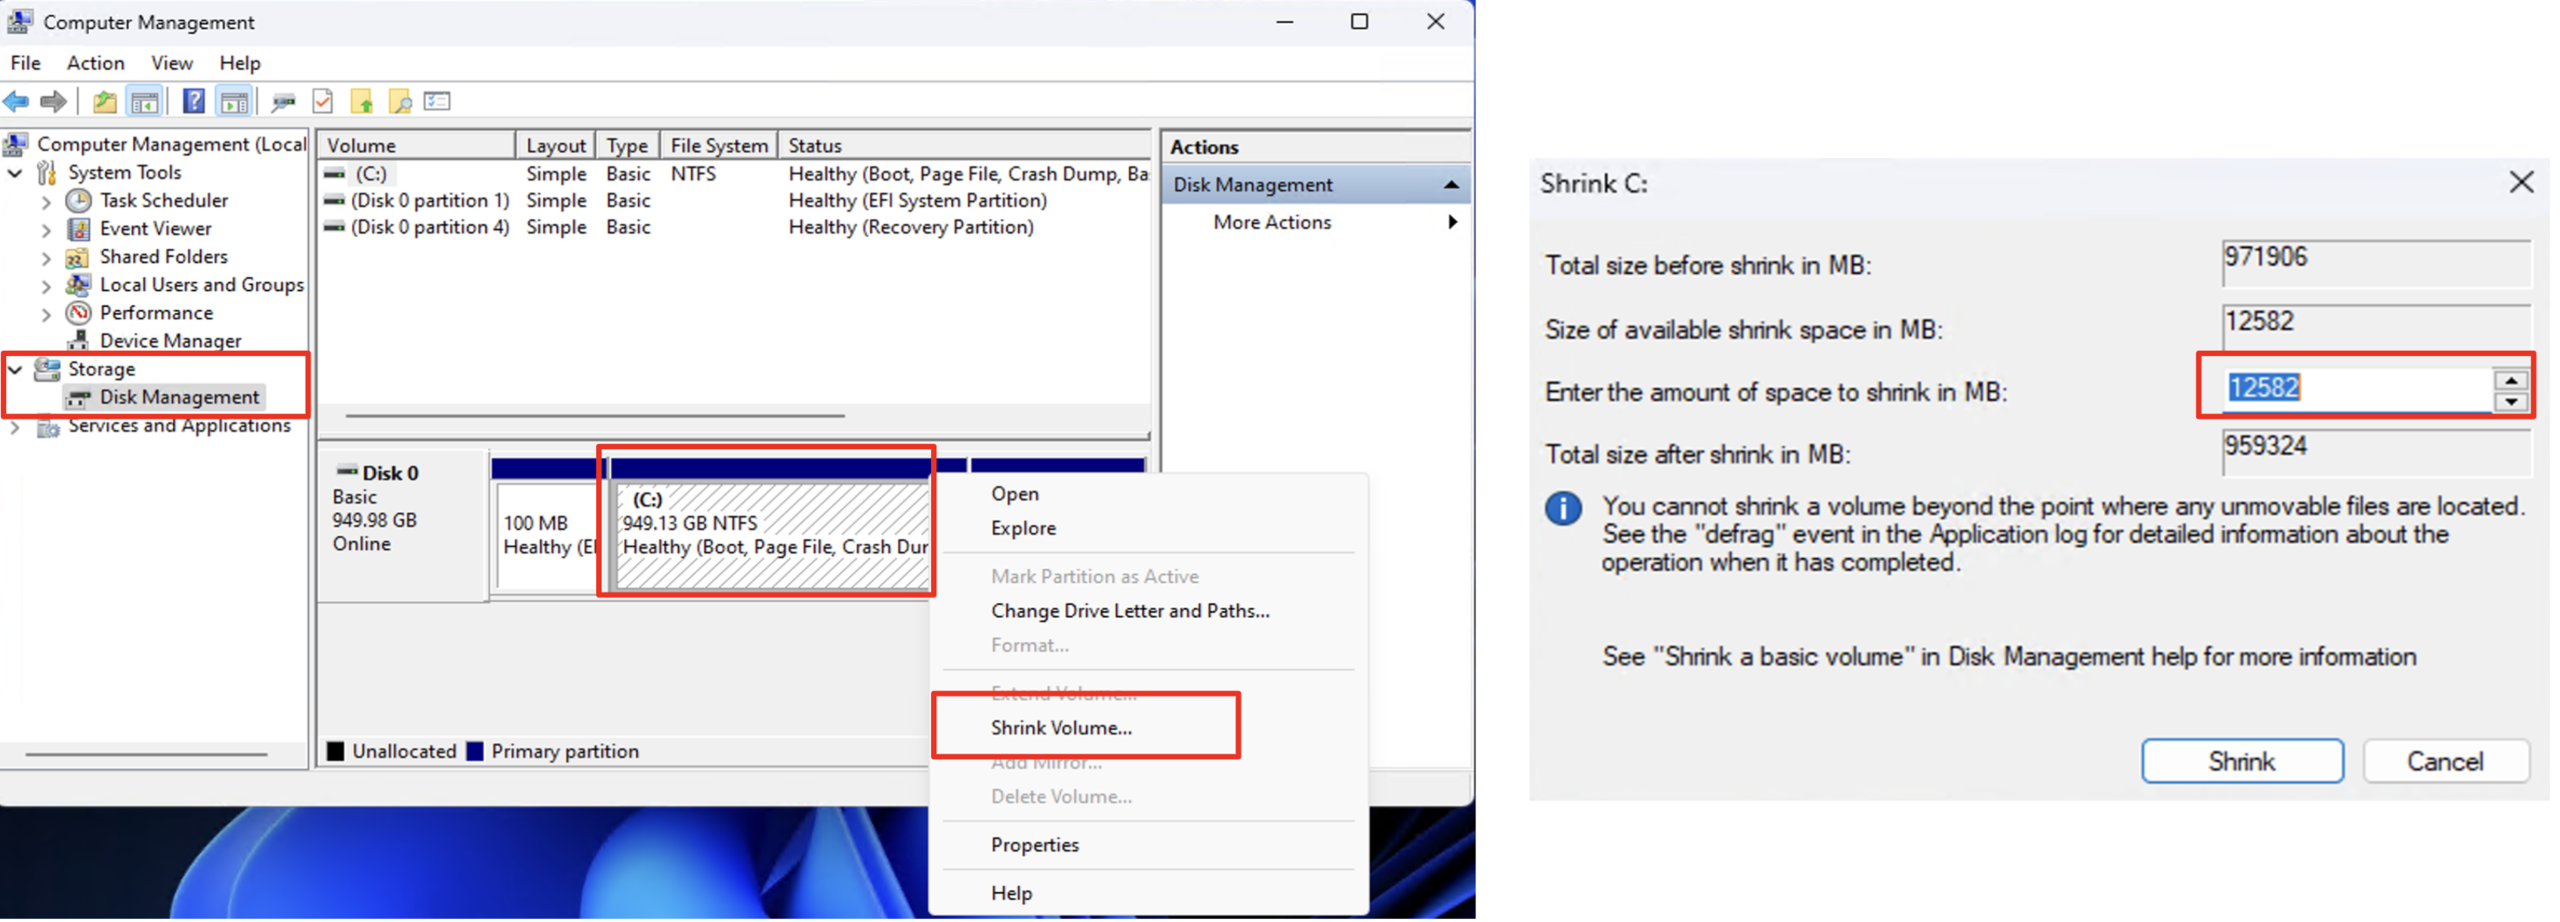
Right-clicking on the primary (largest) of the volumes on your drive, you can select "Shrink Volume". This will show you the maximum amount of storage space that can be freed up from Windows. If what you get looks acceptable, click "Shrink" on the next screen, and you should be good to go. This will then show a black bar with "Unallocated Space" and if the amount works for you, you can move on to installation. You can even delete the "Recovery Partition" freeing up about 1 GB of space using this guide, however if you ever need to re-install Windows you'll need to do it from scratch (no bad thing).
That being said, the 2 times I tried this, Windows failed to accurately report the correct amount of free space. If this happens to you, a free tool called Easeus Partition Master has been my go-to for managing partitions for years.
Once installed, the process for shrinking the partition is essentially the same. Right-click on the volume, and choose "Extend / Shrink" and drag the slider to free up the space. Click "Execute Task" on the next screen and Easeus Partition Master will boot into a separate recovery image from Windows to perform the operation, which works around Windows underreporting the free space.

Installing Bazzite
Once you have successfully partitioned your drive, you can reboot into Windows and check the disk space to see if the drive has shrunk. If so, plug in your USB dock, keyboard and USB drive with Bazzite on it. You'll need to boot from the USB stick, which means entering the BIOS/UEFI menu on your device. Shut down Windows, then turn on the device by pressing the power button and tapping the volume down button (similar to mashing the delete key on a desktop PC). This may vary from device to device. Once in the BIOS, go to the security tab and disable "Secure Boot". On some systems, you may need to first set an administrator password to make the option to disable Secure Boot active.
You may need to reboot back into the BIOS for the changes to be reflected. Once back in the BIOS, switch the order of boot devices, boot from the USB stick and you should be into the Bazzite installation menu.

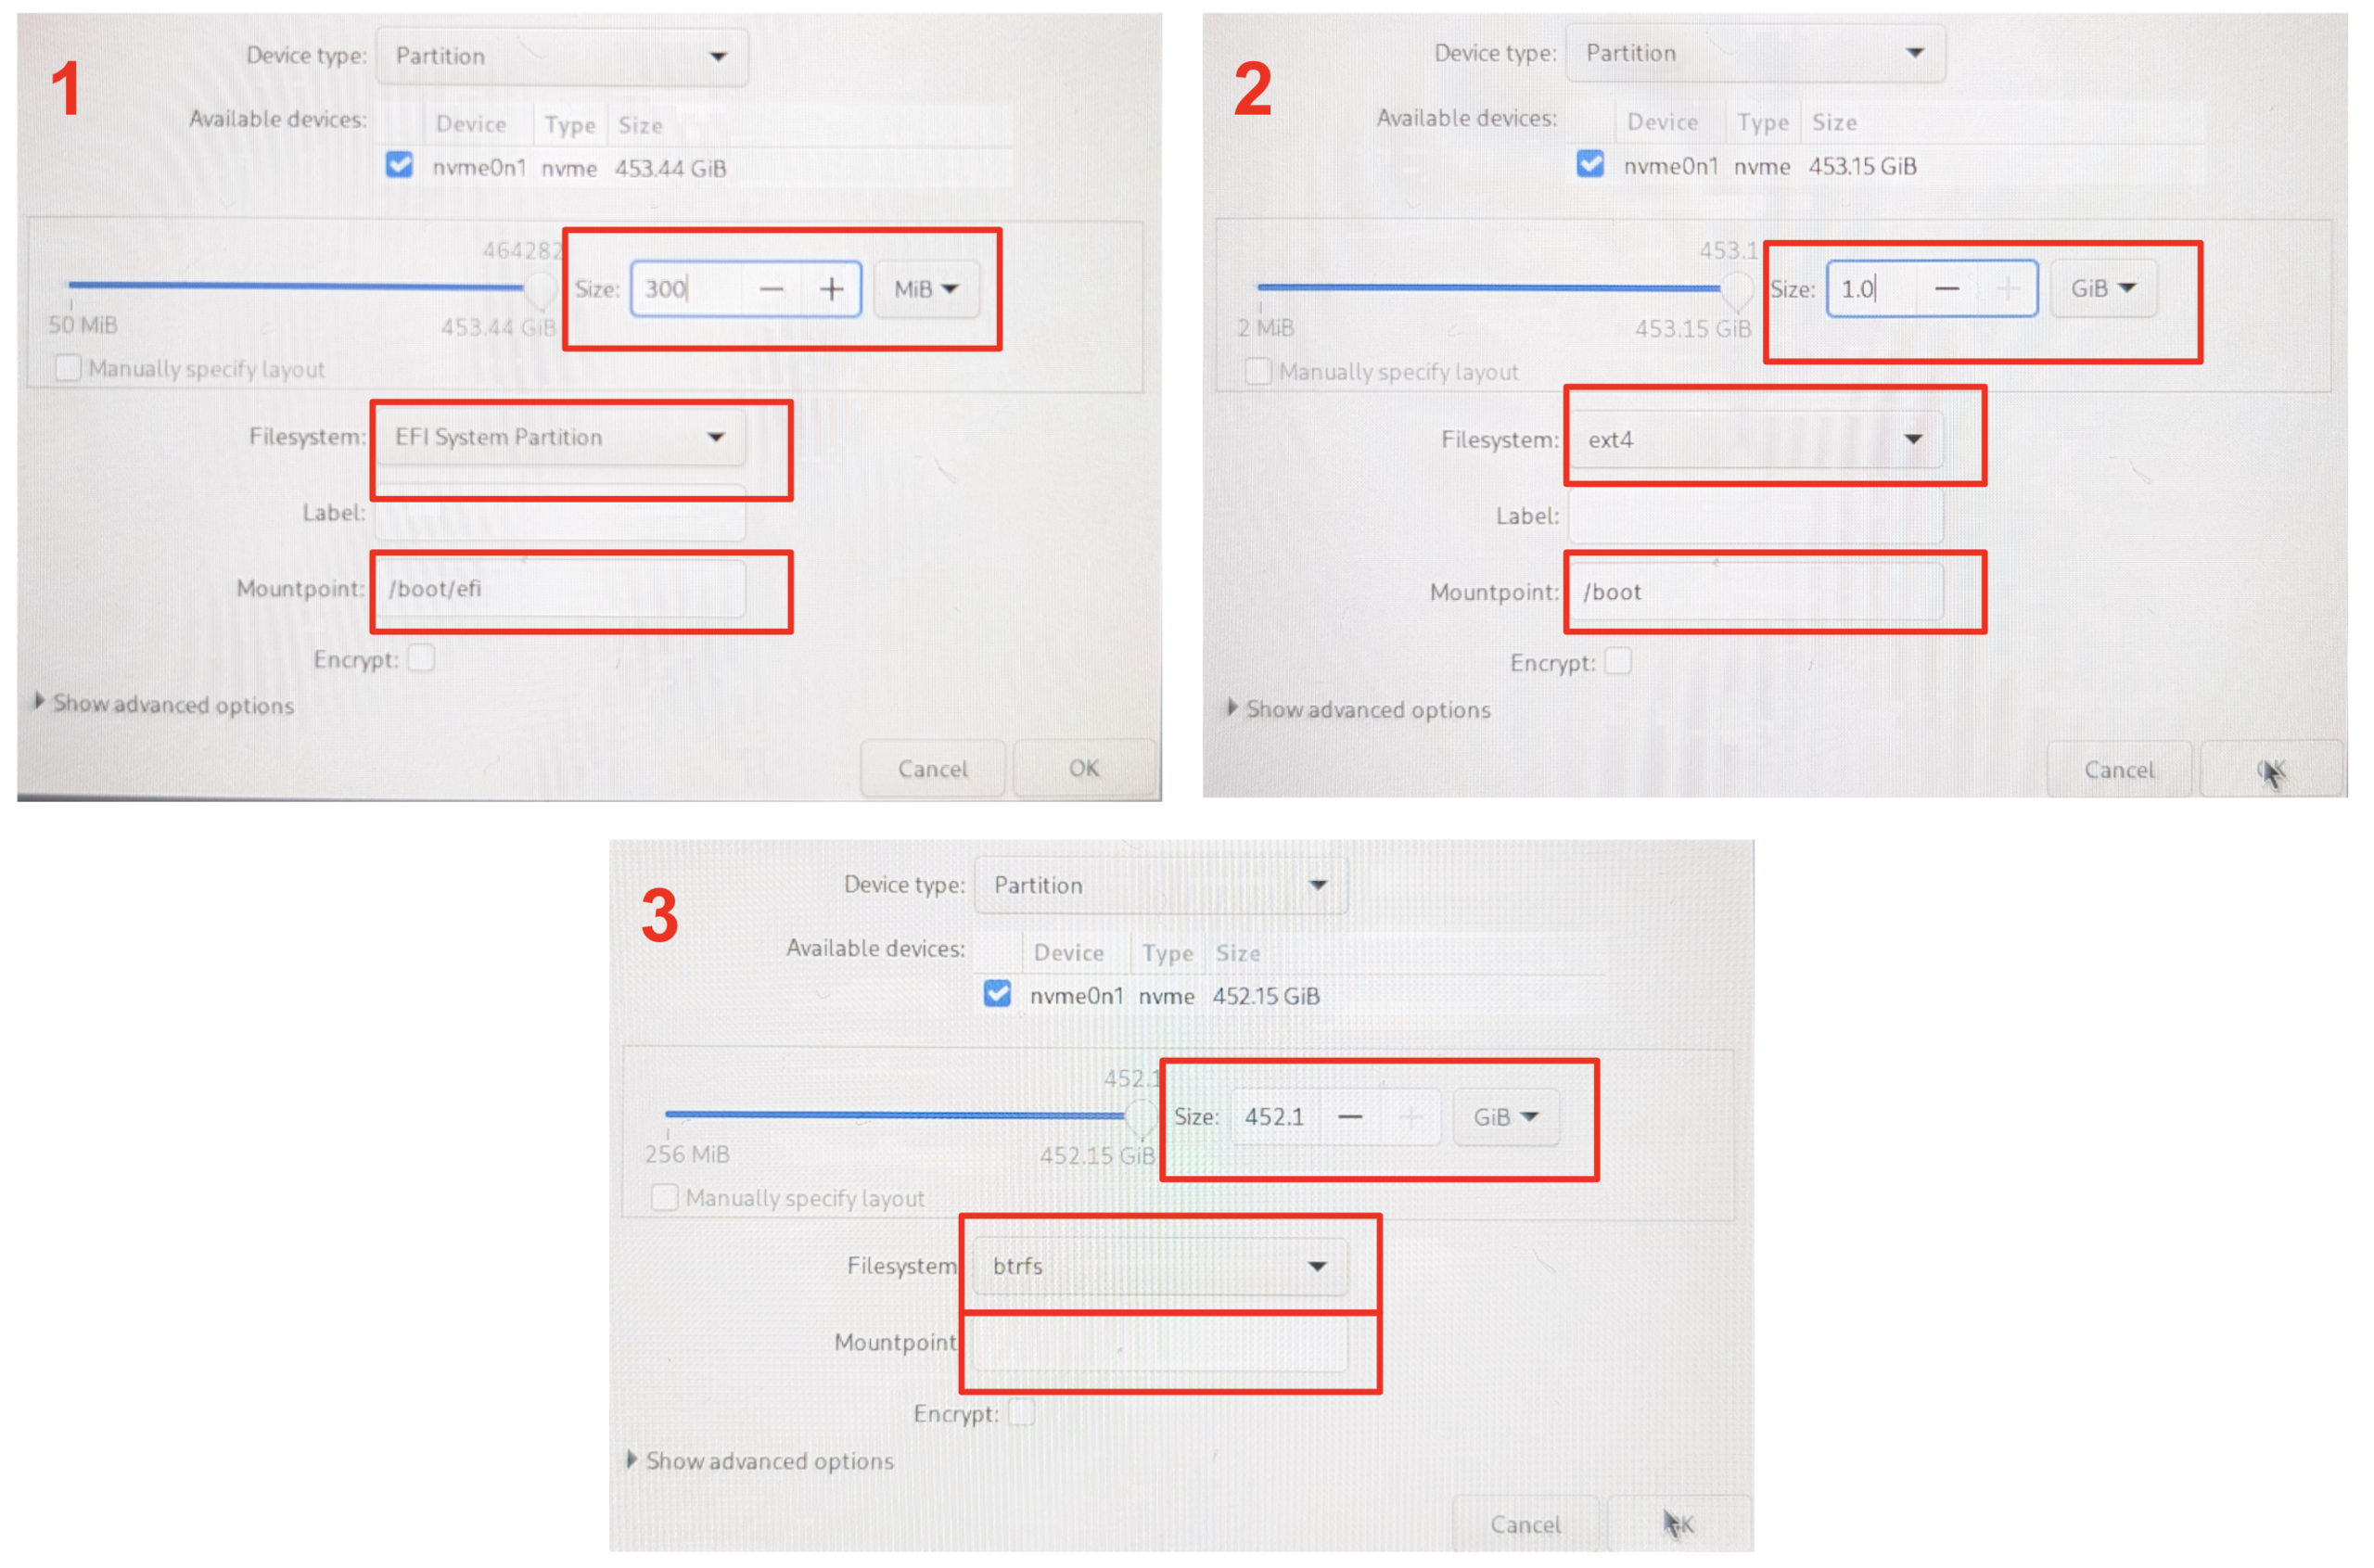
Once in the installer, you can connect to your Wi-Fi network, and create a new user with the name and username "deck". Next, choose the "Installation Destination". This is where having a keyboard connected is essential, as there is no on-screen keyboard in the installer. Select the free space on the far right of the disk layout that we created when we shrank Windows and click the + button. Here, we will create 3 different partitions. Each time, select the free space and click the plus button. Give each partition the following properties:
- Partition Size: 300 MiB. Filesystem: EFI System Partition Mountpoint: /boot/efi
- Partition Size: 1.0 GiB. Filesystem: ext4 Mountpoint: /boot
- Partition Size: *Remaining Space. Filesystem: btrfs Mountpoint: *blank
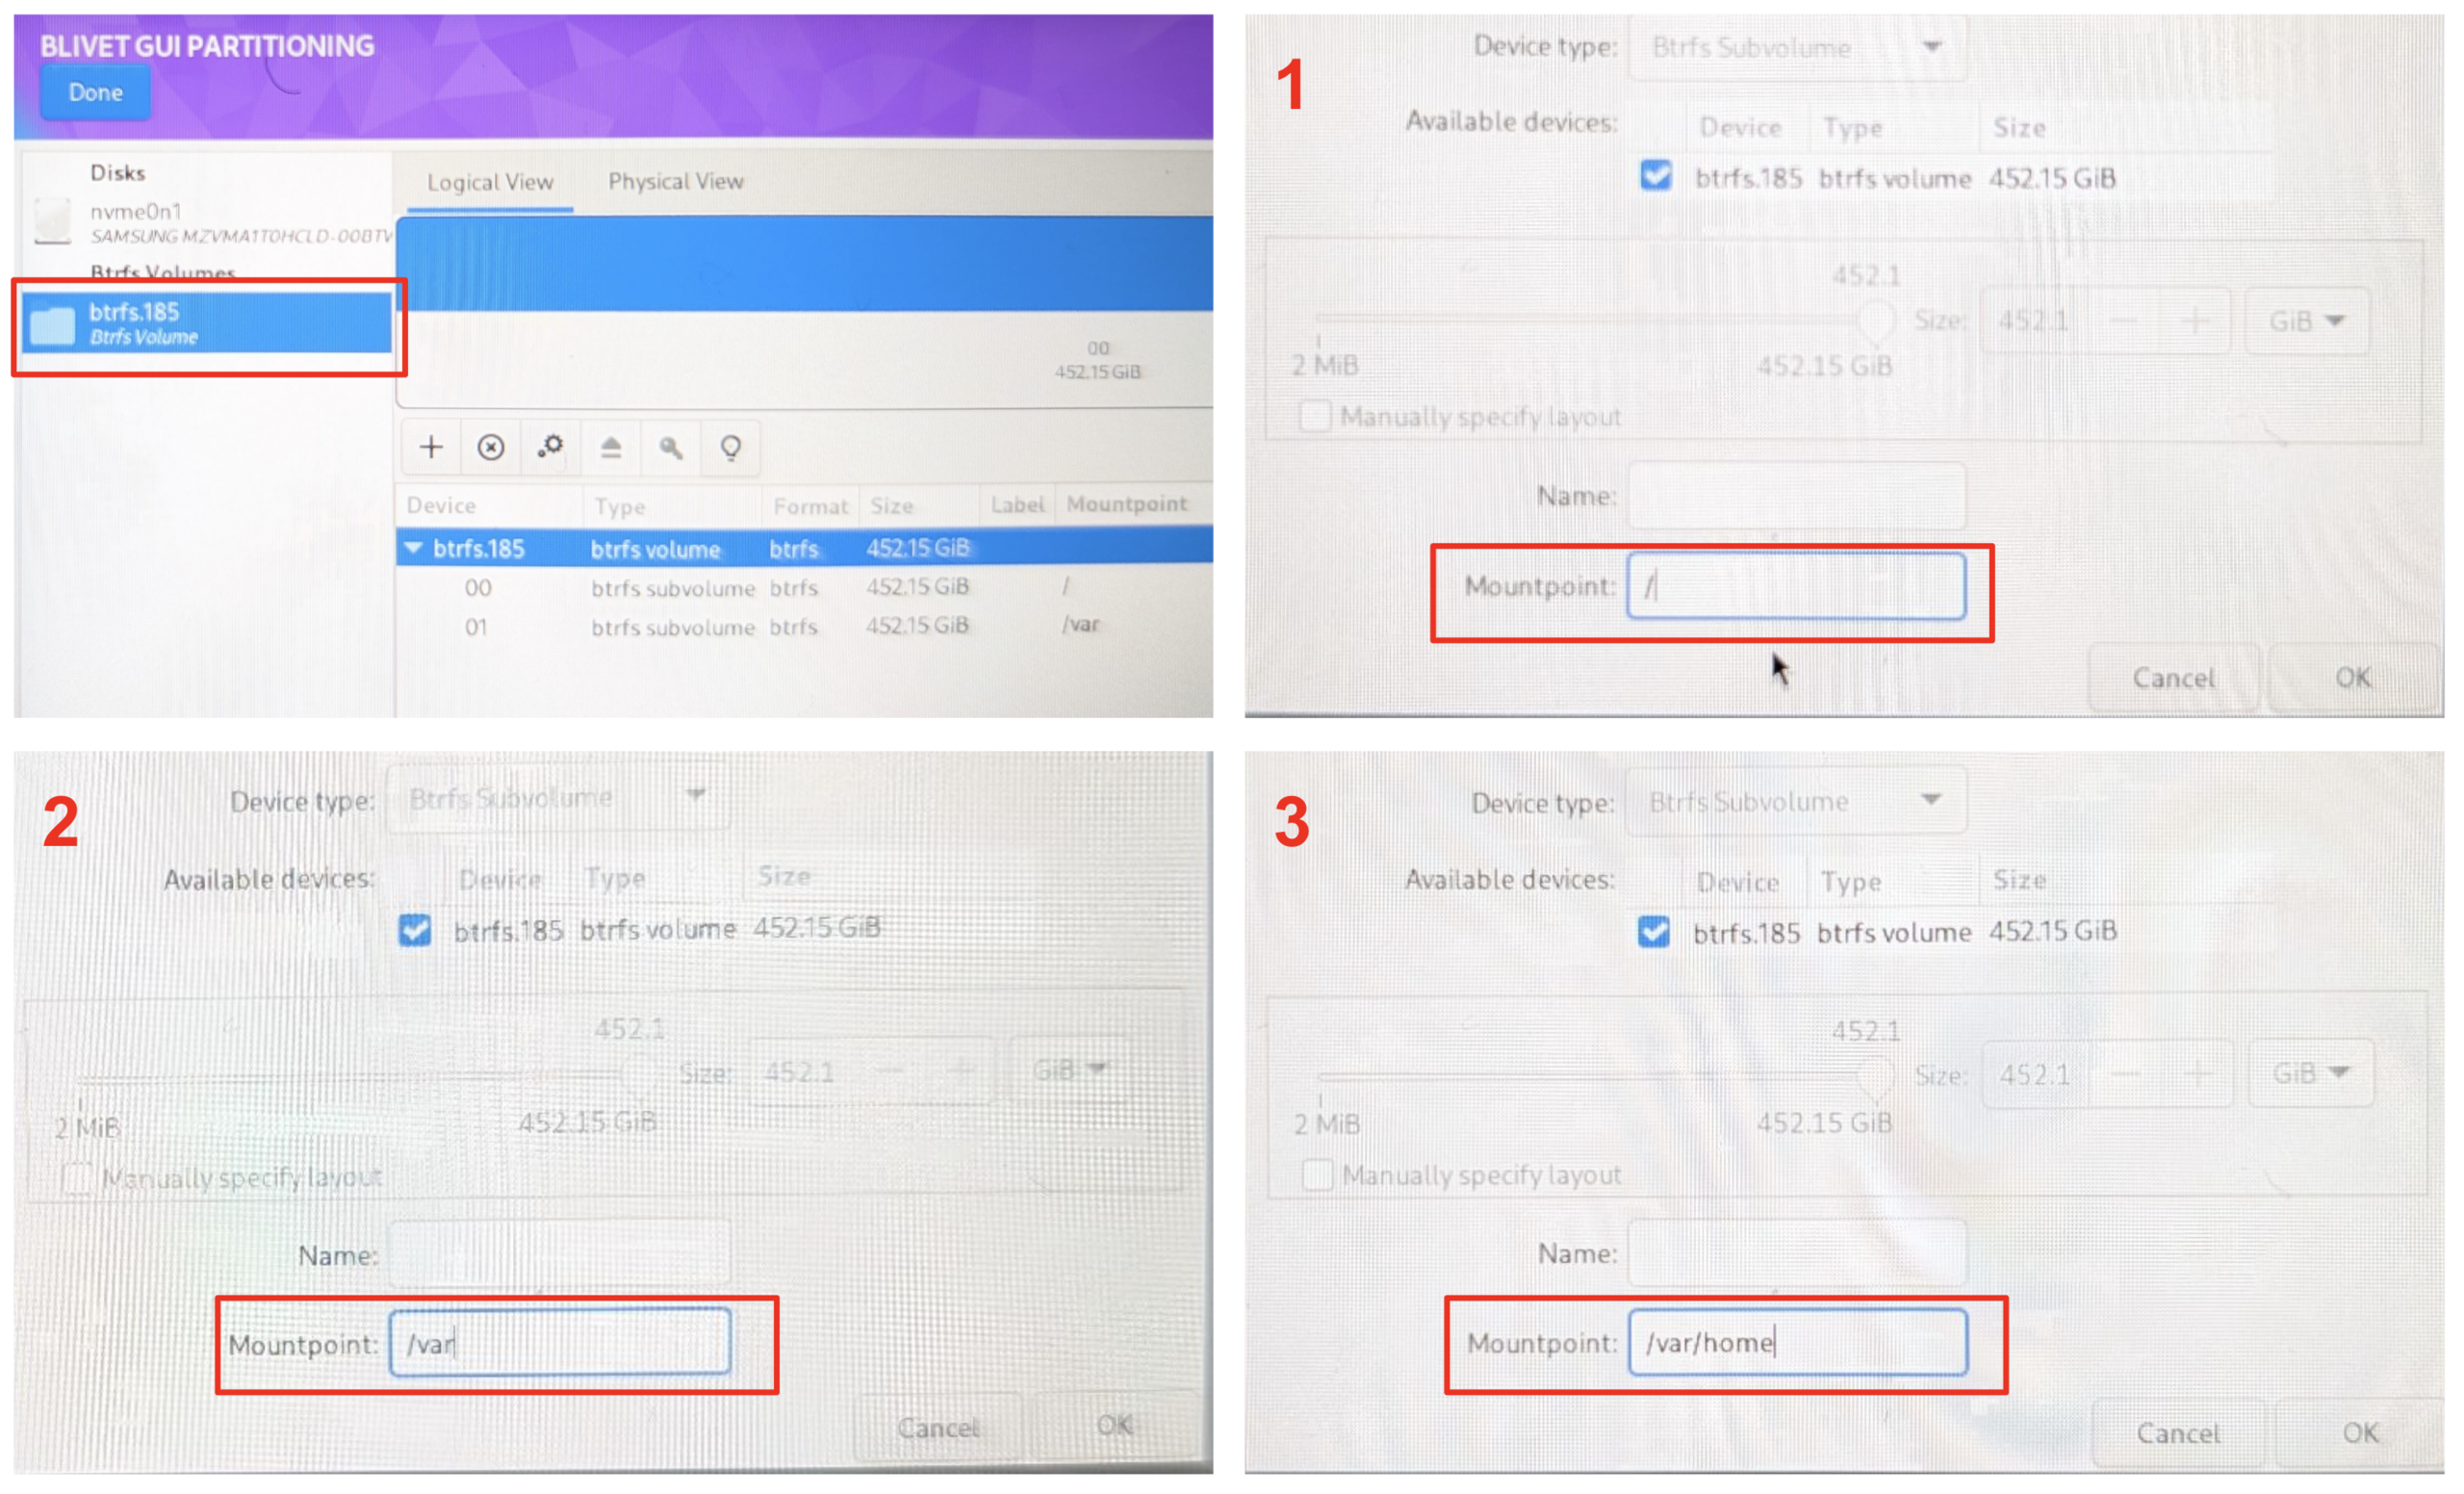
Once you have created the 3 main partitions, a folder will appear called btrfs.XXX where we will need to make 3 btrfs sub-volumes. Select the folder and again, click the plus button creating the following 3 sub-volumes. There is no need to specify space here, just the Mountpoint:
- Mountpoint: /
- Mountpoint: /var
- Mountpoint: /var/home
Once you have the correct partition layout, click "Done" in the top left and "Accept the Changes" on the following popup. This will take you back to the installation overview screen we saw earlier and we can click "Begin Installation" in the bottom right corner. If everything has been done correctly, after a few minutes, your device should reboot into Bazzite.
From there, you can choose to install a range of additional software such as DeckyLoader and EmuDeck, but this is not mandatory. What you should be left with is a fully working Bazzite install ready to go. Sign in to Steam as you would on a Steam Deck and you are good to go.
Switching Between Bazzite and Windows
Switching between Windows and Bazzite is as simple (or convoluted) as booting into the boot menu on your device and selecting the installation you want to use. Bazzite will be the default on a normal boot unless you switch the order in the BIOS. However, you can also create a shortcut in Bazzite to automatically boot into Windows. To do this, go to the power menu, and select "Switch to Desktop". Open a terminal window and type:
ujust setup-boot-windows-steam
This will add "boot-Windows" as a Non-Steam shortcut in your game library.
Conclusion
Regardless of what you think of Windows, Bazzite (and Steam OS) is a far easier way to interact with your device, and leaving Windows as an option gives you the best of both worlds. With Bazzite, everything just works. All the buttons work correctly, including the rear ones. The RGB on the Ally X is present and configurable, the TDP controls and global scaling and scaling filters such as FSR work correctly as well. The biggest benefit is the ability to suspend a session by pressing the power button, and have the device pick up exactly where you left off the next time you pick it up, with little loss of battery - something that historically has been awful under Windows. It even comes with an installation of WayDroid, allowing you to run Android apps as well.
Performance between the 2 operating systems for me was largely the same, but battery life saw a significant boost. Many users report better performance in some games when using Bazzite, though your mileage may vary.
While an official Valve release of Steam OS is likely only weeks away as of late March, 2025, Bazzite is a mature product that is easy to set up, fully functional and supports almost every handheld out there which is why plenty of users regard it as the handheld operating system of choice.
