How to correctly install and assign monitor color profiles in Windows 10
Monitor profiles and color management
A color space or color gamut is the sum of all colors a device (monitor, TV, printer, etc.) can display or record (digital camera, scanner, etc.). Every device has its own color gamut based on its hardware, which leads, for example, to the case that the photo you took with your camera looks different on its screen than it does on your computer monitor.
The color values for red, green and blue (at a color depth of 8-bit, black e.g. is 0,0,0, white is 255,255,255 and 0,255,0 is for the most intense pure green) recorded by a device are not absolute values but are to be understood as percentages. When a camera “sees” pure blue and this blue corresponds to the strongest blue the camera can record, it writes a value of 0,0,255 (= 100% blue) for the pixel into the image file. If this photo was displayed on a wide-gamut monitor with an especially large color space, which can display a more vibrant blue at 100% than the camera has “seen”, the color would be too intense. Hence, accurate color reproduction requires a conversion into absolute values.
This is where color profiles or ICC profiles come into play, which define the specific color space (gamut) of a device within a standardized color space such as the small standard sRGB color space for which most consumer devices are designed. The correction values stored in the profile are identified by the color-management-capable applications and operating systems of the device at hand and are converted into RGB values to achieve the most accurate color reproduction possible.
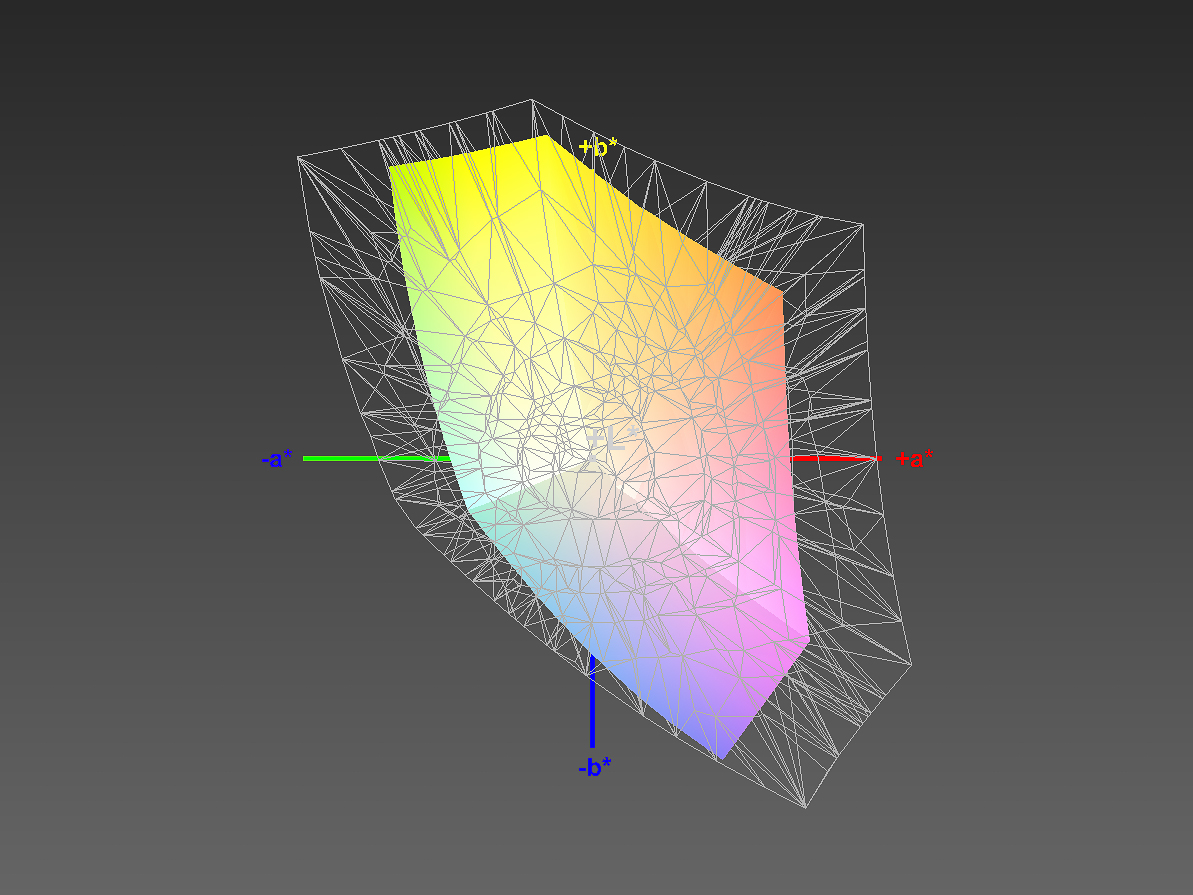
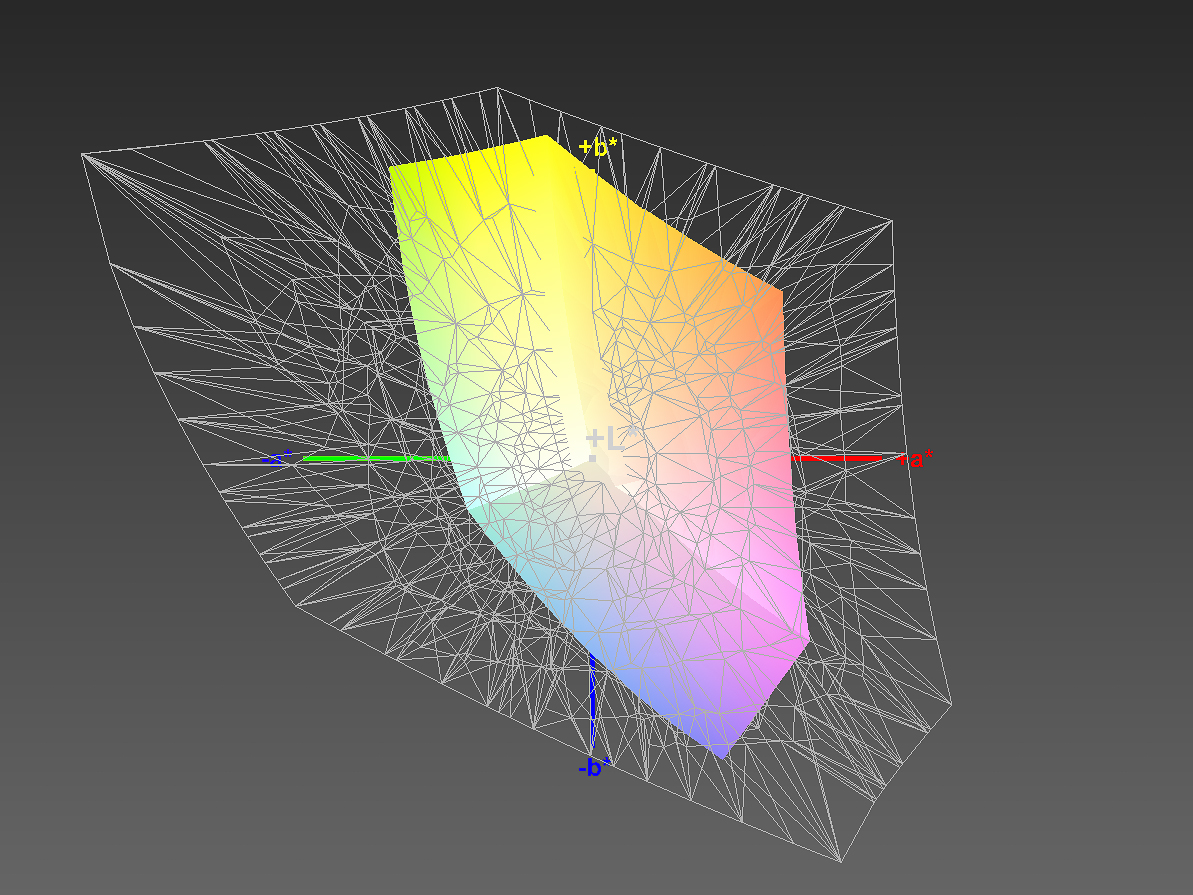
The two graphs below show the relatively small color gamut of a TN panel on a cheap laptop in comparison to the small sRGB and the much larger AdobeRGB color gamut.
Where can I get a matching monitor color profile?
Color profiles mostly come with the “icc” file extension and less often with the “icm” file extension. Premium desktop monitors are often shipped with a matching color profile out the box and if not, the manufacturer offers the necessary downloadable file on their support pages. The easiest way to find color profiles created by other users is to enter the exact model name, which can be discovered with tools such as HWiNFO if necessary, alongside some keywords like “color profile”, “icc” etc. on Google. Unfortunately, it is often difficult or even impossible to find a profile for the respective panel, especially with notebooks.
In the display section of our notebook reviews, we always provide a color profile which will improve the color reproduction in most cases on “identical” panels. You’ll be able to download it by clicking on the gray box.
Calibrating and profiling using a colorimeter
Due to manufacturing tolerances and the use of organic materials, no panel is exactly the same as the next one off the production line, so that pre-fabricated profiles or profiles created on other monitors of the same model don't usually offer the same color fidelity as a custom profile. Ambitious image editors who want to use such an individual profile will probably have to invest in a colorimeter. Appropriate equipment that isn't scrap can be purchased from around 100 Euros (~$118) upwards.
During the course of the service life of a monitor, parameters such as its brightness or color reproduction can change significantly enough that periodic recalibration and re-profiling is recommended. When using two different monitors, their color reproduction should ideally be as similar as technically possible.
Installing and assigning monitor profiles in Windows 10
If a suitable color profile is already available, it can be easily installed by double-clicking on the file or by right-clicking and selecting “Install profile”. A third and more convenient option in case you want to install multiple profiles at once would be to copy the files into the corresponding Windows system folder (C:Windows/System32/spool/drivers/color).
The fist pitfall is lurking here, because unfortunately there’s a little more to it than simply installing them. The profile needs to be assigned to the monitor, which is to be done in the extended color management utility in the control panel known from even before Windows Vista.
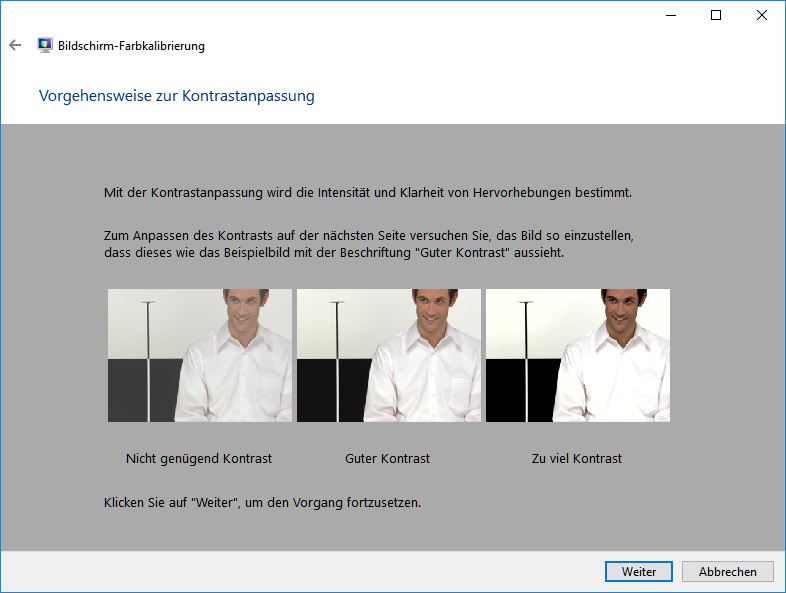
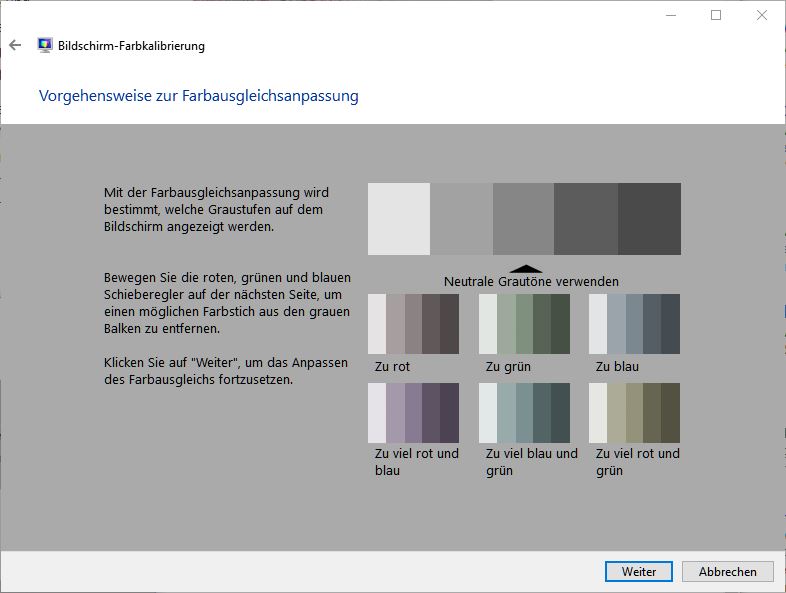
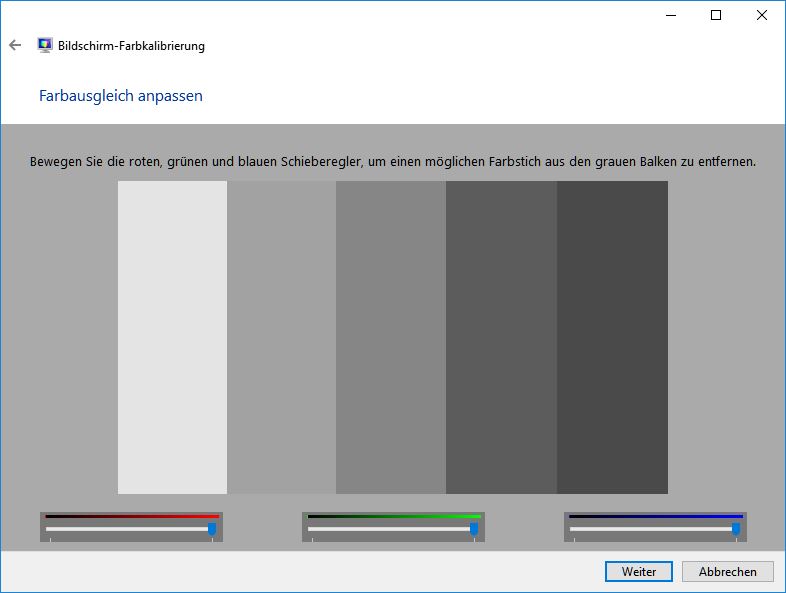
Doing a Windows system search with “Color…” might take you to the wrong destination (Figure 1). You’ll be more successful by trying “Color m…” or by getting there from the control panel (Figure 2). If two or more monitors with the same name are connected, you should first click on “Identify monitor” (Figure 3) and then make sure the monitor to which you want to assign the profile to is also selected in the pull-down menu. Click to enlarge the images below.

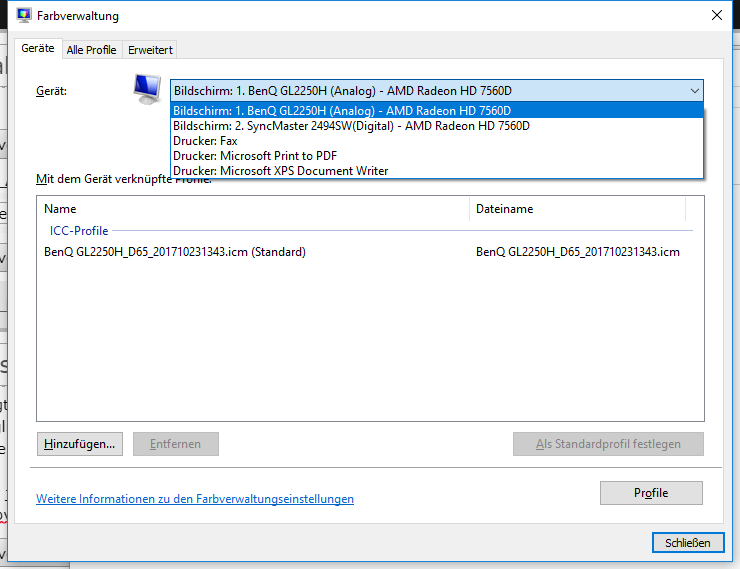
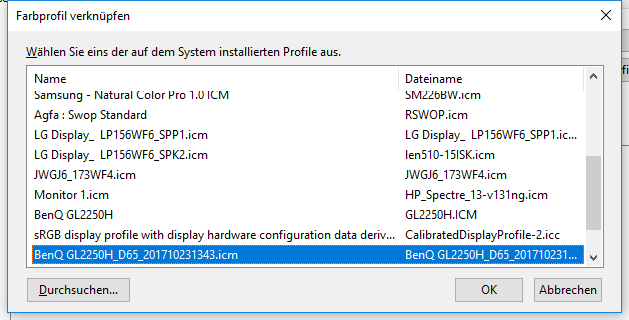
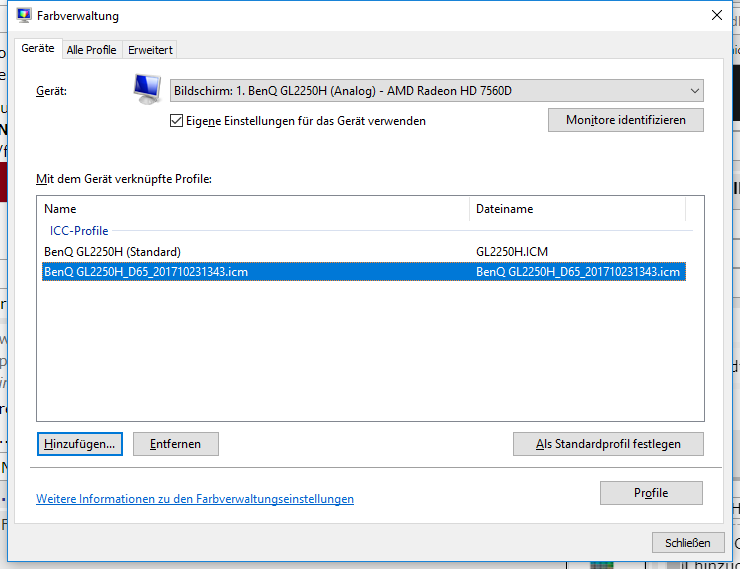
If necessary, check the box “Use my settings for this device” (Figure 3). The newly installed monitor profile can’t be selected in the list just yet (Figures 3 and 4), since it first needs to be added to the selection. After a click on the corresponding button, all available color profiles appear (Figure 5) out of which you need to choose the right one. It will appear in the selection where it is automatically highlighted (Figure 6). Now you can set the profile as the default profile for the corresponding monitor. Repeat these steps for multiple monitors if necessary.
Unnecessary or obsolete profiles are better off being deleted for the sake of clarity. They will not get deleted irreversibly from the system and can hence be added to the selection if necessary.
Verification of the assignment and further solutions
Once you are done with assigning the profiles, the color reproduction of the corresponding monitor should change noticeably. Unfortunately, visually verifying the color accuracy doesn’t work reliably if the new profile doesn’t differ much from the old one or if the new one is very similar to the default sRGB profile. To make sure that the new profile is actually activated, you could download an intentionally wrong profile with a very pronounced color cast, assign it to the monitor and see if the colors changed accordingly. If they did, you can be certain that the other one works, as well.
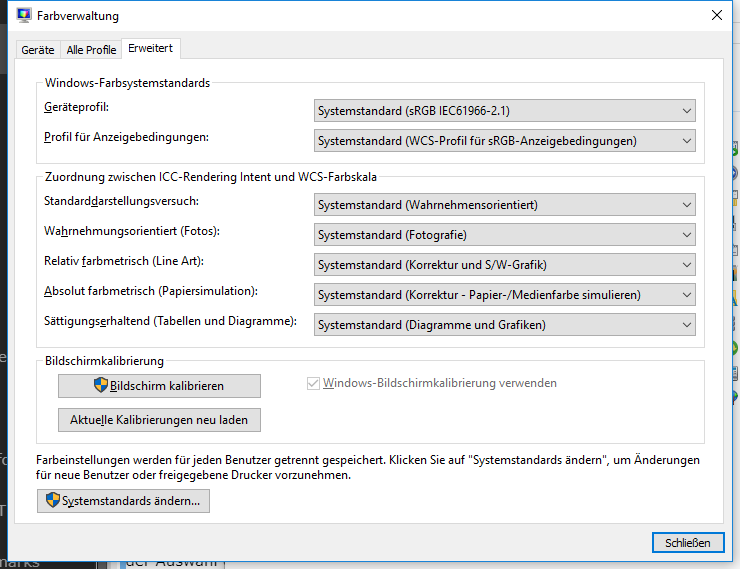
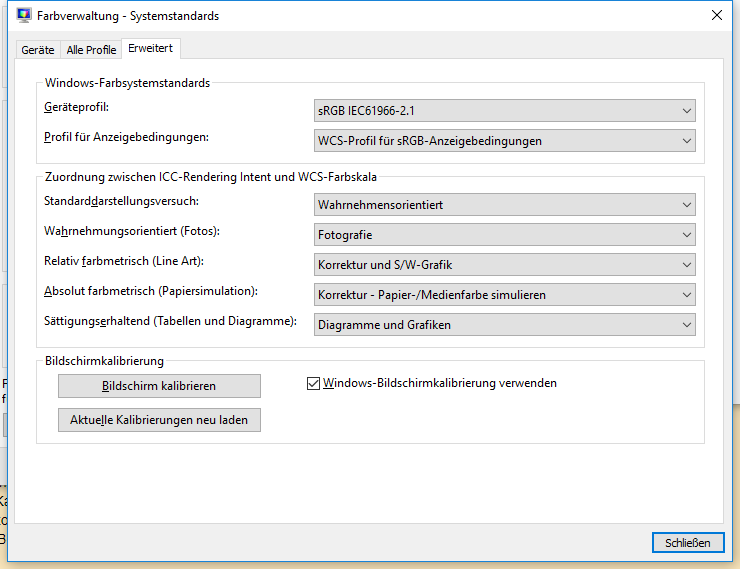
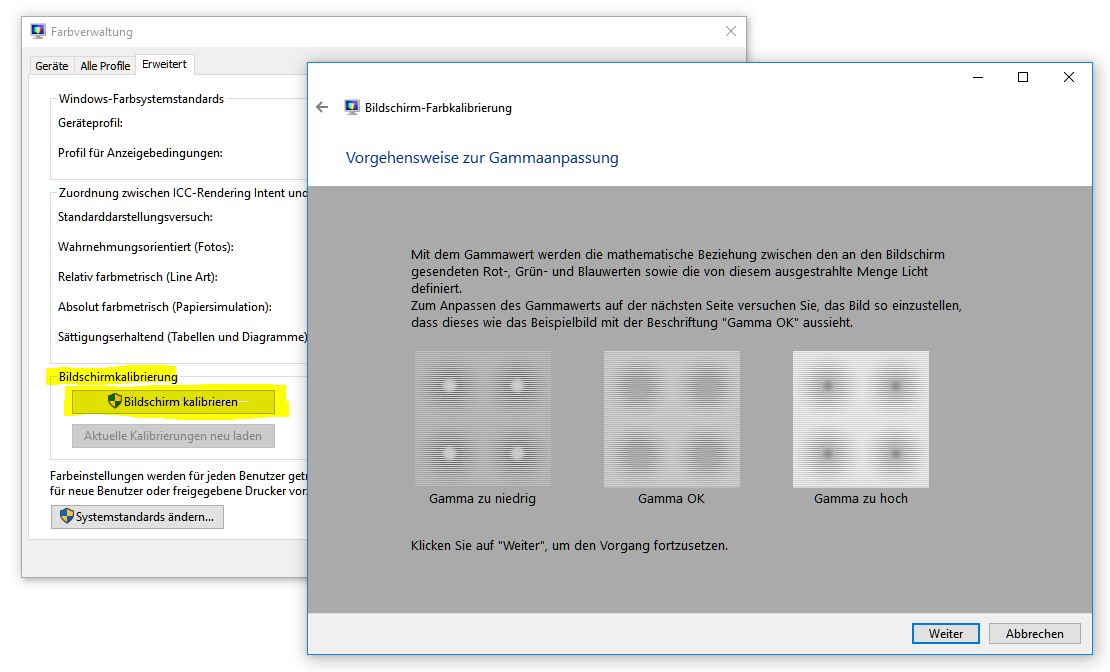
If this whole procedure doesn’t lead to the desired success, another well-hidden setting must be checked, which can only be changed as administrator. To do this, select the “Advanced” tab (Figure 7) in the color management tool and make sure that the “sRGB IEC61966-2.1” profile is selected, which is usually the case. It is recommended not to change any other settings. What is important is the button “Change system defaults”, which leads you to “Color management – system defaults” (Figure 8) where you need to go to the “Advanced” tab, again. On the bottom right there’s a checkbox called “Use Windows display calibration”. Tick it.
Problem: Color profile is not transferred
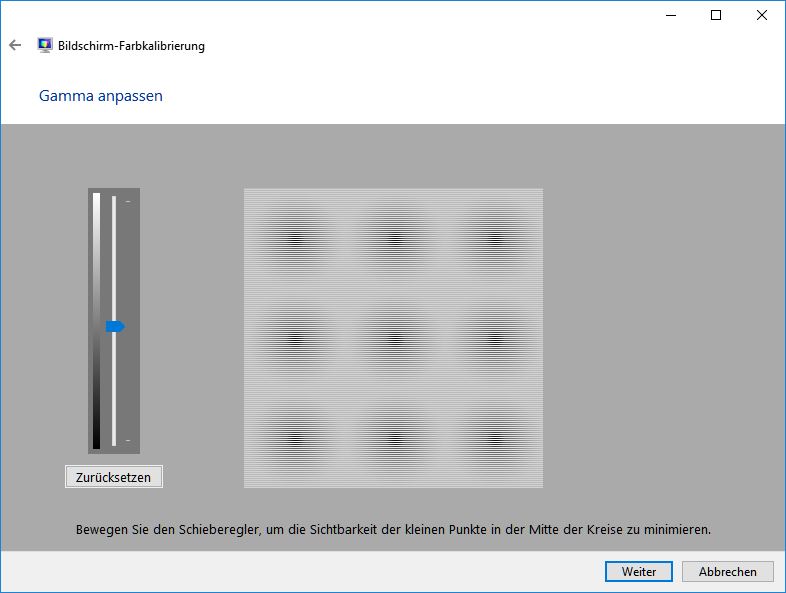
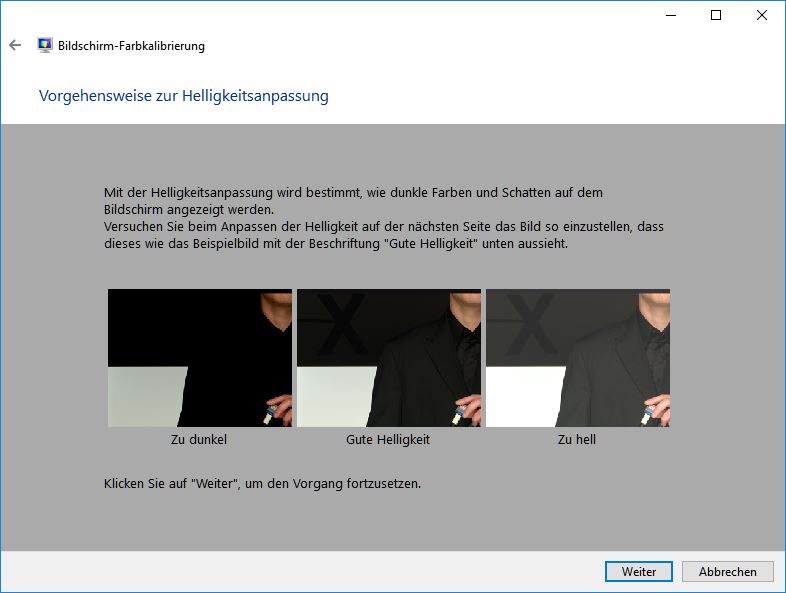
In our experience, Windows doesn’t always apply the assigned color profiles despite our previous efforts. In this case, it could help to go through Windows’ own screen calibration tool, which you can find in the “Advanced” tab in the color management utility or by typing “Calibration…” into the Windows system search.
A common source of error is that users are playing around with the function "Second screen only", which can be accessed via Windows + P. If two monitors are connected, they should both be active before assigning profiles and both should be supplied with image content from the graphics card via the "Duplicate" or "Extend" settings. Failure to do so can cause misallocations if the configuration changes after the profile assignment.

Fix color and quality issues with desktop wallpapers
Windows doesn’t apply any color management to the desktop wallpaper or the lock screen and reduces the JPG quality to 85% by default for faster loading times. This may lead to inaccurate color reproduction. Moreover, the reduced JPG quality may lead to tonal value or brightness gradients breaks, which is referred to as “banding”.
The first issue can be circumvented by converting the wallpaper image into the monitor’s color space with image-processing software such as Adobe Photoshop. Attention: It doesn’t help to assign the monitor profile to the file, which would be ignored by Windows anyway, and instead, the file itself needs to be converted into the correct color values.
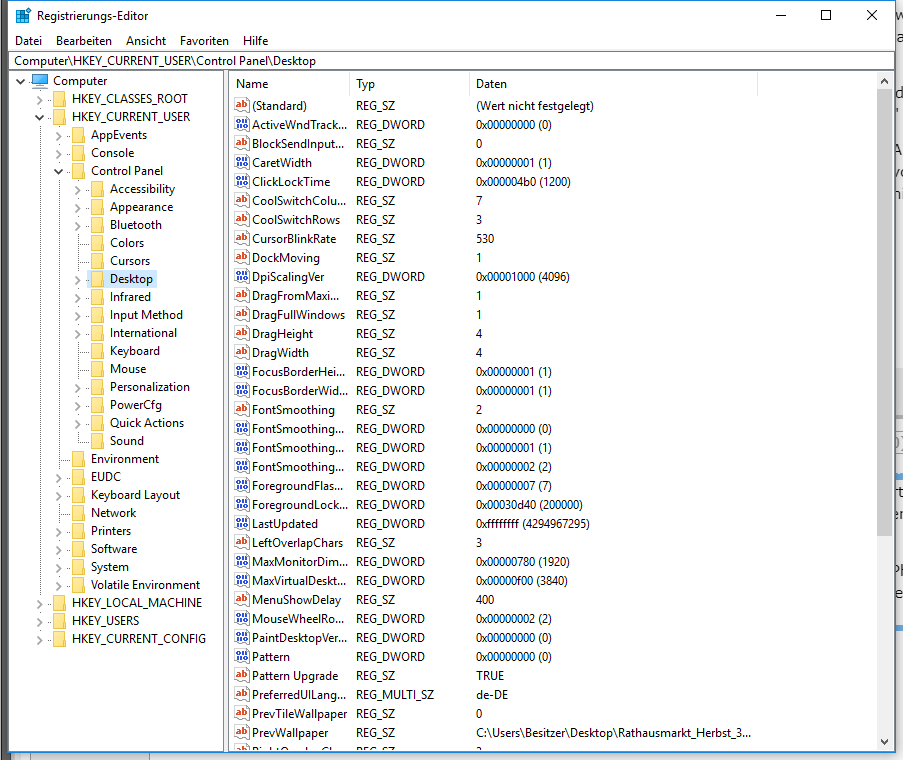
The JPG issue can be circumvented with a registry hack, which forces the system to display wallpapers in full JPG quality. To achieve this, a new 32-bit-DWORD entry called “JPEGImportQuality” with a decimal value of 100 needs to be created within the registry editor under HKEY_CURRENT_USERControl PanelDesktop. If the DWORD is already there, simply adjust the value. In 64-bit systems, the 32-bit DWORD is still the correct one. Before any changes are made in the registry, we advise you to save a backup of the changed file. If this seems a little too much trouble, you could also simply save your image file in a lossless DNG format with the conversion into the monitor color space and select that one.
