Testing the Anycubic Kobra Max 3D Printer: One huge printer for large 3D objects
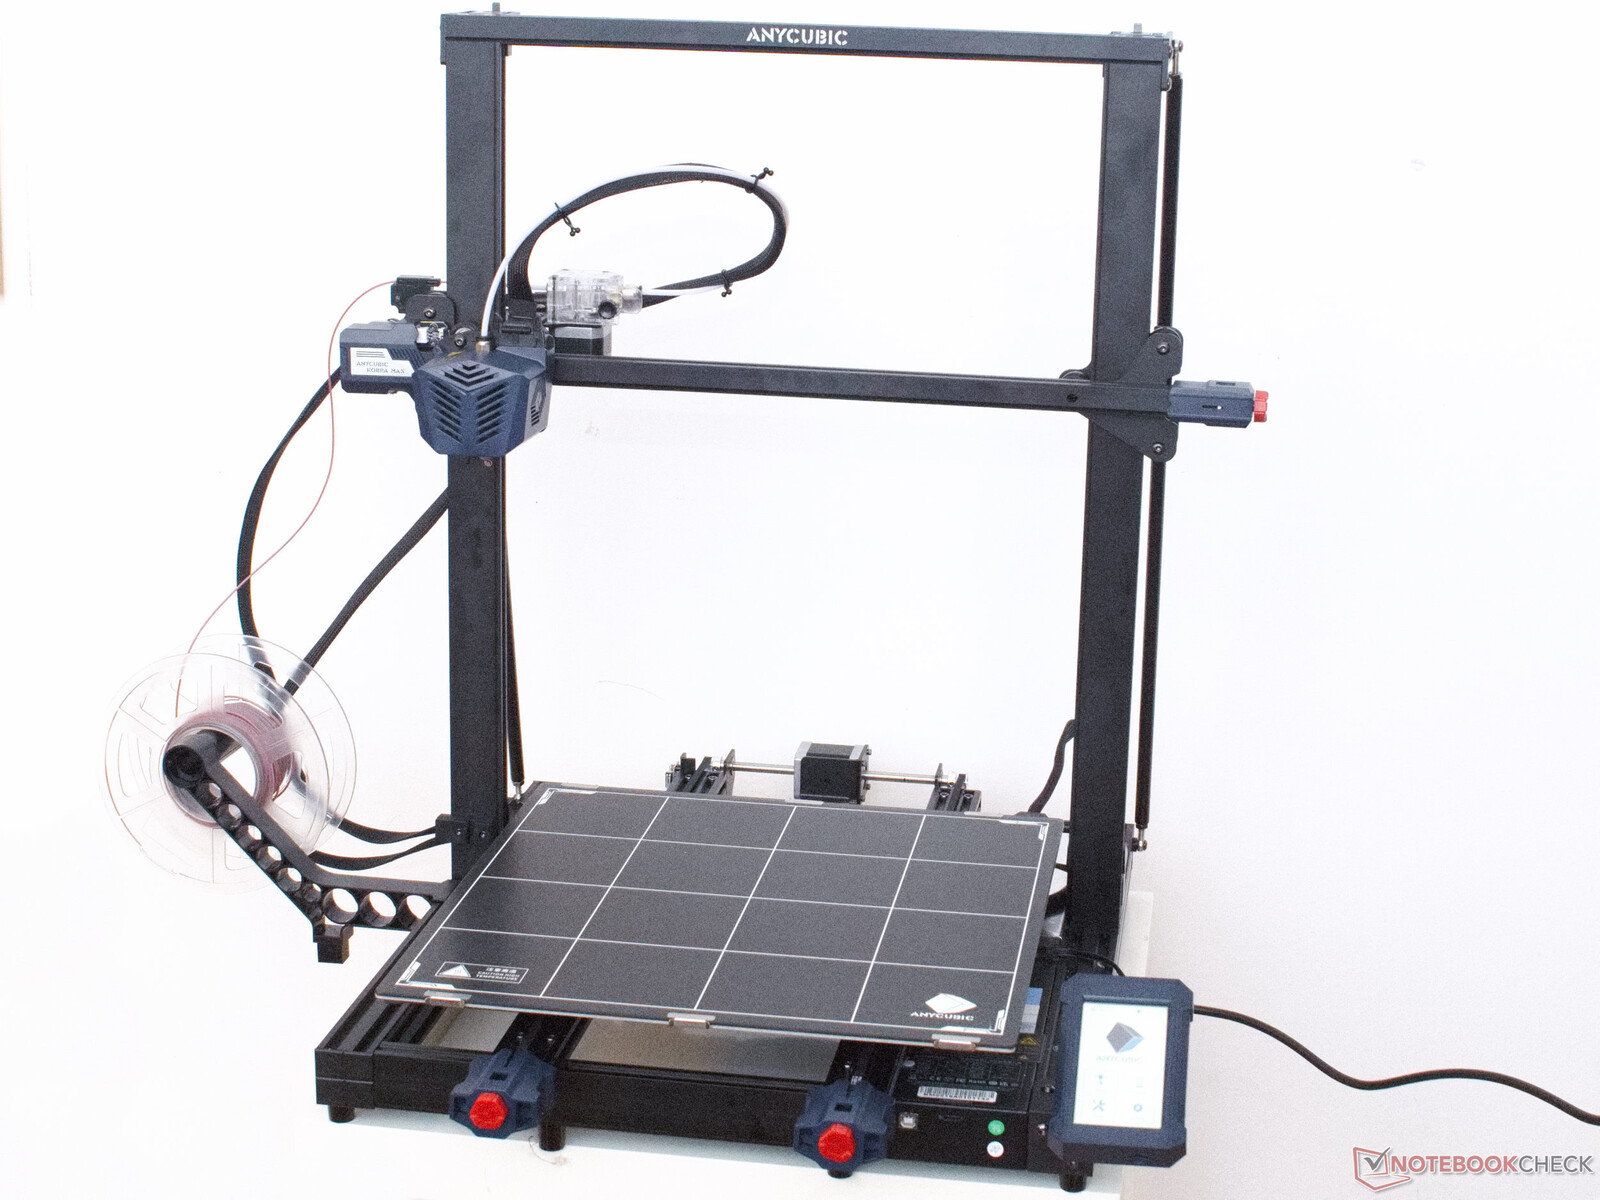
Anycubic is announcing five new 3D printers in the second quarter of 2022. One of these is the Anycubic Kobra Max. This huge 3D printer lives up to its name with its 15.75 in x 15.75 in x 17.72 in (400 mm × 400 mm × 450 mm) build volume. Apart from its size, this 3D printer offers some special features. For example, as with the earlier Viper model, a load cell is used for automatic mesh bed leveling.
Our testing shows that the Kobra Max can deliver reasonable print speeds while delivering commensurate quality when a few parameter settings are tuned to the job at hand. But at US$569 it’s not only its physical size that leaves an impression. And because of its size its energy consumption is also relatively high.
At least in terms of size, the Anycubic Kobra Max is a direct successor to the Chiron, while the technology itself tends to be based on the newer Anycubic Viper model. Thus, the category of large volume 3D printers has a newcomer with the latest technology in its ranks.
Specifications
It is not hard to discern the Viper as the Kobra Max’s predecessor and apart from size-related adjustments, there are few changes to the basic design of this printer. However, the PEI-coated spring steel build platform has been replaced with one made of glass with a silicon carbide coating.
| Anycubic Kobra Max | |
|---|---|
| Underlying Technology | FDM, FFF |
| 3D print size limit | 400 mm × 400 mm × 450 mm ≅ 72 L (1ft 3¾ in x 1ft 3¾ in x 1' 5 11/16 in, approx. 2 ½ cu ft) |
| Dimensions excl. power lead | 80 cm × 83 cm × 72 cm (2ft 7 ½ in x 2ft 8 11/16 in x 2ft 4 3/8 in) |
| Kinematics | Prusa/Mendel XYZ calibration |
| Extruder | Bowden dual gear extruder with a Volcano hotend |
| System board Microcontroller | Trigorilla Pro A V1.0.4 Board HDSC hc32f460 |
| Firmware on supplied test unit | Anycubic Kobra Firmware (Marlin Derivate) GCode-Compatible |
| Stepper Motor Driver | 1/256 step interpolation stepper driver with soldered pinheaders |
| Ports | micro SD, USB Type B |
| Controller | internal touchscreen (serial connect via USB) |
| Power supply | internal 110 V - 240 V to 24 V power supply |
| Manufacturer’s website | Anycubic |
Assembly and Setup
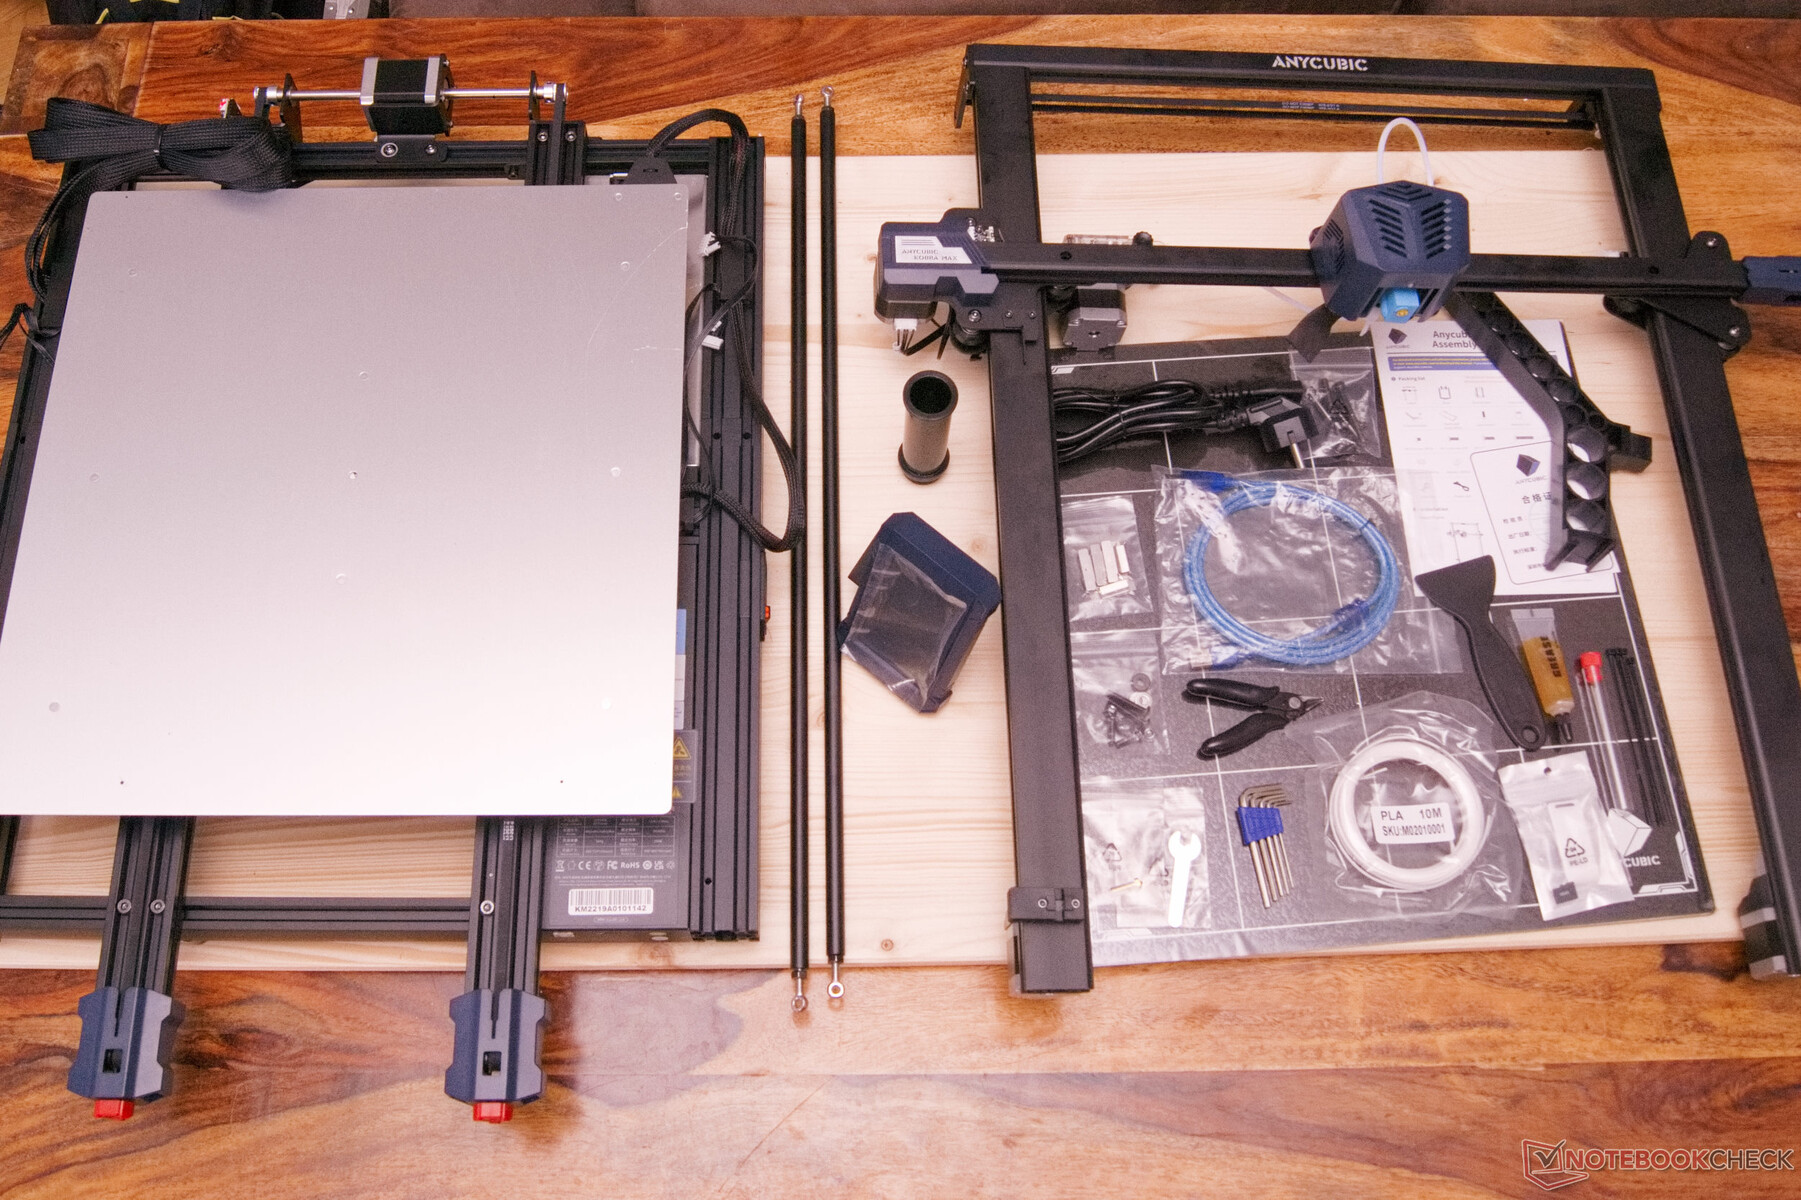
The large 3D printer is delivered by Anycubic in an appropriately large cardboard box. It contains all the tools needed for assembly as well as some spare parts. Although the Kobra Max has not been overly disassembled, you should take your time when assembling it. Due to the large size of this 3D printer almost every single part is somewhat unwieldy, and you should allow for a total of one hour for the assembly and initial setup. As the frame is screwed to the base, it has two pendulum support stabilizers. To avoid twisting the structure it is particularly important to ensure that these stabilizers sit loosely before tightening the mounting screws. There are some open questions around the printer’s cable routing as Anycubic assembly instructions are not yet very accurate. Even with clear instructions on which plug goes into which socket our test assembly gives a decidedly untidy impression.
The assembled printer weighs well over 20 kg (44 lbs), so you should decide where to place it before setting it up. Due to the size of the Kobra Max, moving the unit even small distances is not that easy especially since the over two and half foot wide printer may have difficulty fitting through a normal door frame.
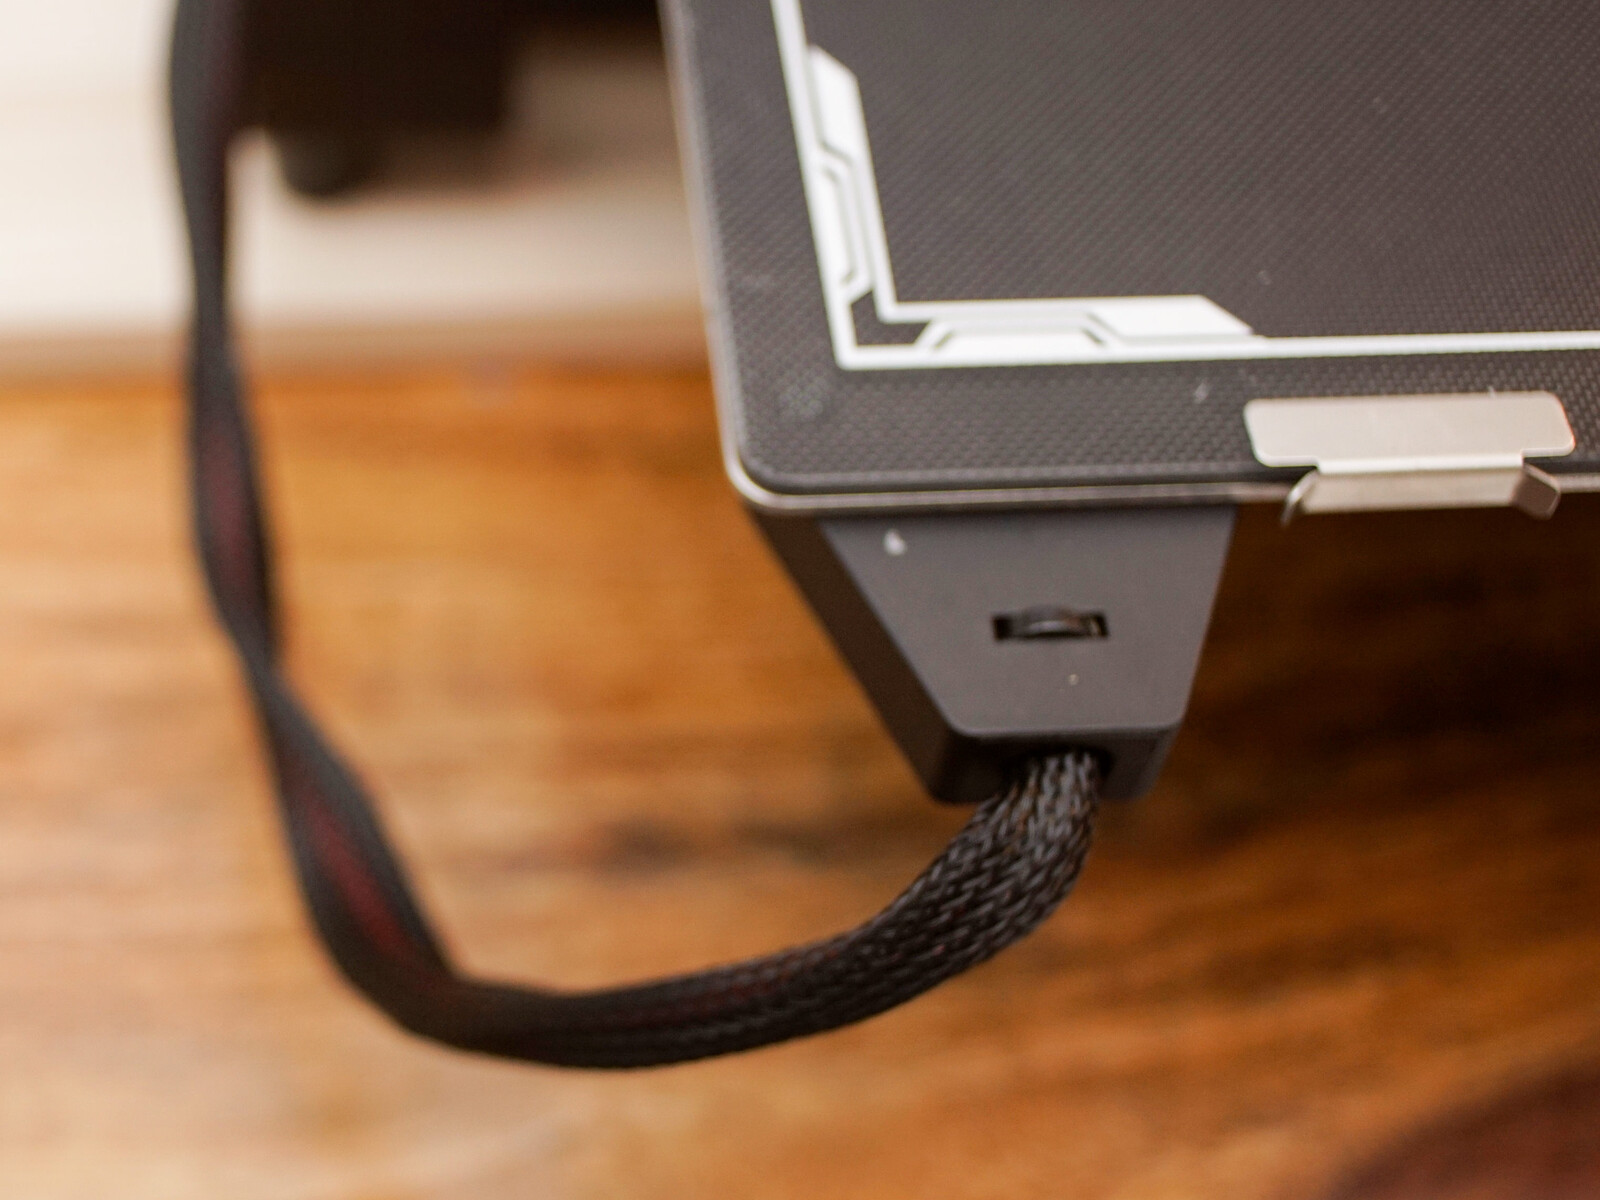
Cable management
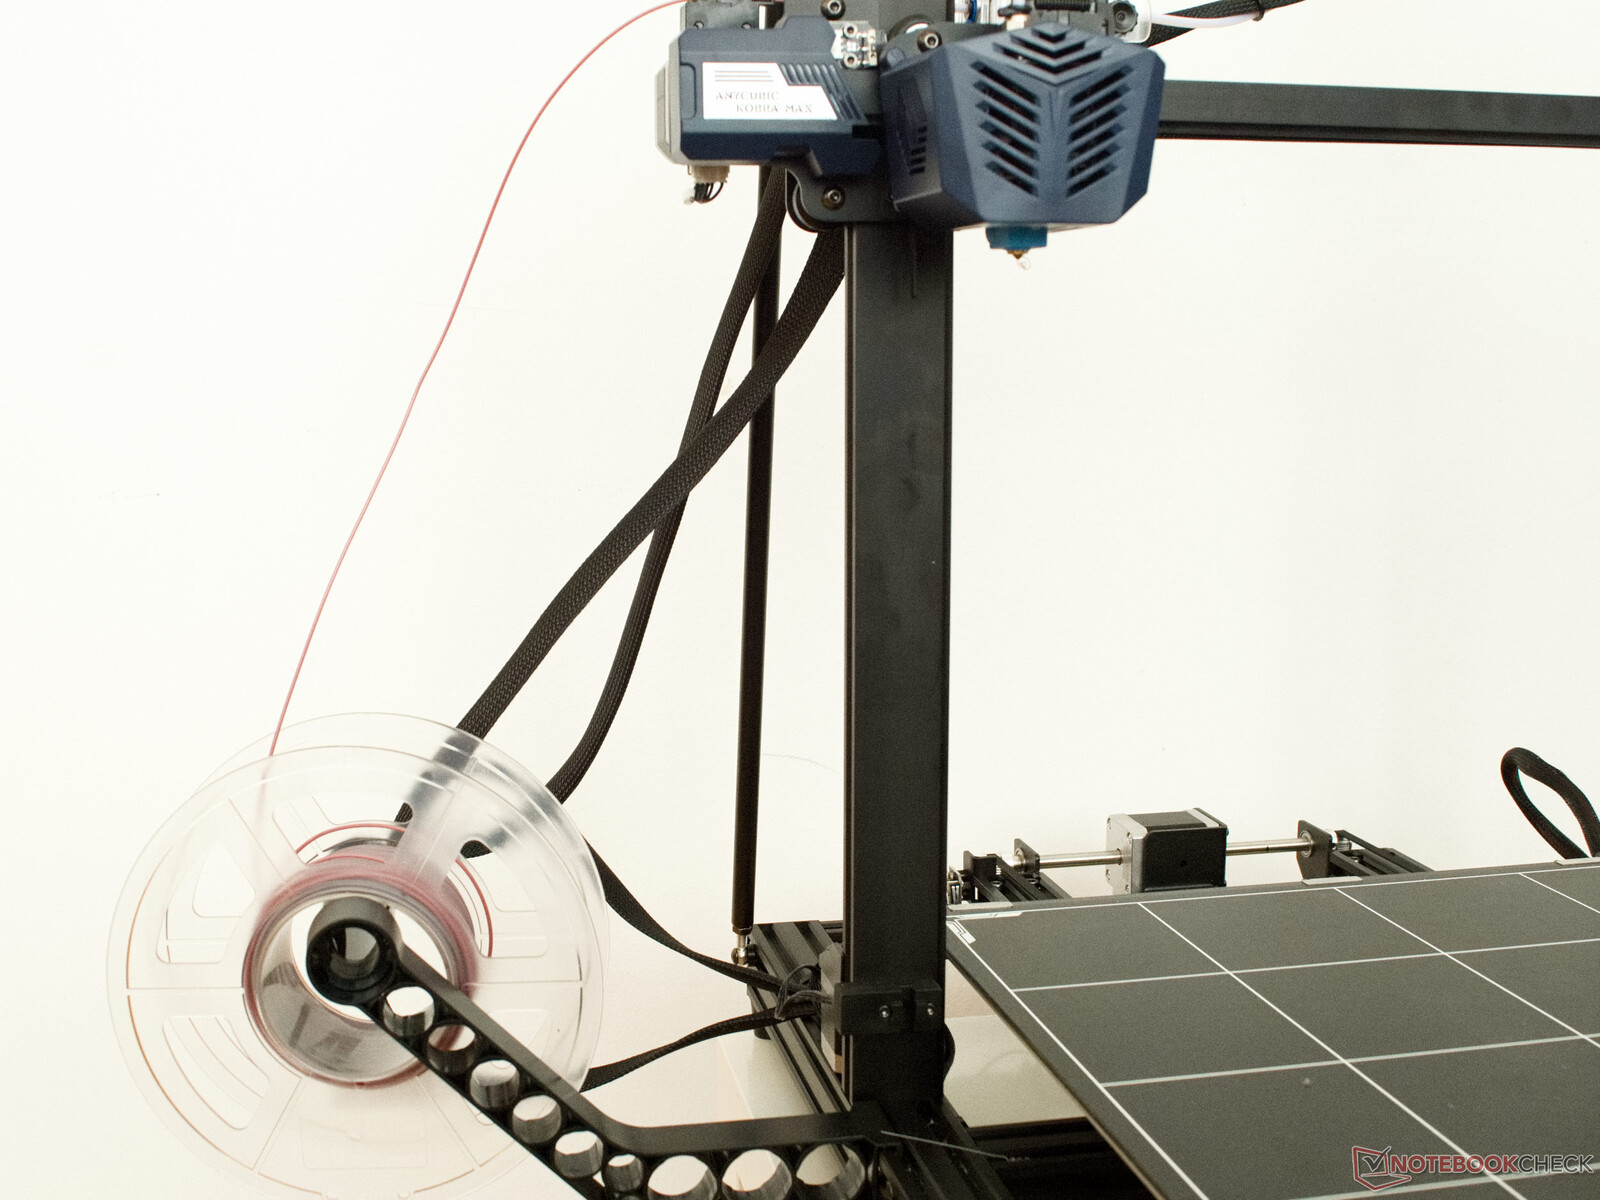
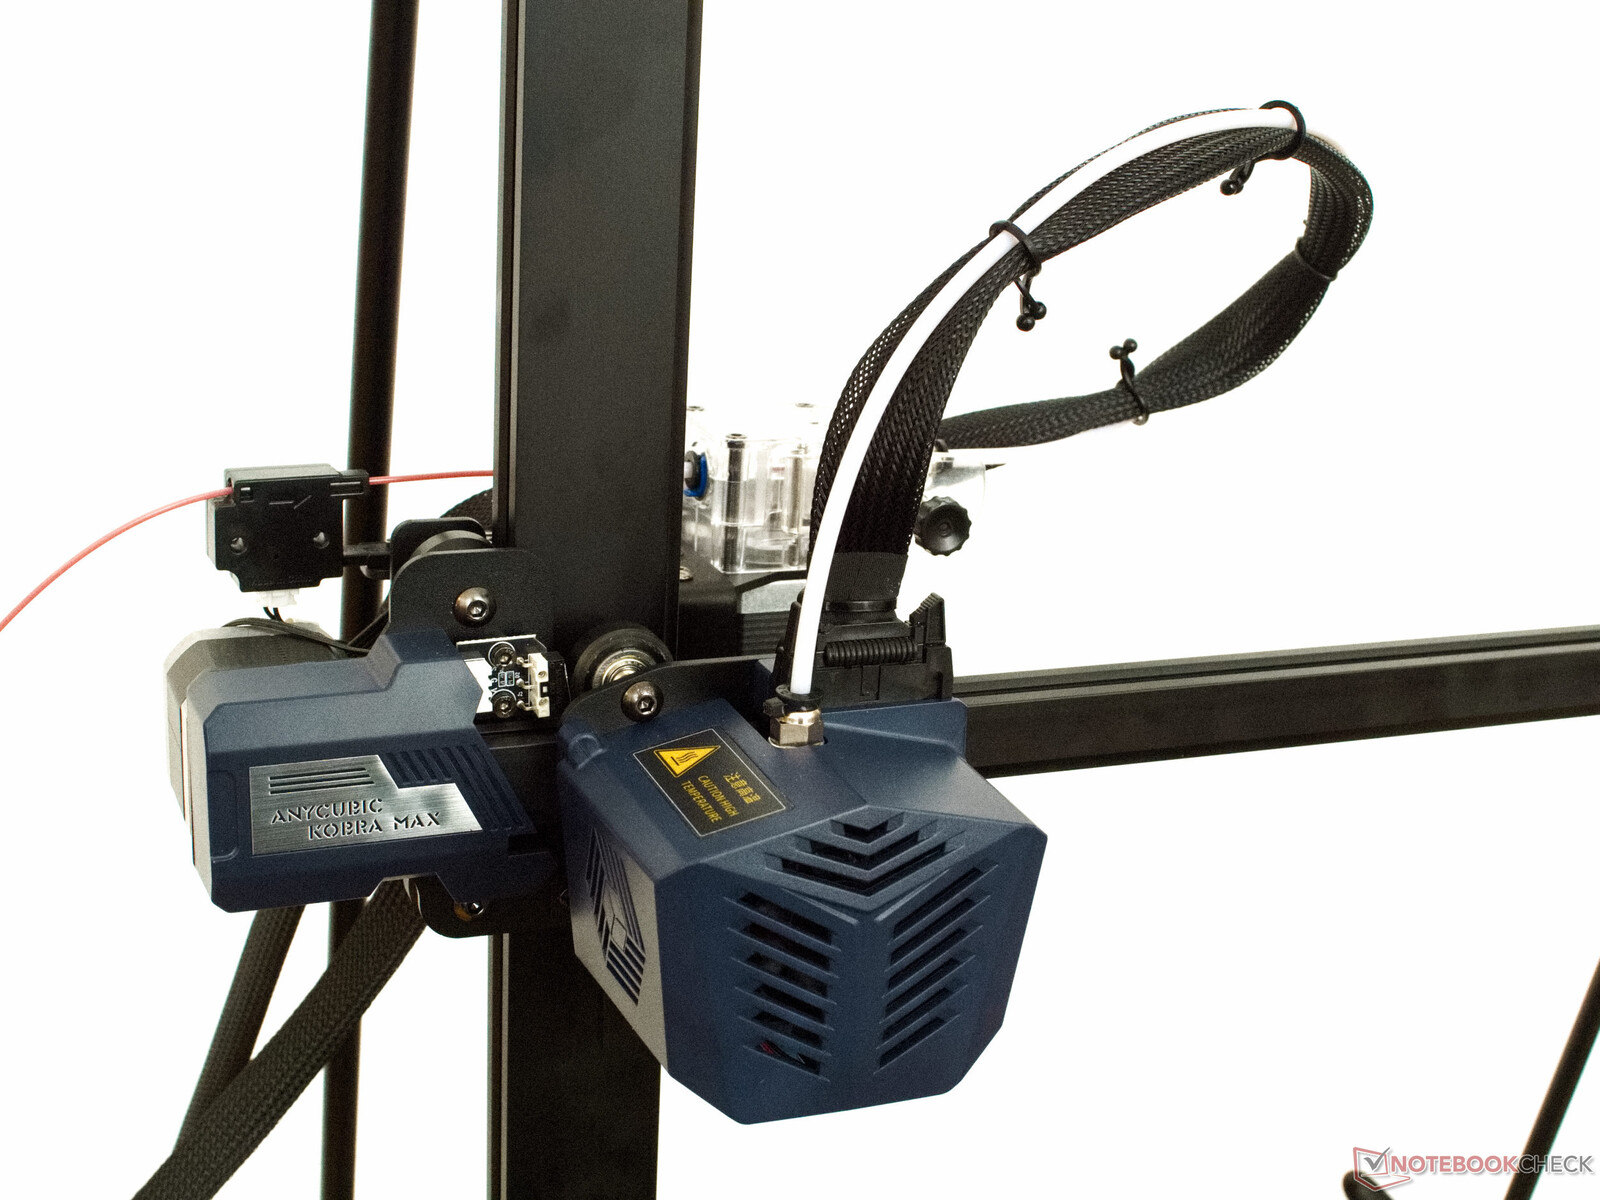
While it still looks relatively tidy under the covers, this 3D printer lacks a good way of ducting the cables to the print head and the X-drive. The two strands of cable just hang loosely down either side of the Kobra Max and the cable strand to the print bed seems somewhat short. Also, when working the rear of the print bed the cables don’t seem to have the latitude required to manoeuvre. Over time this could lead to cable damage. There’s also no conduit for the cables that connect to the touchscreen. In summary, we’d be looking for improved cable ducting for all cables emanating from the base of the unit.
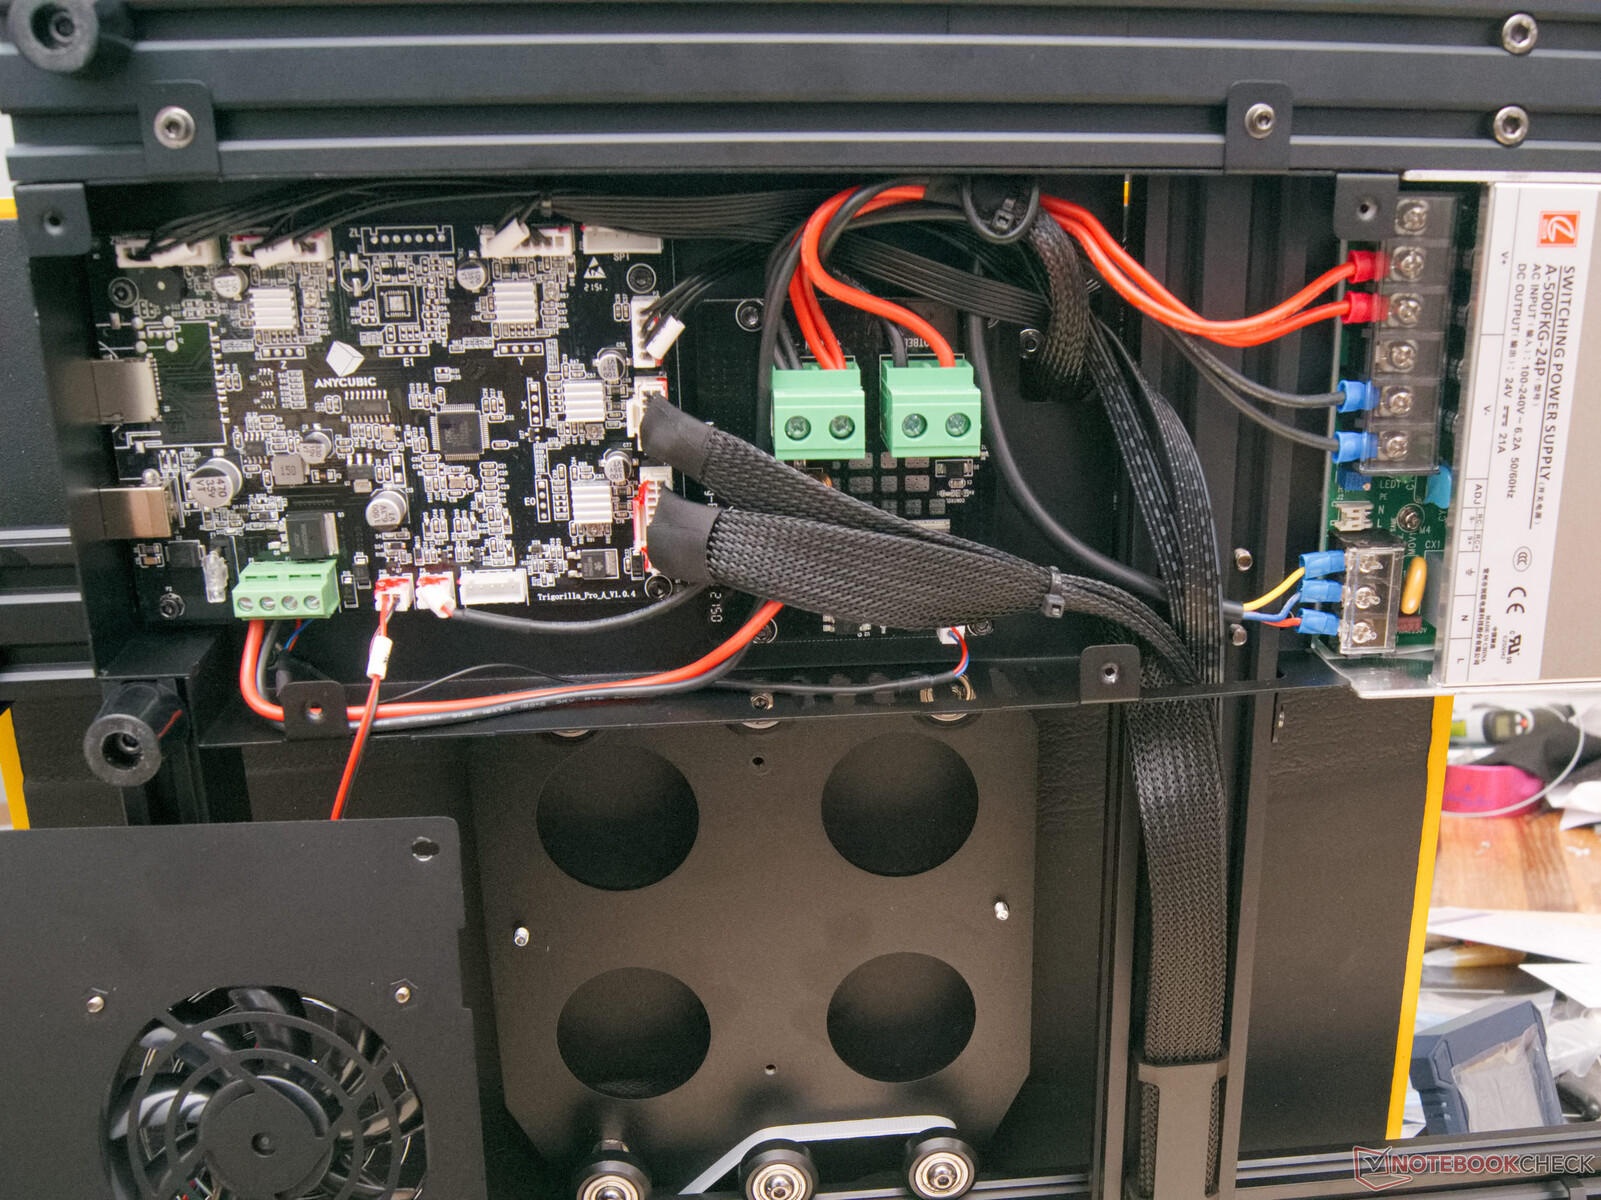
The Mainboard
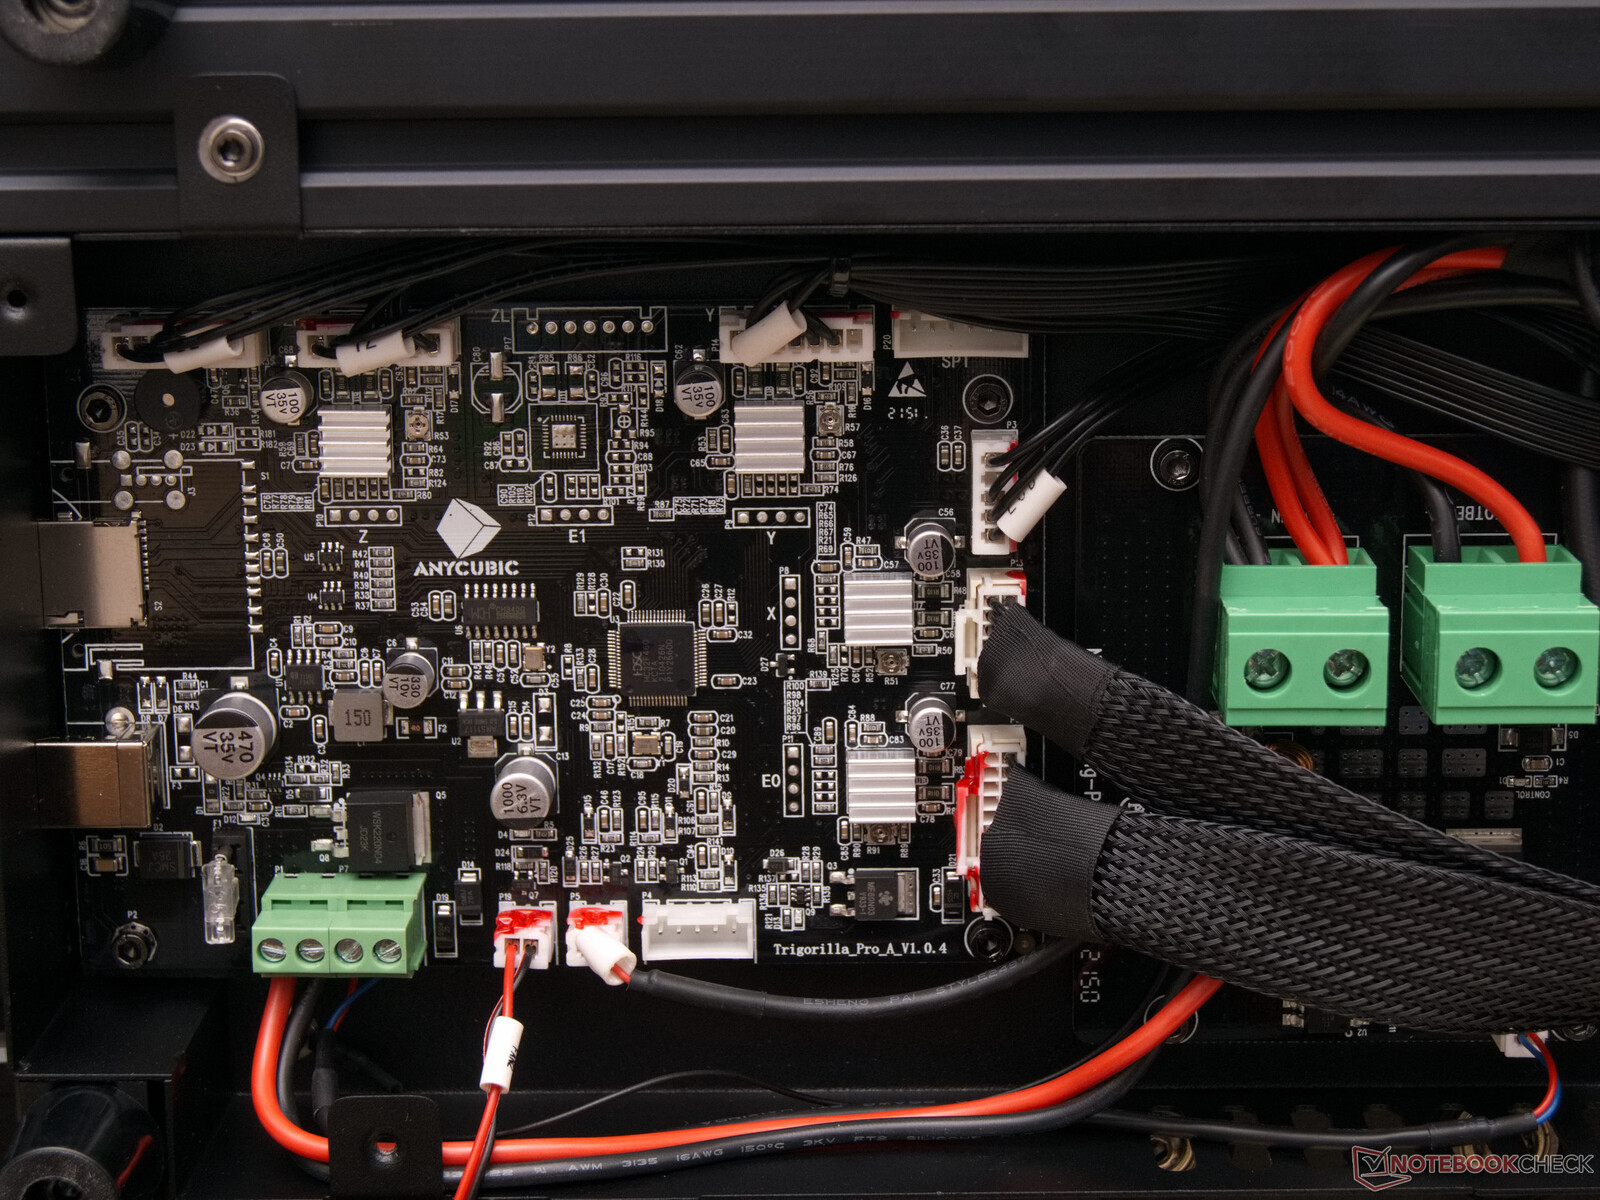
The Anycubic Trigorilla Pro A V1.0.4 board comes with just bare minimum connectivity. Upgrade options for DIYers are simply not provided. It is just not possible to determine exactly which stepper motor drivers are hidden behind the soldering and cooling unit that are wrapped around them.
The microcontroller is an HDSC hc32f460. Its 32-bit chip with a Cortex-M4-CPU runs at 200 MHz and provides an abundance of computational power. To avoid overloading the components of the Trigorilla system boards – its printer bed requires high amperage – the Kobra Max has its own external power control unit.
3D Printer Frame
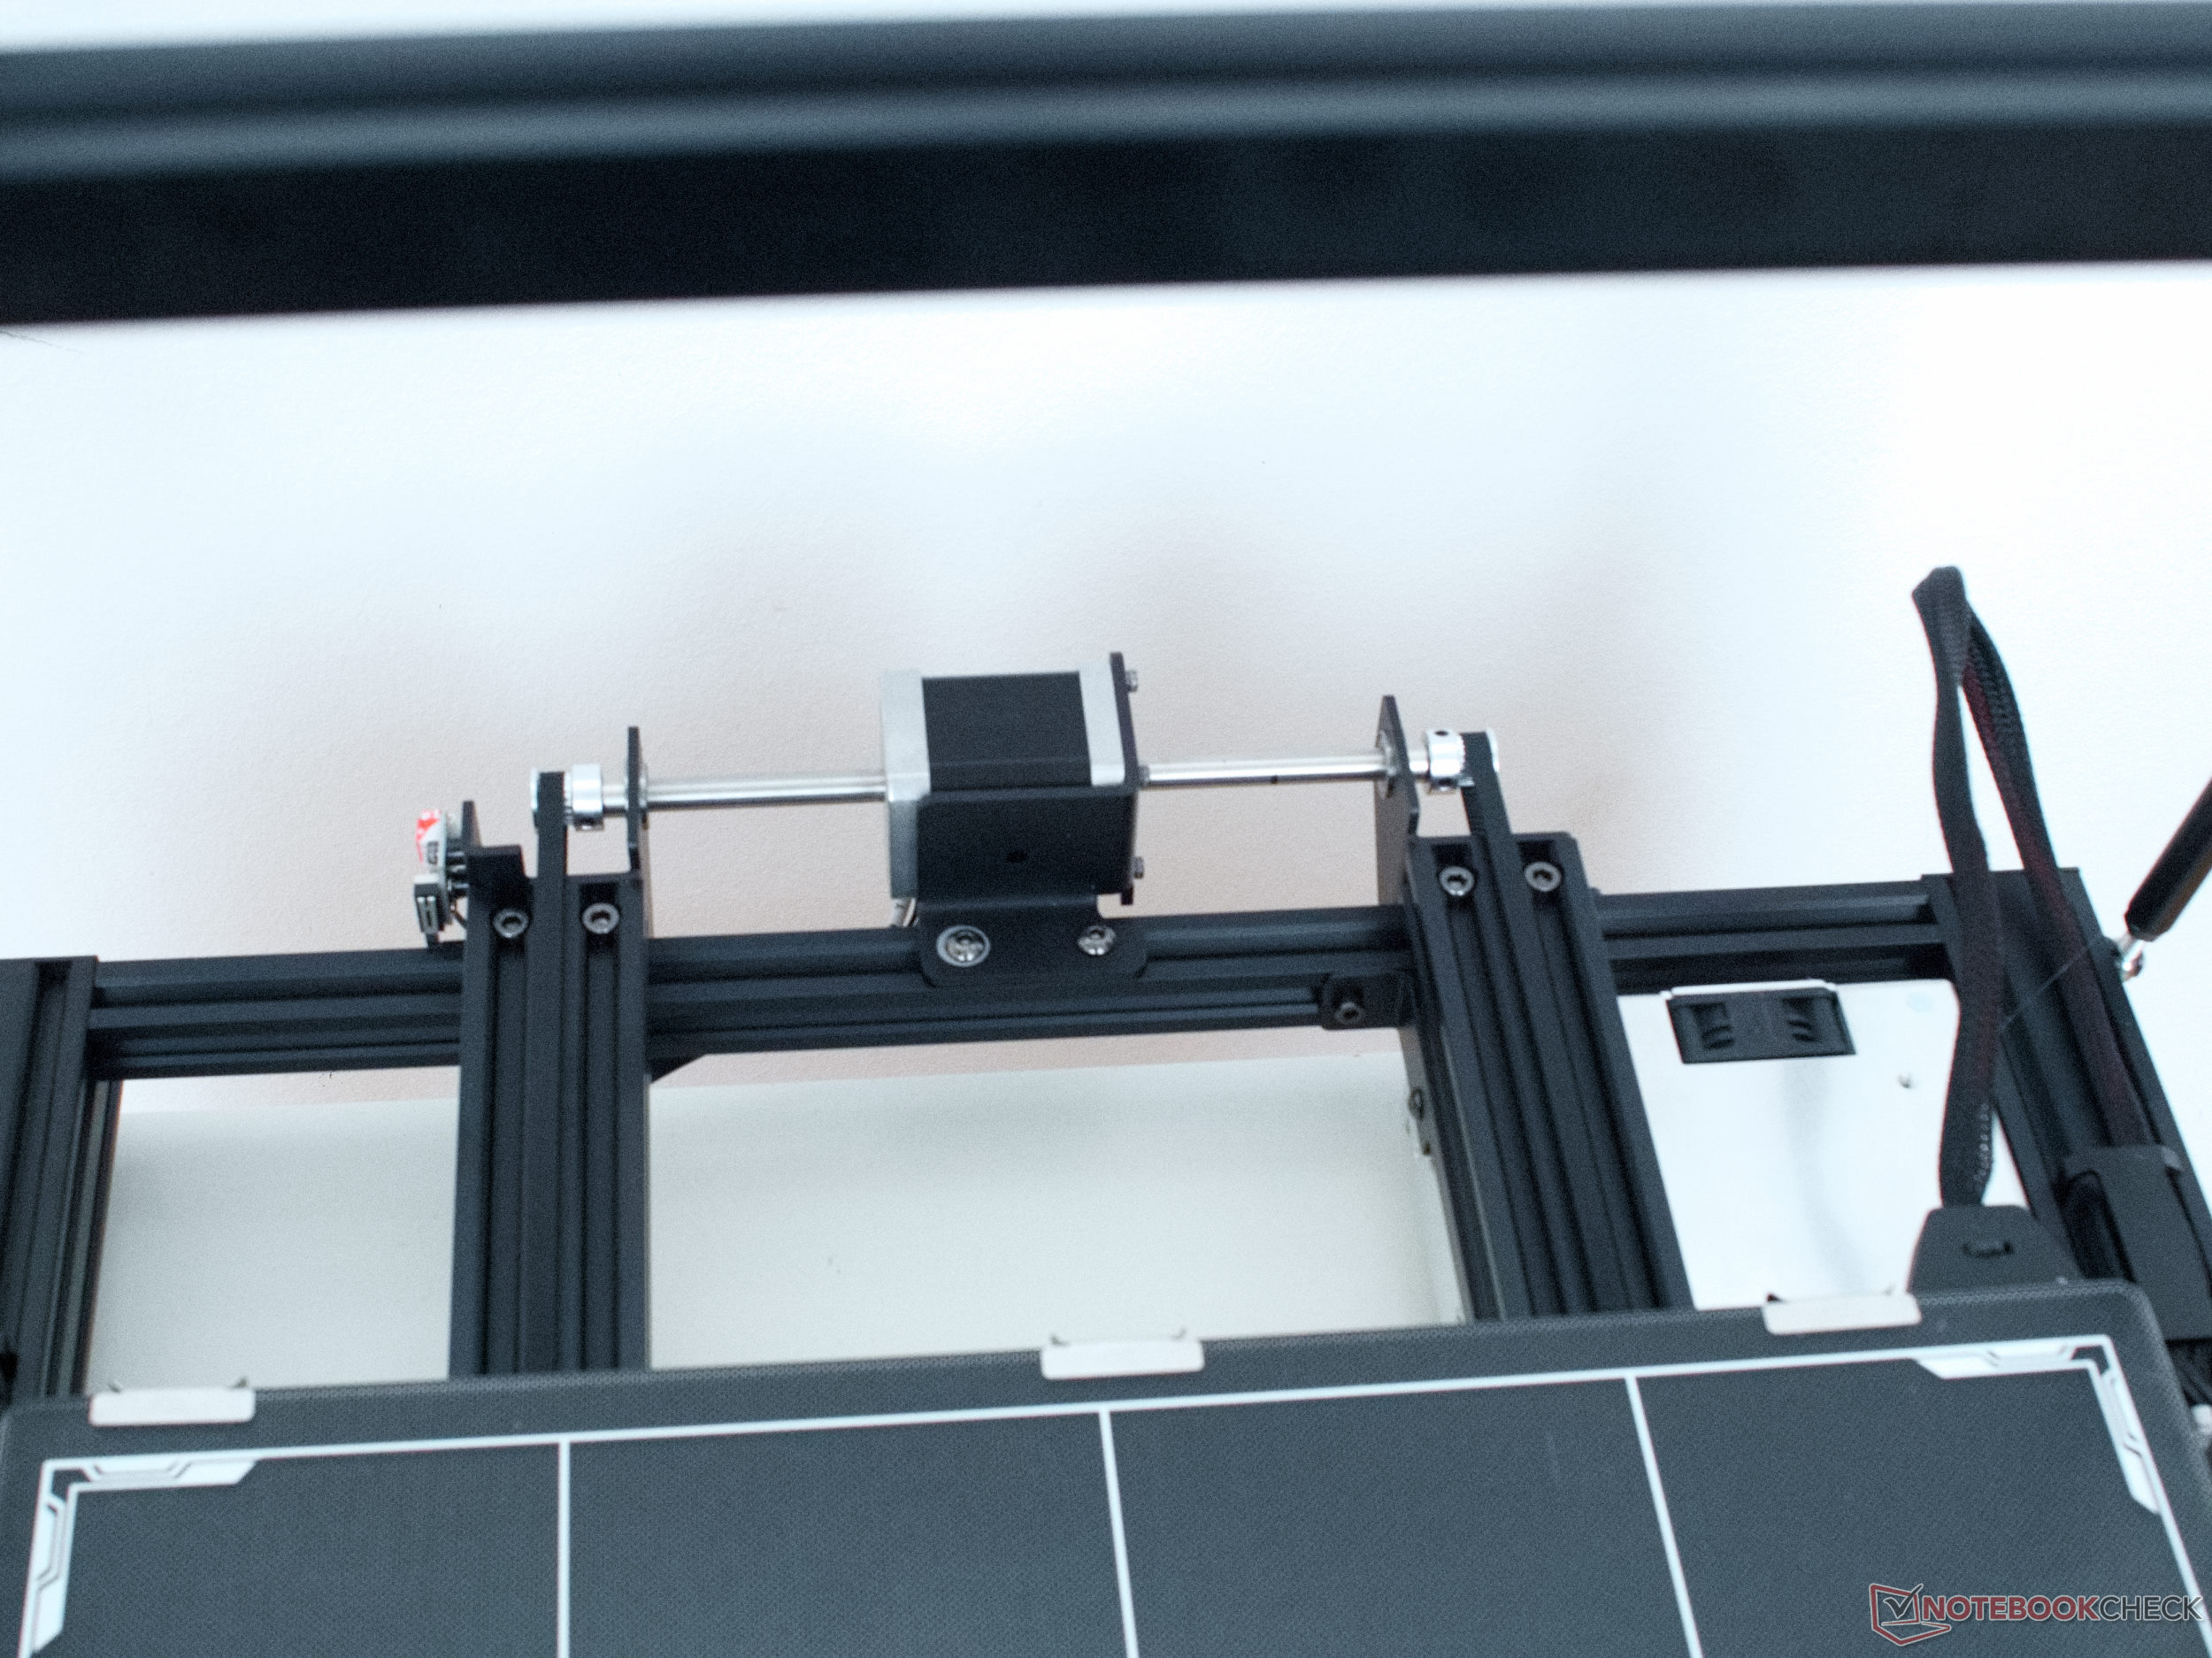
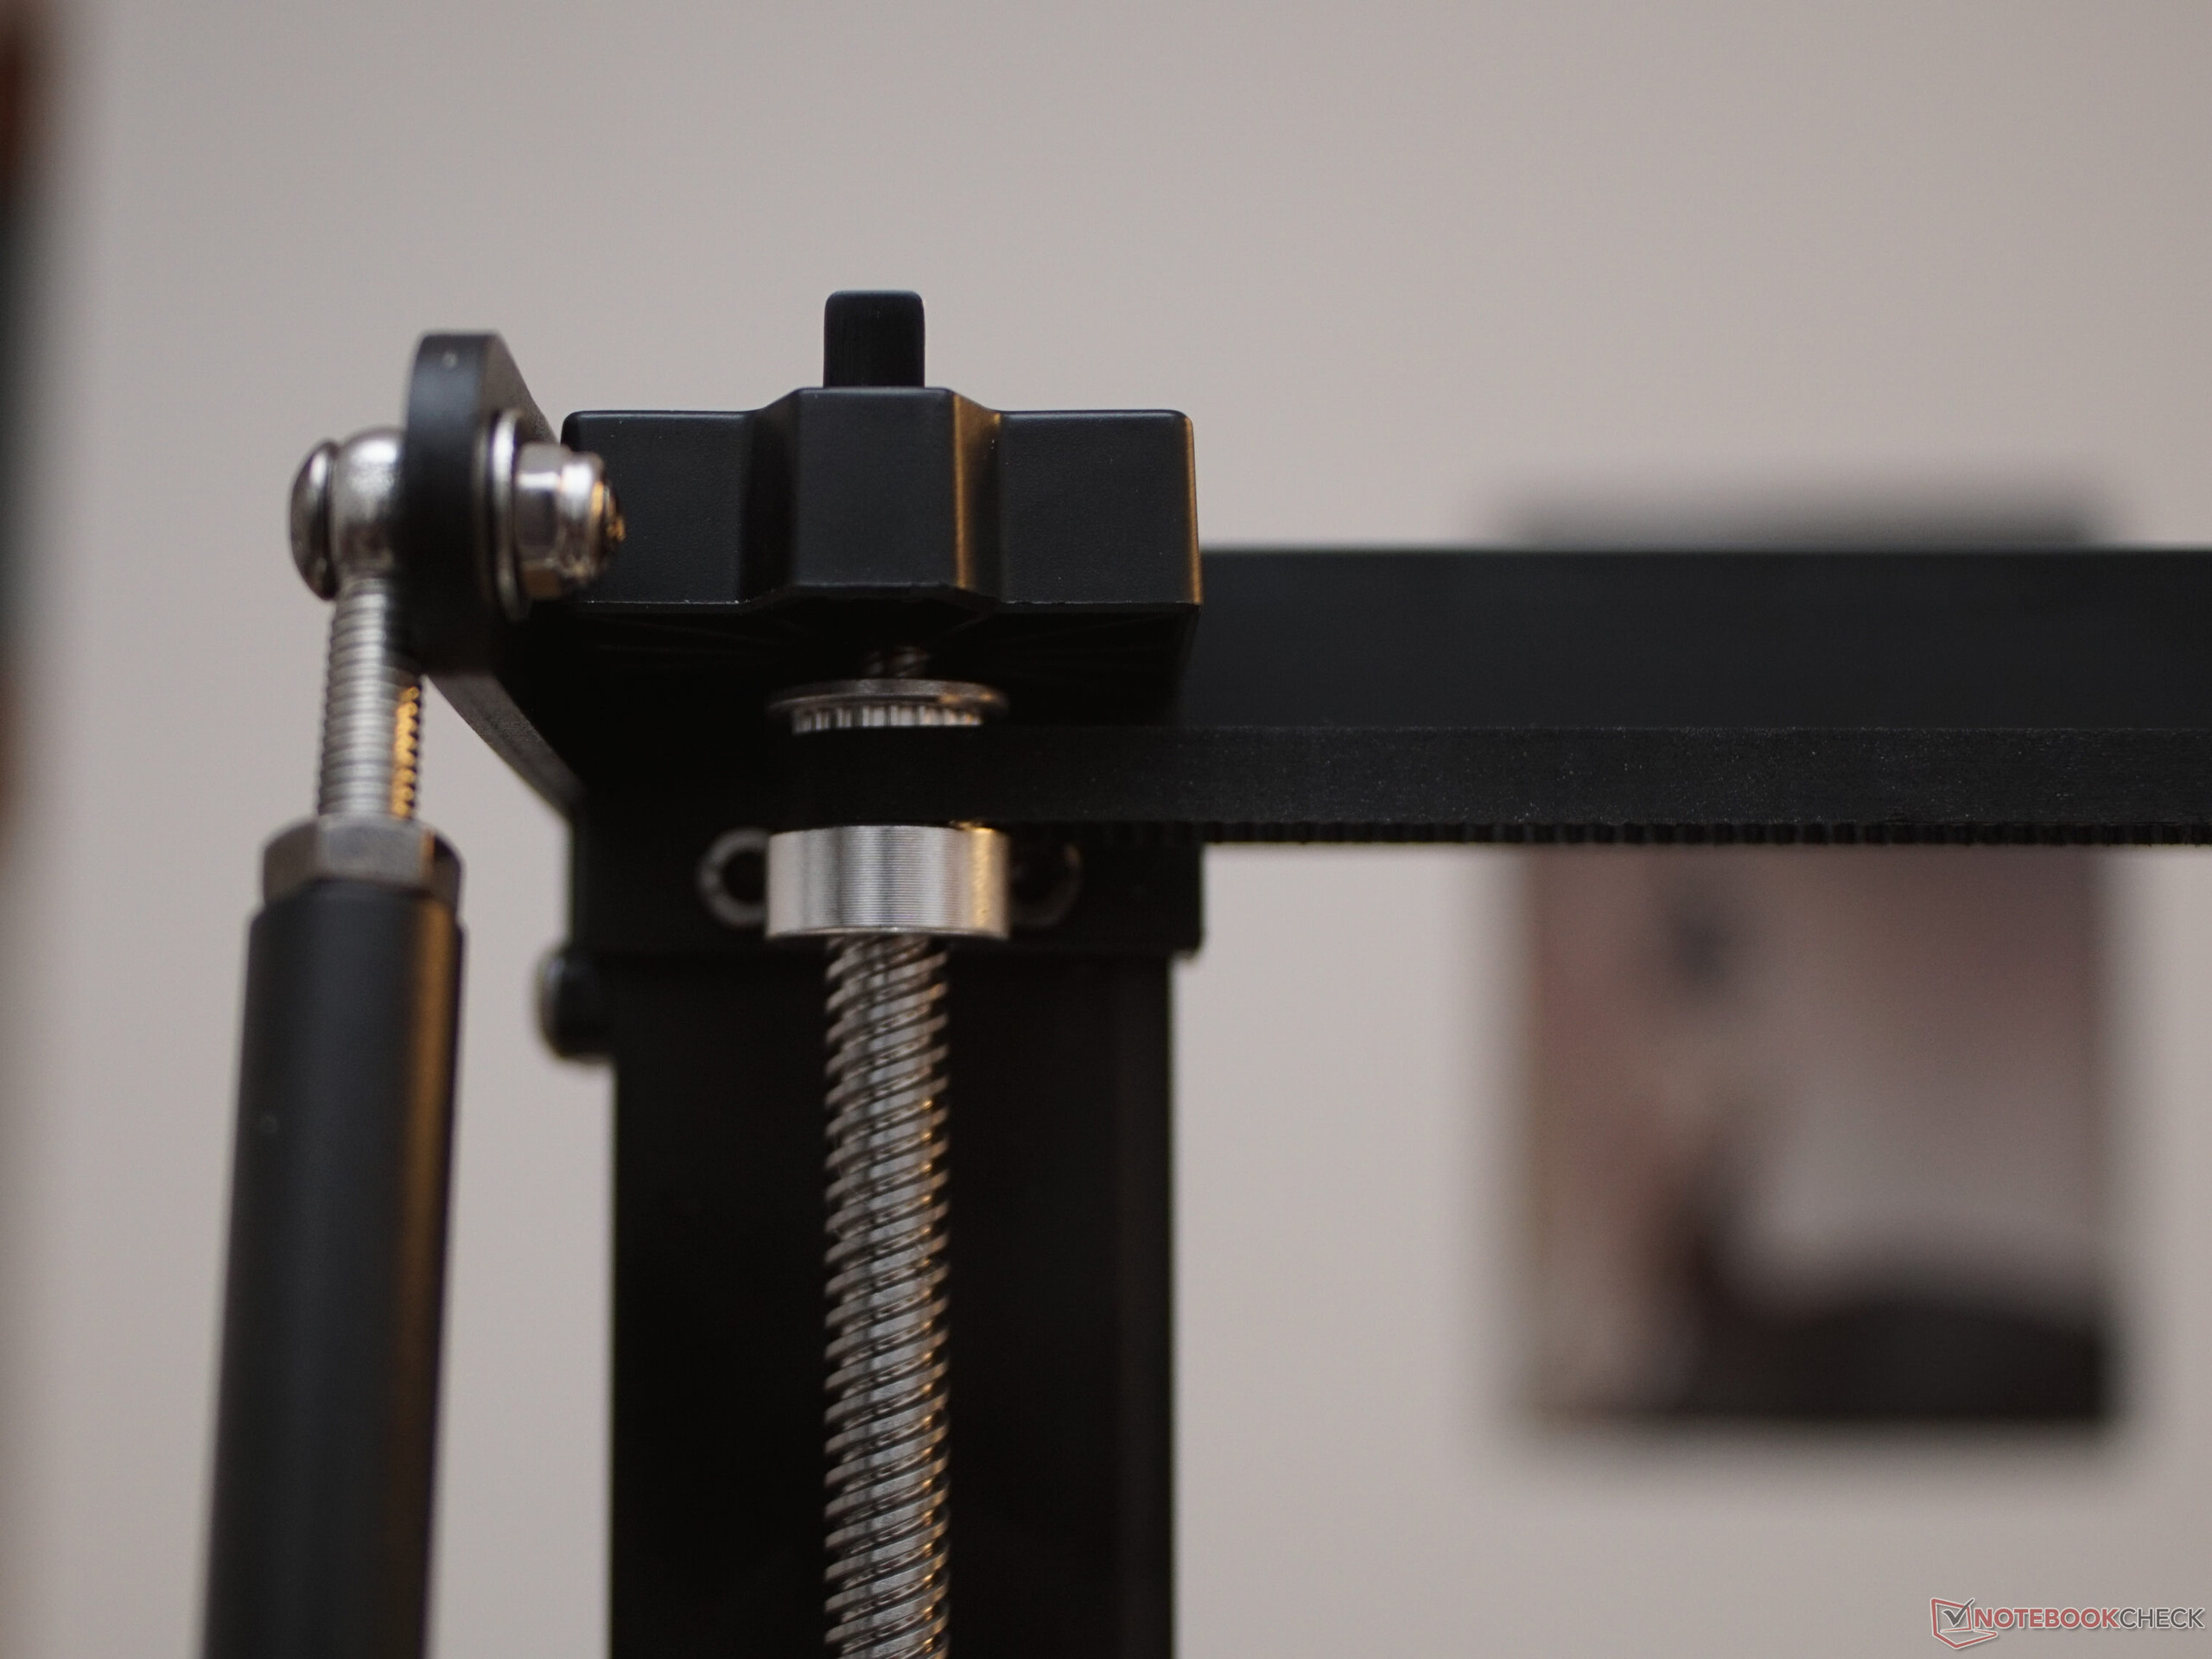
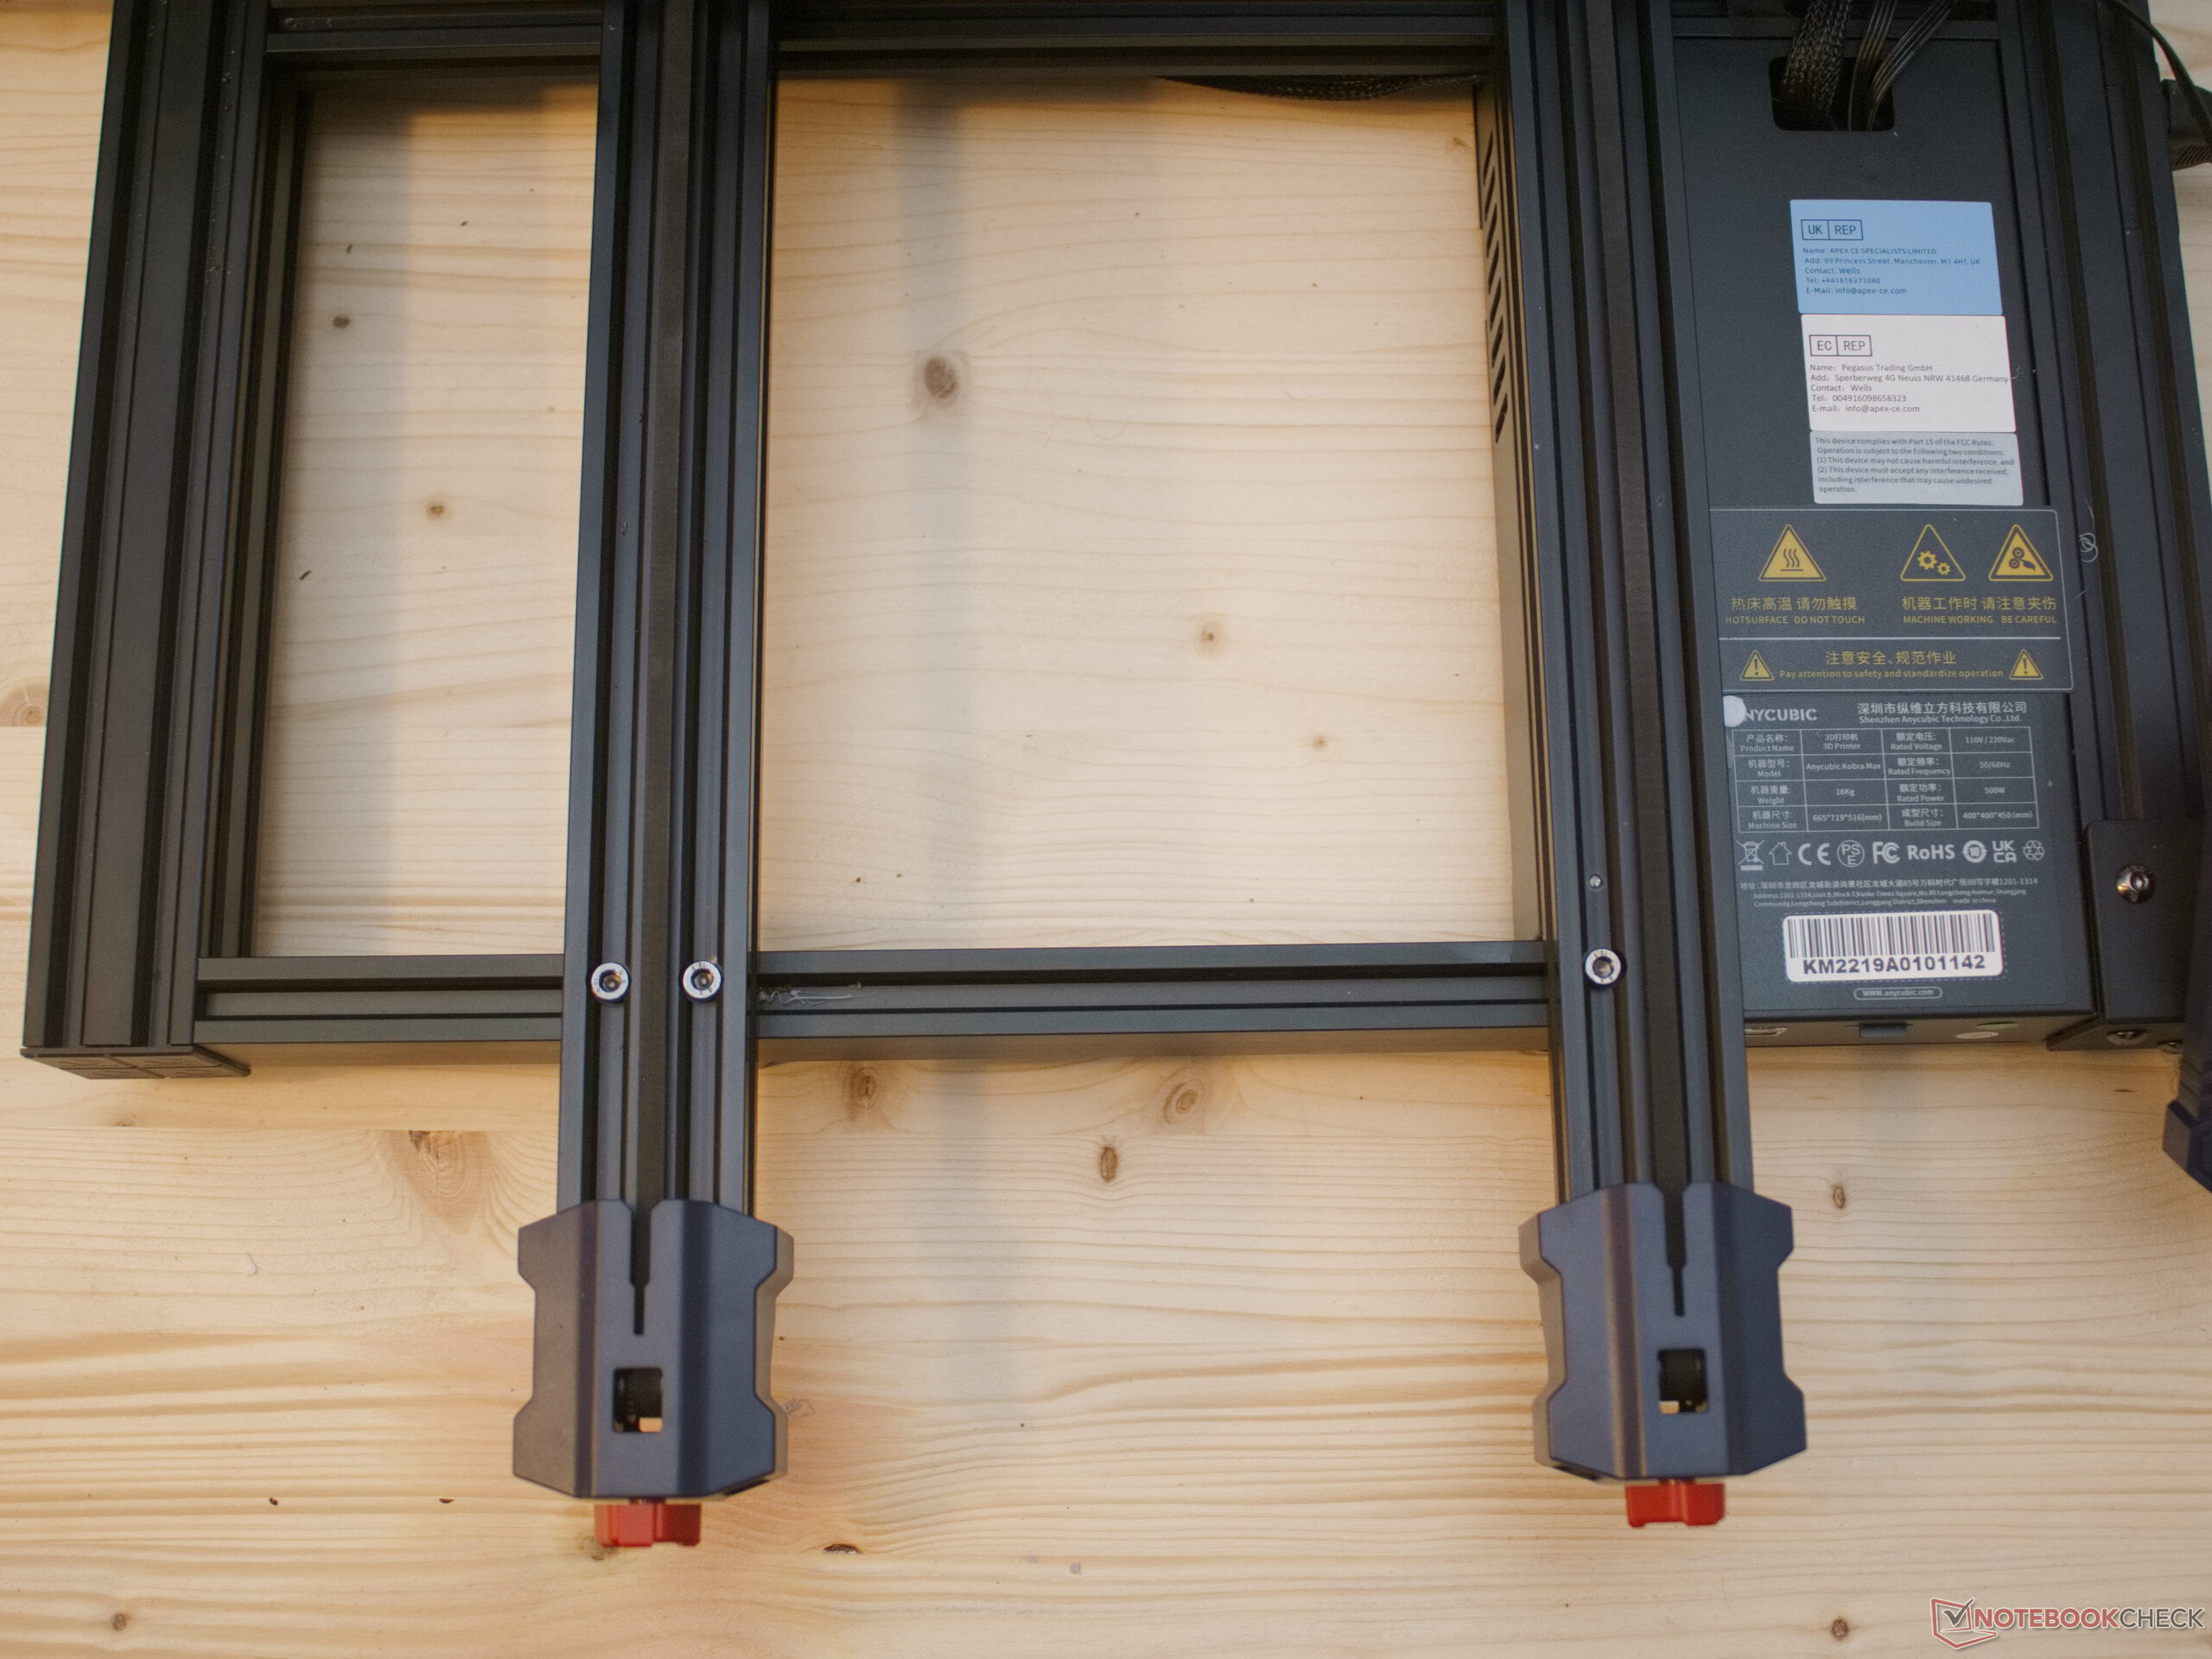
Two Pendulum stabilizers provide for the much-needed stability of this unit. As is commonly the case with current 3D printers, its moving parts run on a combination of V-slot Aluminum Extrusions and D-Rollers. This rather rigidly configured solution shows its limitations as a direct result of the length of some of the profiles. While there is no shortage of 40 mm x 40 mm (1 9/16 inch x 1 9/16 inch) profiles implemented in the Base, the 20 mm (13/16 inch) 2020 aluminum extrusion for the printhead seems inappropriately flexible.
The printing bed, on the other hand, seems particularly well stabilised. A total of 12 D-rollers run off two profile rods. The only issue that presented itself was adjusting the settings for the castors to spin freely. In our test run, the fixed row on the right side was first aligned with the rollers over the eccentric nuts, followed by the left. A challenge that arises in doing this lies in the not insignificant thermal expansion of the printer bed. Even theoretically, the large aluminium printer bed to which the Carborundum glass is attached, will expand by nearly a millimetre when heated to 60 °C (140 °F). Over the ten days the 3D Printer was made available to us for testing, we had to adjust our settings on several occasions.
The Z axis is powered by two motors and threaded spindles that are synchronised via a timing belt. Using compression springs on the T-8 nuts provides for backlash-free operation of the belt.


Printer Control
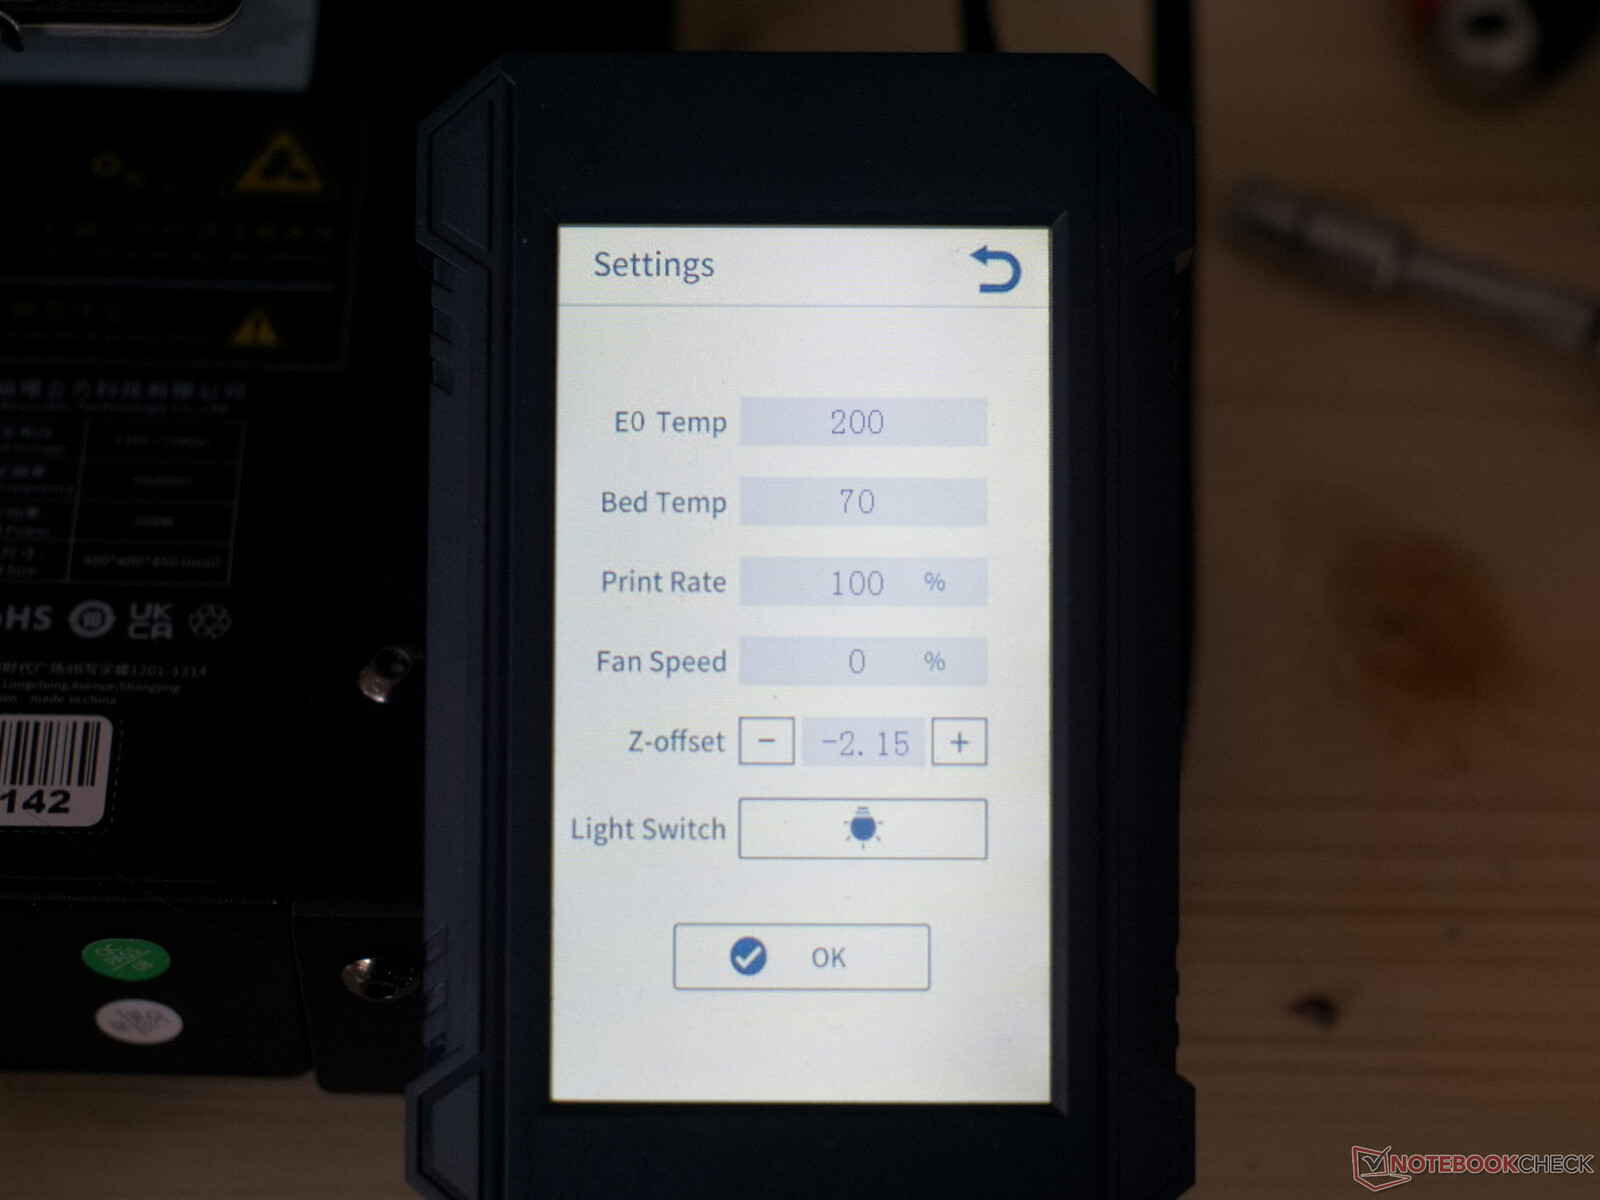
The Anycubic Kobra Max is driven by either a touchscreen or via USB using applications such as Pronterface. The touchscreen menu is clearly laid out. Numerical values can be entered via a counter with plus minus buttons or via a numeric input field. The clear layout of the menu doesn’t, however, provide many control options beyond standard, compliant bed levelling, pre-heating and filament change. And while printing is in progress, only adjustments that govern print speed, temperature, fan speeds and the LEDs built into the printer-head are available.
Missing is a smart tool to establish the required Z axis offset and the ability to modify the extrusion multiplier. It’s only when connected to a computer that this 3D printer can be made to perform well.
Performance
Printer Bed

The silicon carbide coated printer bed isn’t exactly level as such, but adhesion qualities are good once the automatic bed levelling process is completed and adjustments are made to the Z axis offset. The Carborundum glass is fixed here with six clamps on an aluminum plate with the heating element. Additionally, the print bed is provided with thin thermal insulation on the underside.
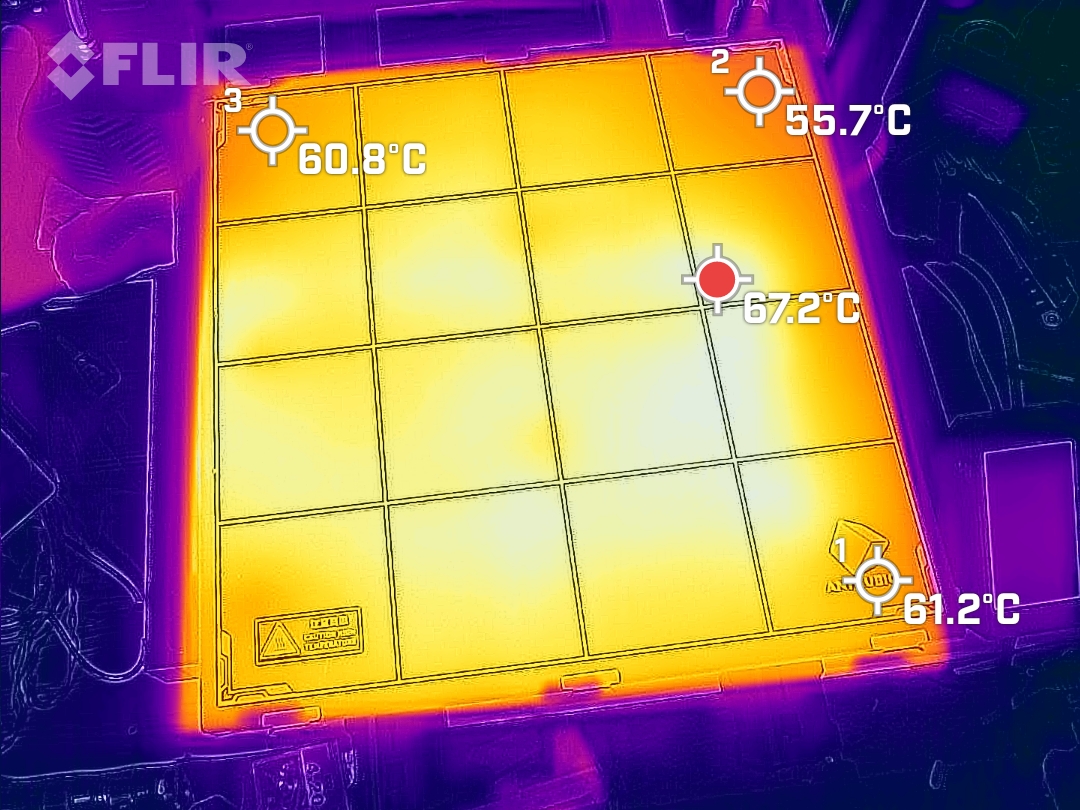
The printer bed is heated via the 24 V DC power source and uses up to 400 W. Nevertheless, it takes around five minutes to heat up from around 20 °C (68 °F) to 60 °C (140 °F) because of the large area involved. The firmware allows up to 110 °C (230 °F), making it difficult for the Anycubic Kobra Max to process ABS. The thermal image shows a temperature drop over a roughly two-inch margin around the edges. Otherwise, the distribution of heat over this large printing bed seems relatively even. We did not, however, determine any degradation of adhesion along the edges. It’s quite likely that the temperature differential, as measured by the Flir One Pro, is less than the actual temperature difference, as emissivity of the surface was not measured on the apron.
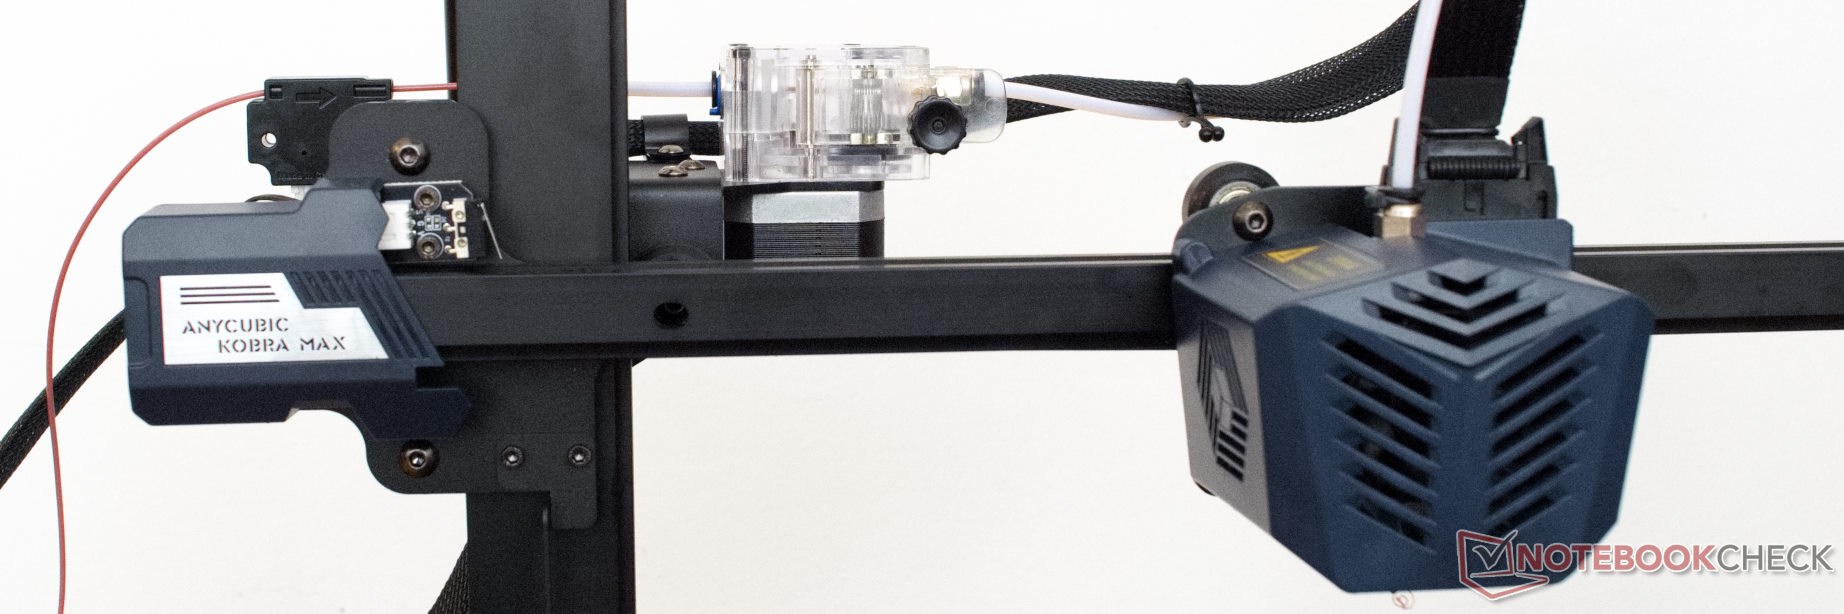
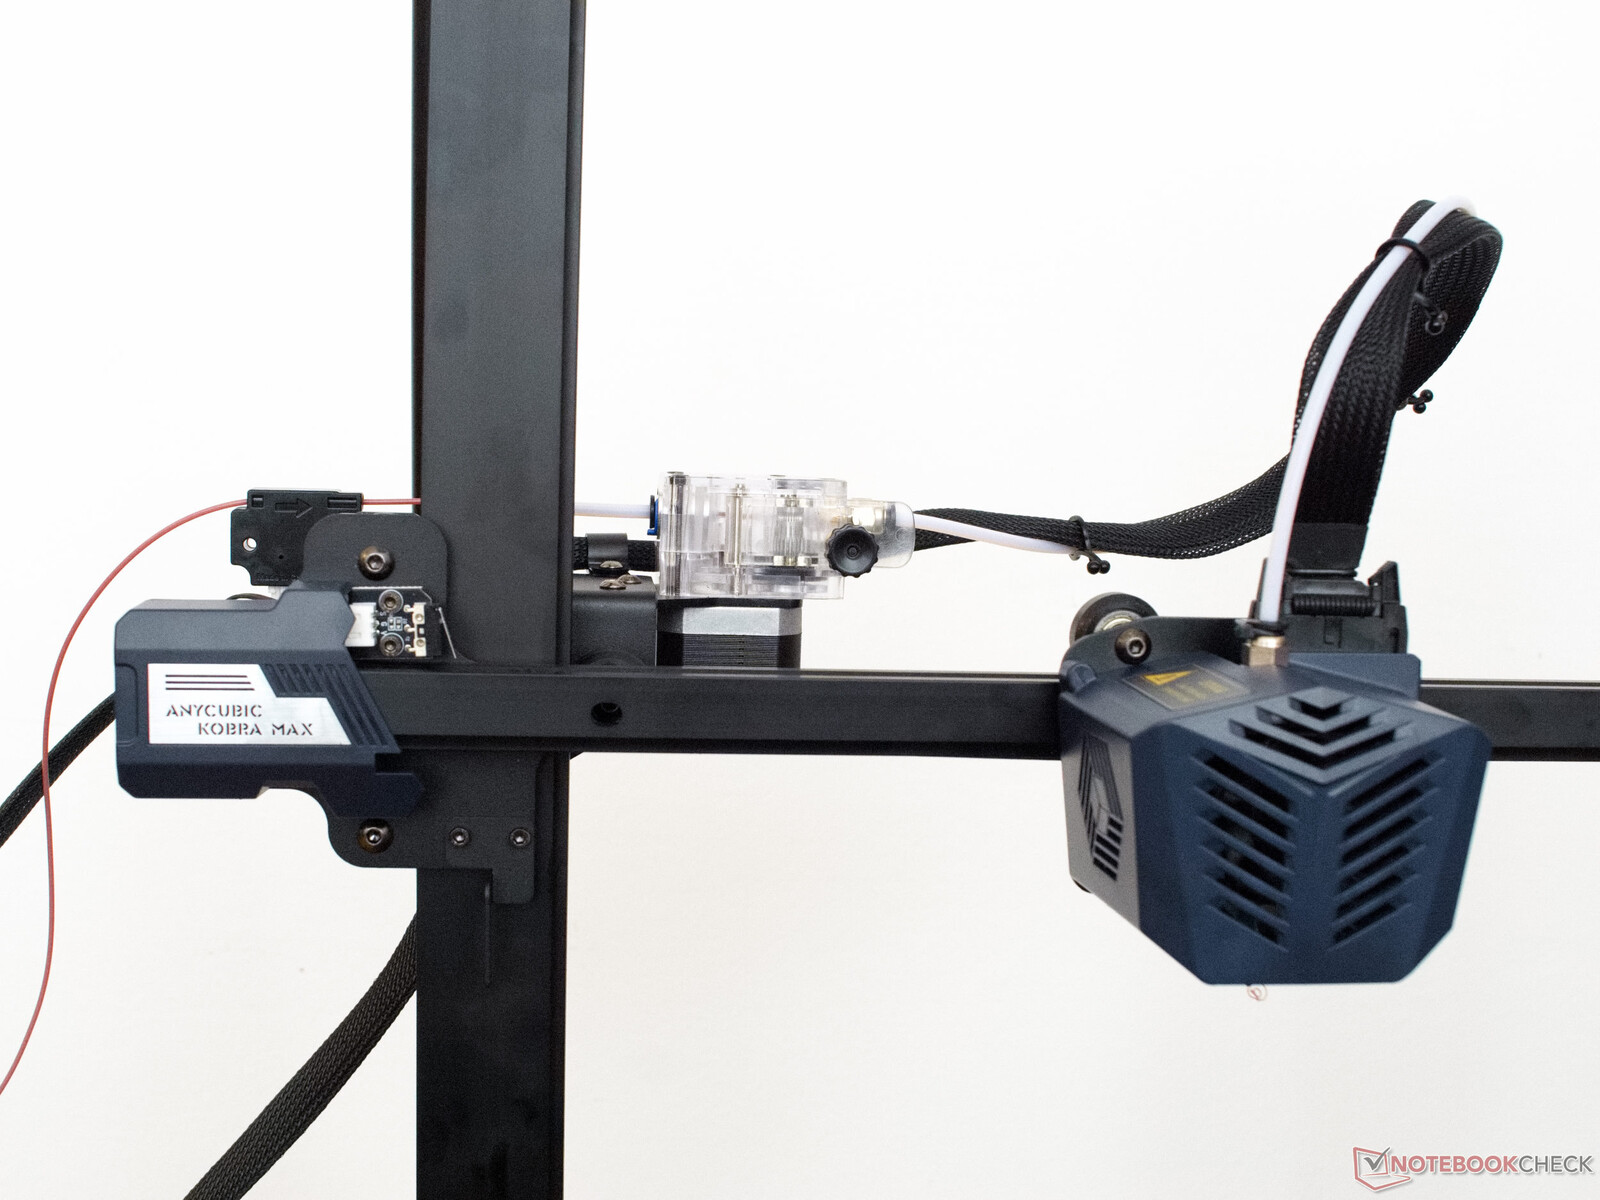
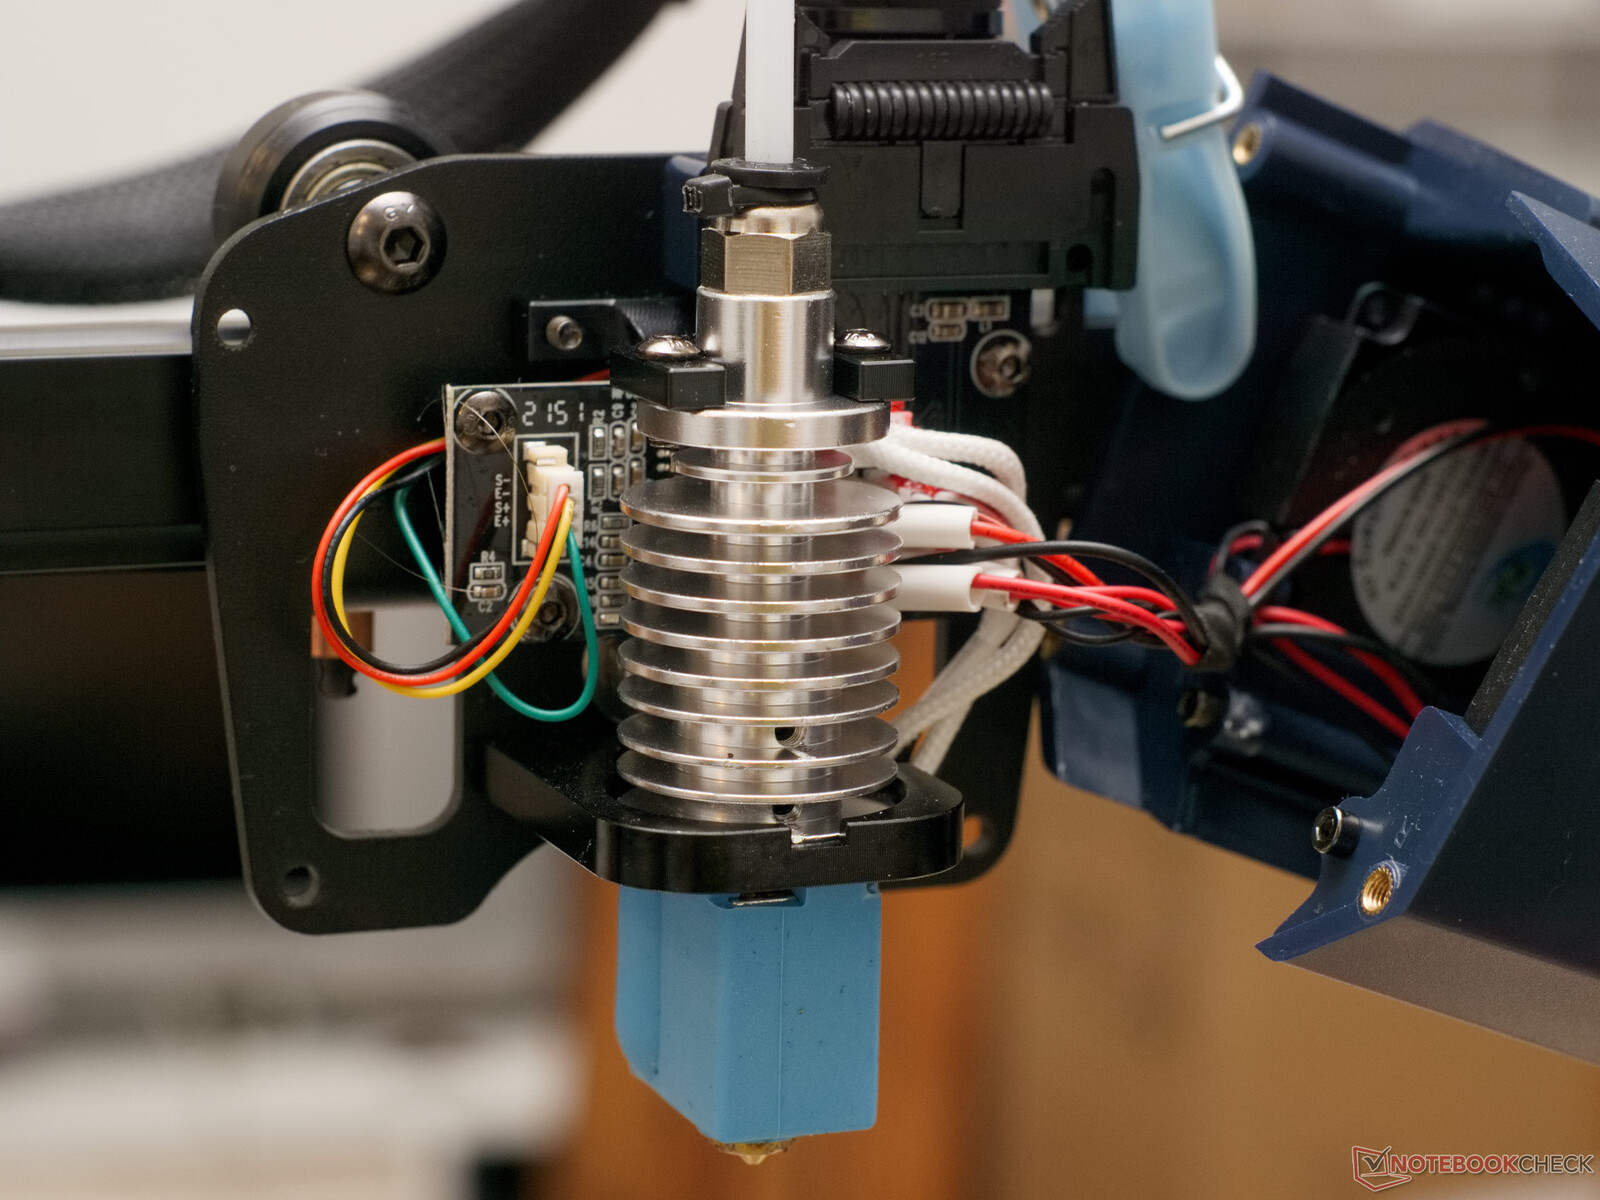
Hotend and Extruder
A BMG-style extruder and a Volcano hotend do a great job on the Anycubic Kobra Max. The roughly 45 cm (one and a half feet) long PTFE pipes delivering the filament to the unit are barely noticeable in our print results. As is quite common for dual gear extruders, a whistling sound is audible with every retraction. The printer head and overall structure of this model are not significantly different from those on the Anycubic Viper and the rather unusual process for automated bed-levelling is also implemented here. When lowering the print head nozzle onto individual contact points, a load cell determines the timing. What is noticeable with the Kobra, however, is a slight deviation from specified parameters. This is due to the somewhat high flexibility of the X-axis and print bed. This flexibility of the x-axis is less pronounced at the edges of the print bed and is at its highest in the center of the print bed. This results in a saddle-shaped distortion being picked up by the ABL sensor. However, we did not identify any issues during our rather short testing period apart from a small over- and under-extrusion in the respective areas of the first layer. The print head is also equipped with a small LED light and two radial fans that are positioned next to the hotend and the load cell.
The BMG clone can deliver a high flow rate in the extrusion test. Only at the required 20 mm³/s (about ¾ in3/s) does the filament flow cut in. This delivers a calculated maximum printing speed of around 180 mm/s (just over 7 inches/s) given an extrusion width of 0.044 mm (44 μm) and a layer height of 0.2 mm (200 μm).
However, while actually printing, the back pressure in the nozzle increases. The first real issues become apparent in our test scenario at speeds over 140 mm/s (5½ in/s). At a print speed of 150mm/s (5.9 in/s) the first holes appear in the printed test output. Given the potential size of Anycubic Kobra Max's printed output, higher print speeds seem somewhat desirable. An alternative approach to achieve faster print speeds would be to deploy a larger nozzle. Especially with large objects, the use of 0.6 mm or 0.8 mm nozzles could save significant time. Anycubic provides just a single 0.4 mm Volcano nozzle.


Print Quality
The micro-SD card that came with our test device includes a Cura profile that we used unmodified for our benchmark print quality testing procedures. Anycubic recommends using relatively high print speeds of up to 80 mm/s (3.15 in/s).
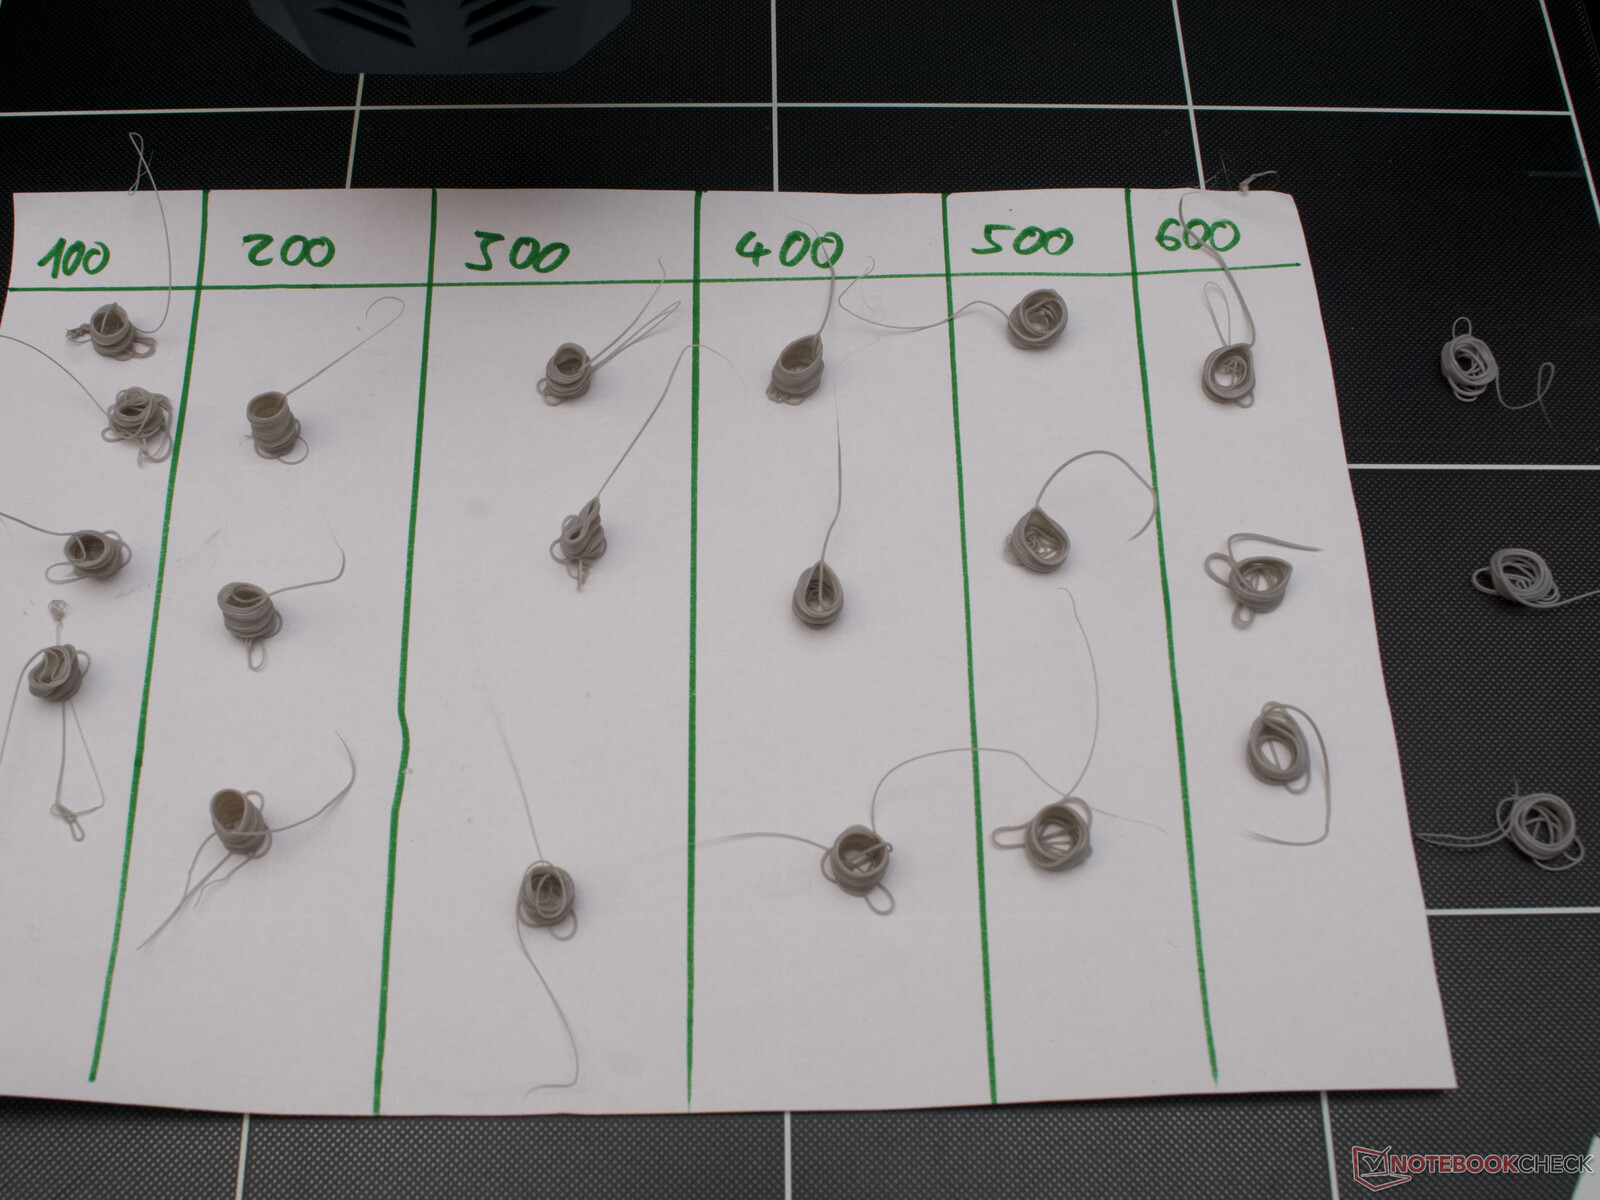
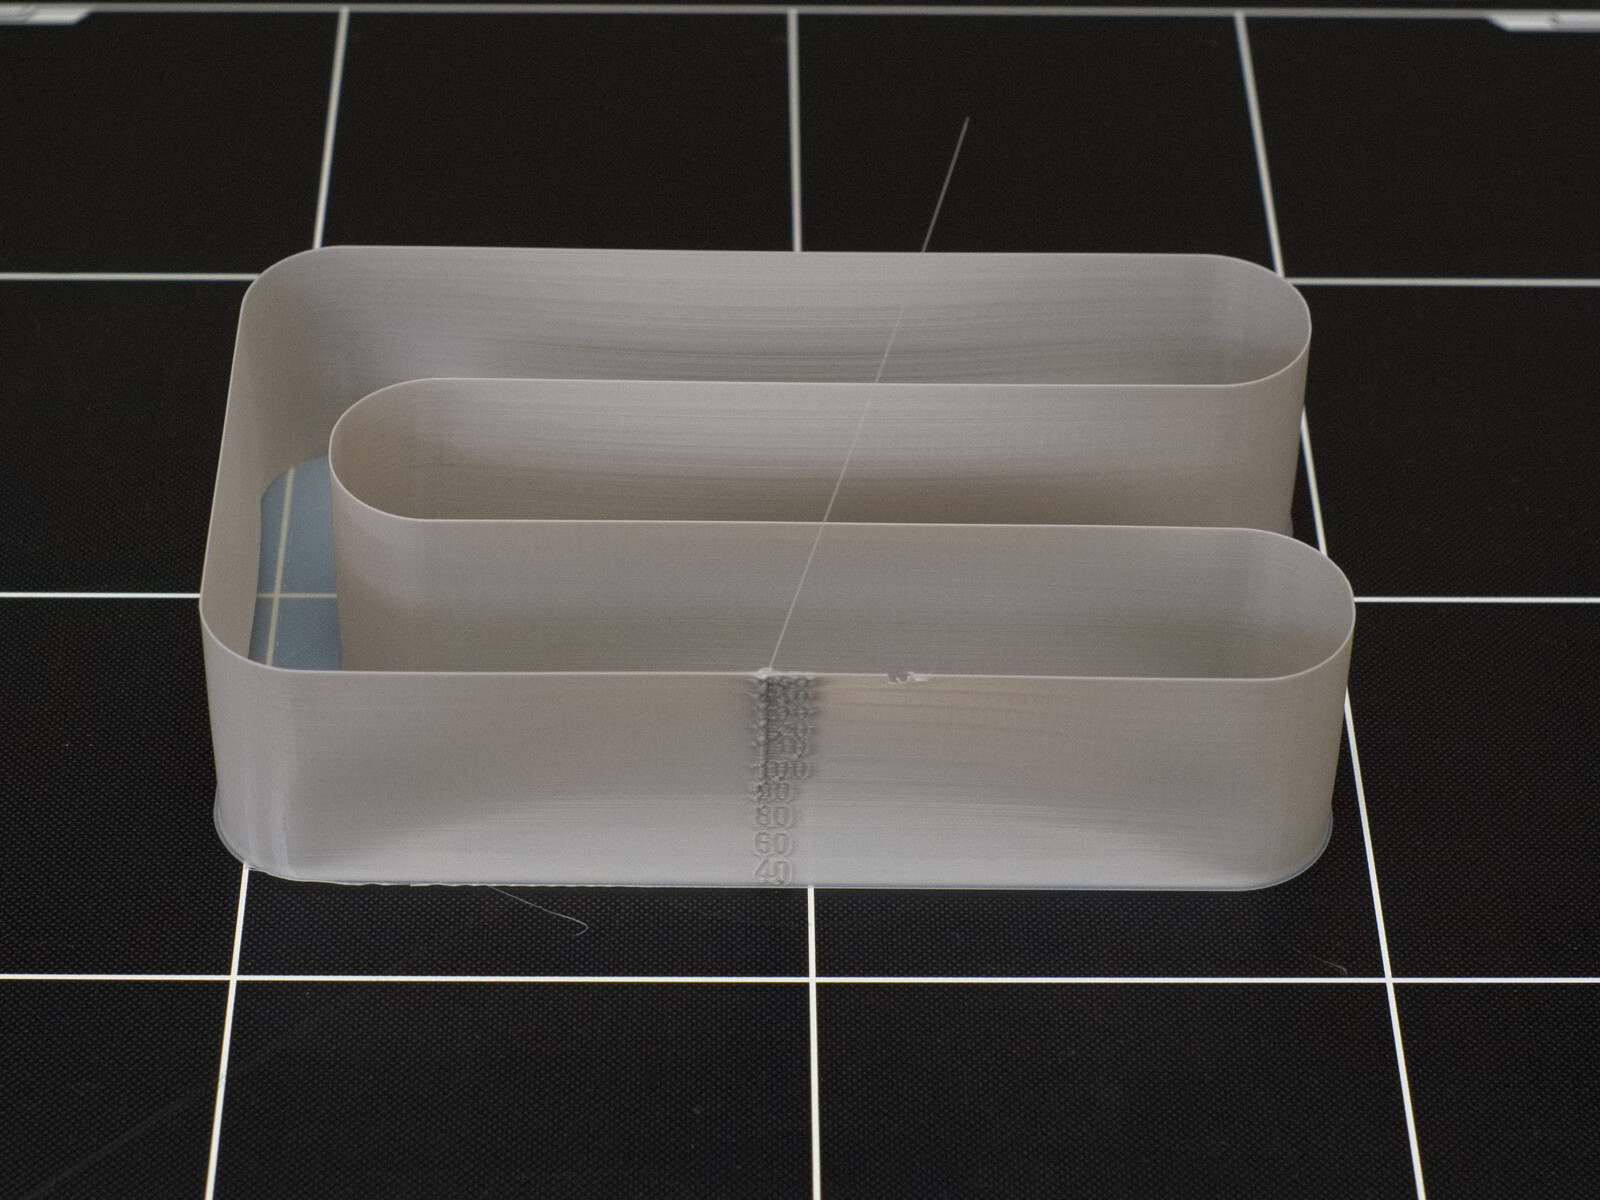
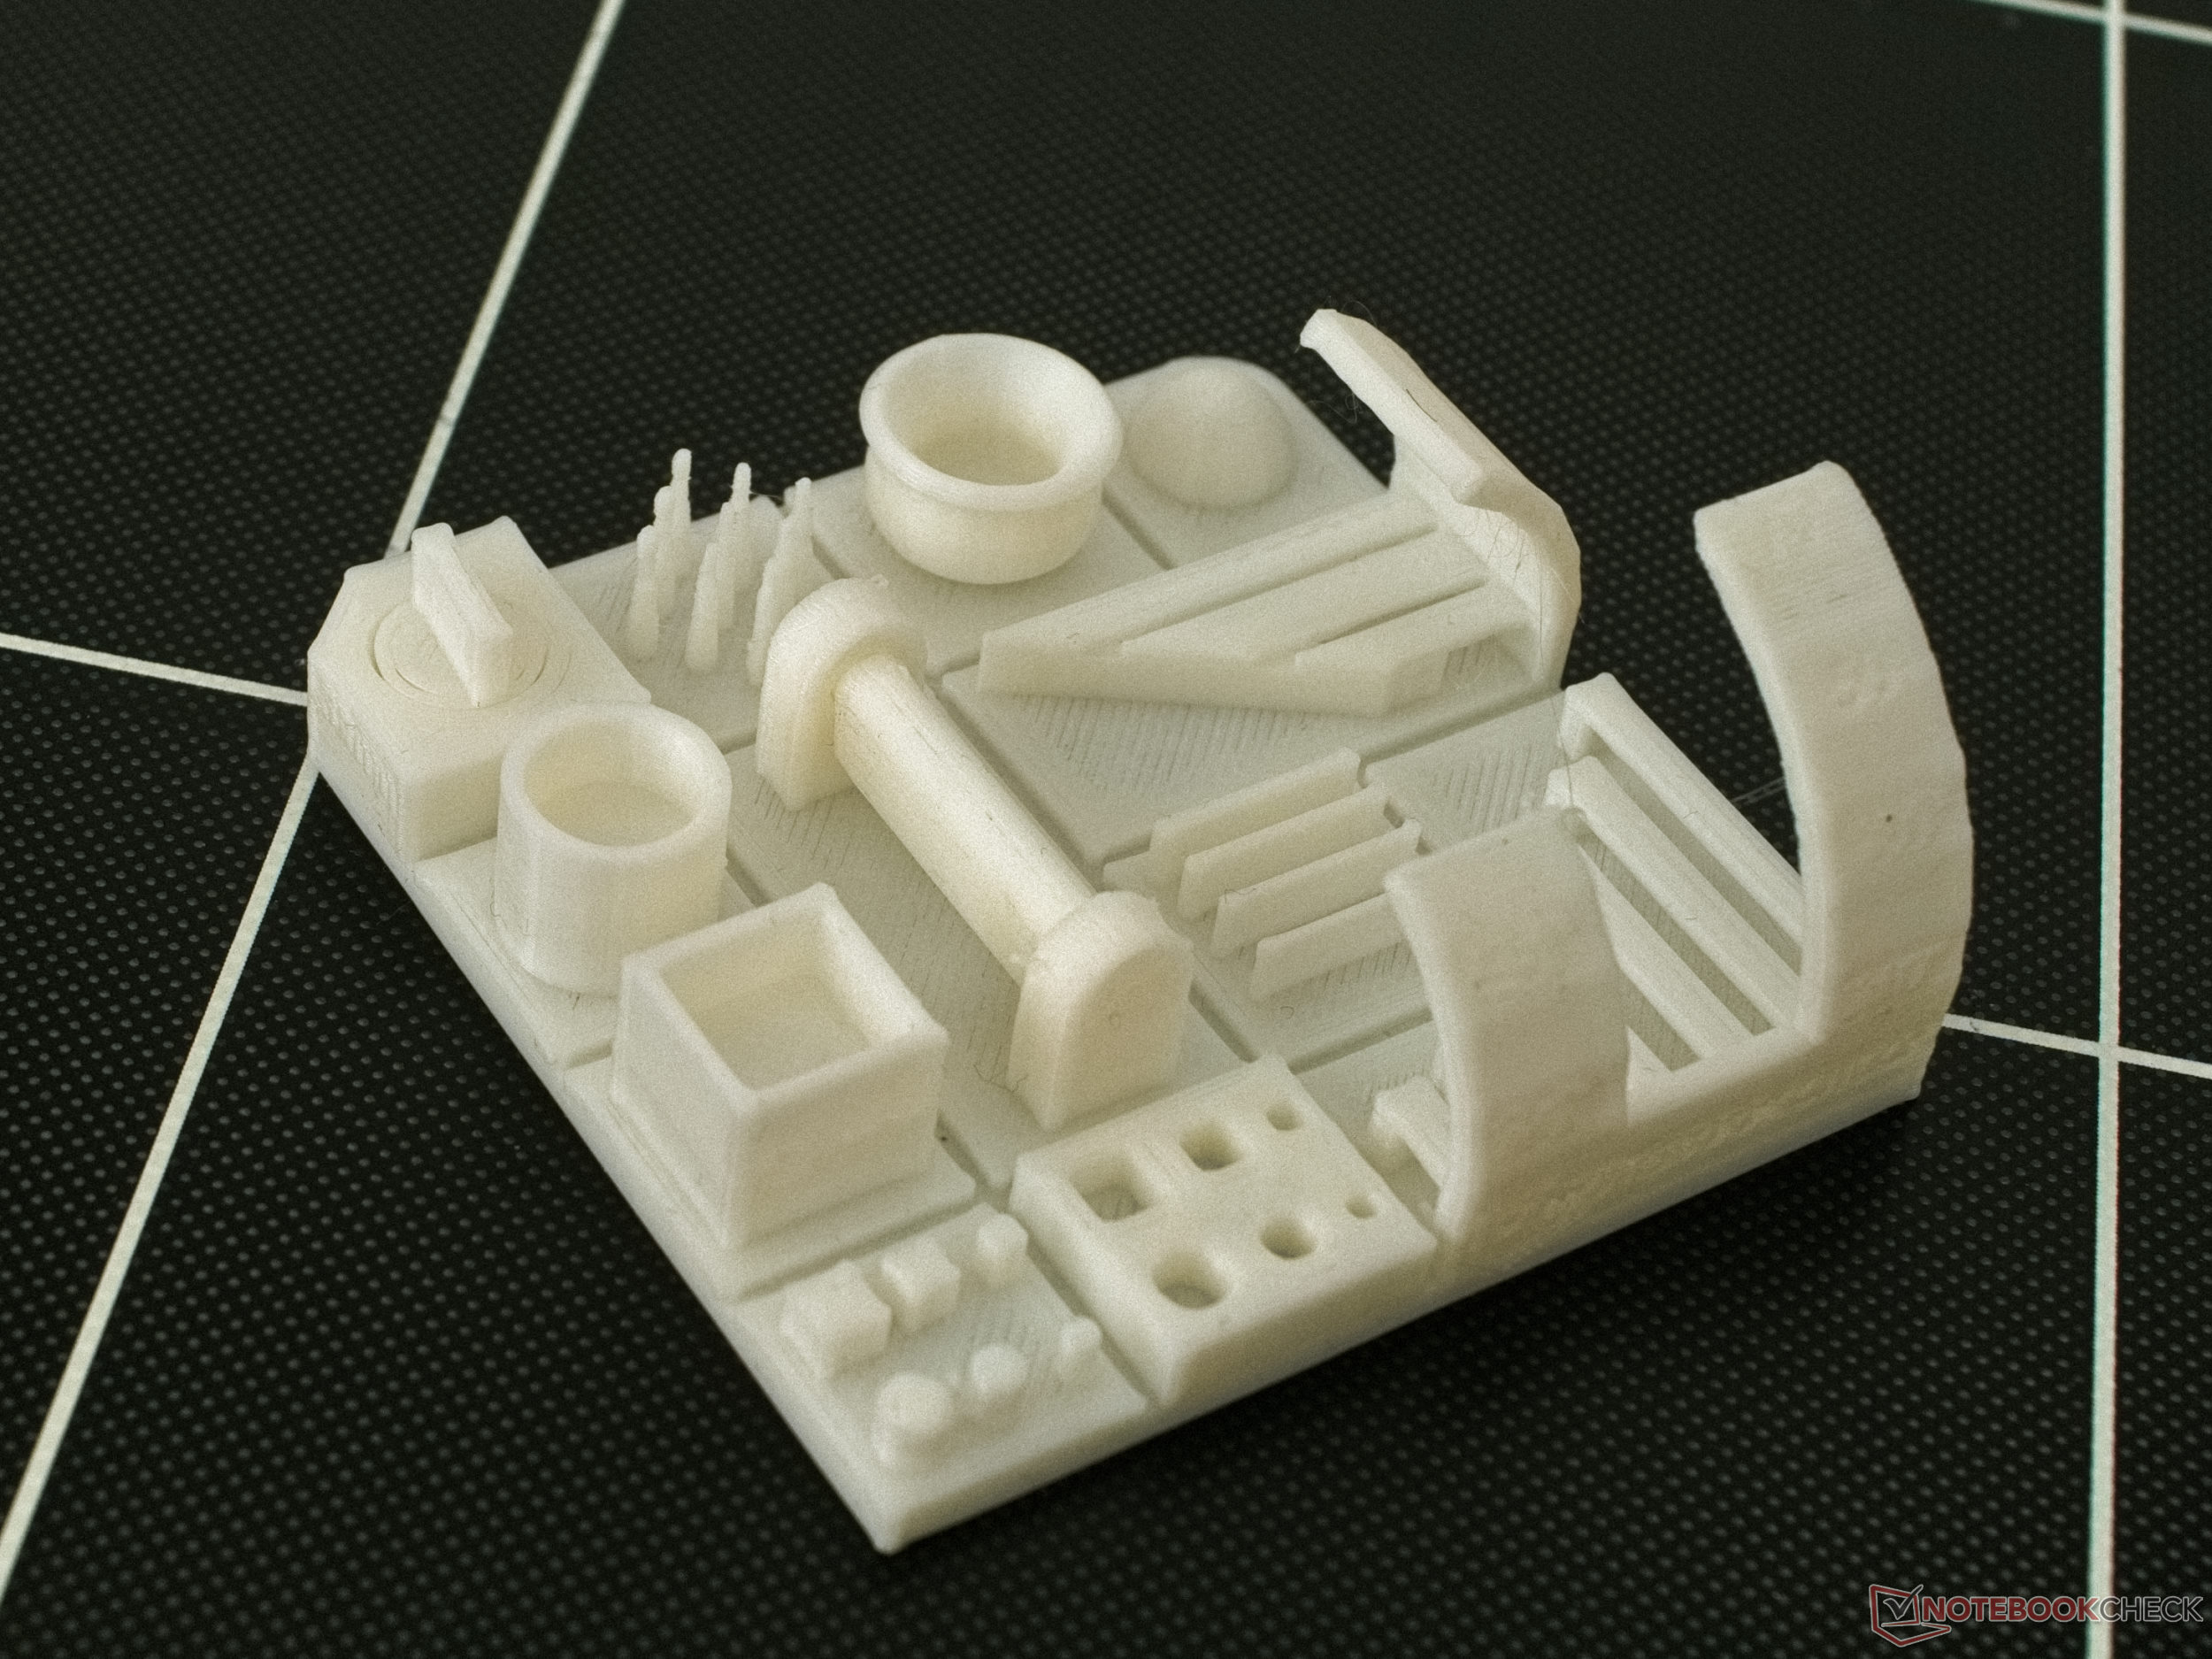
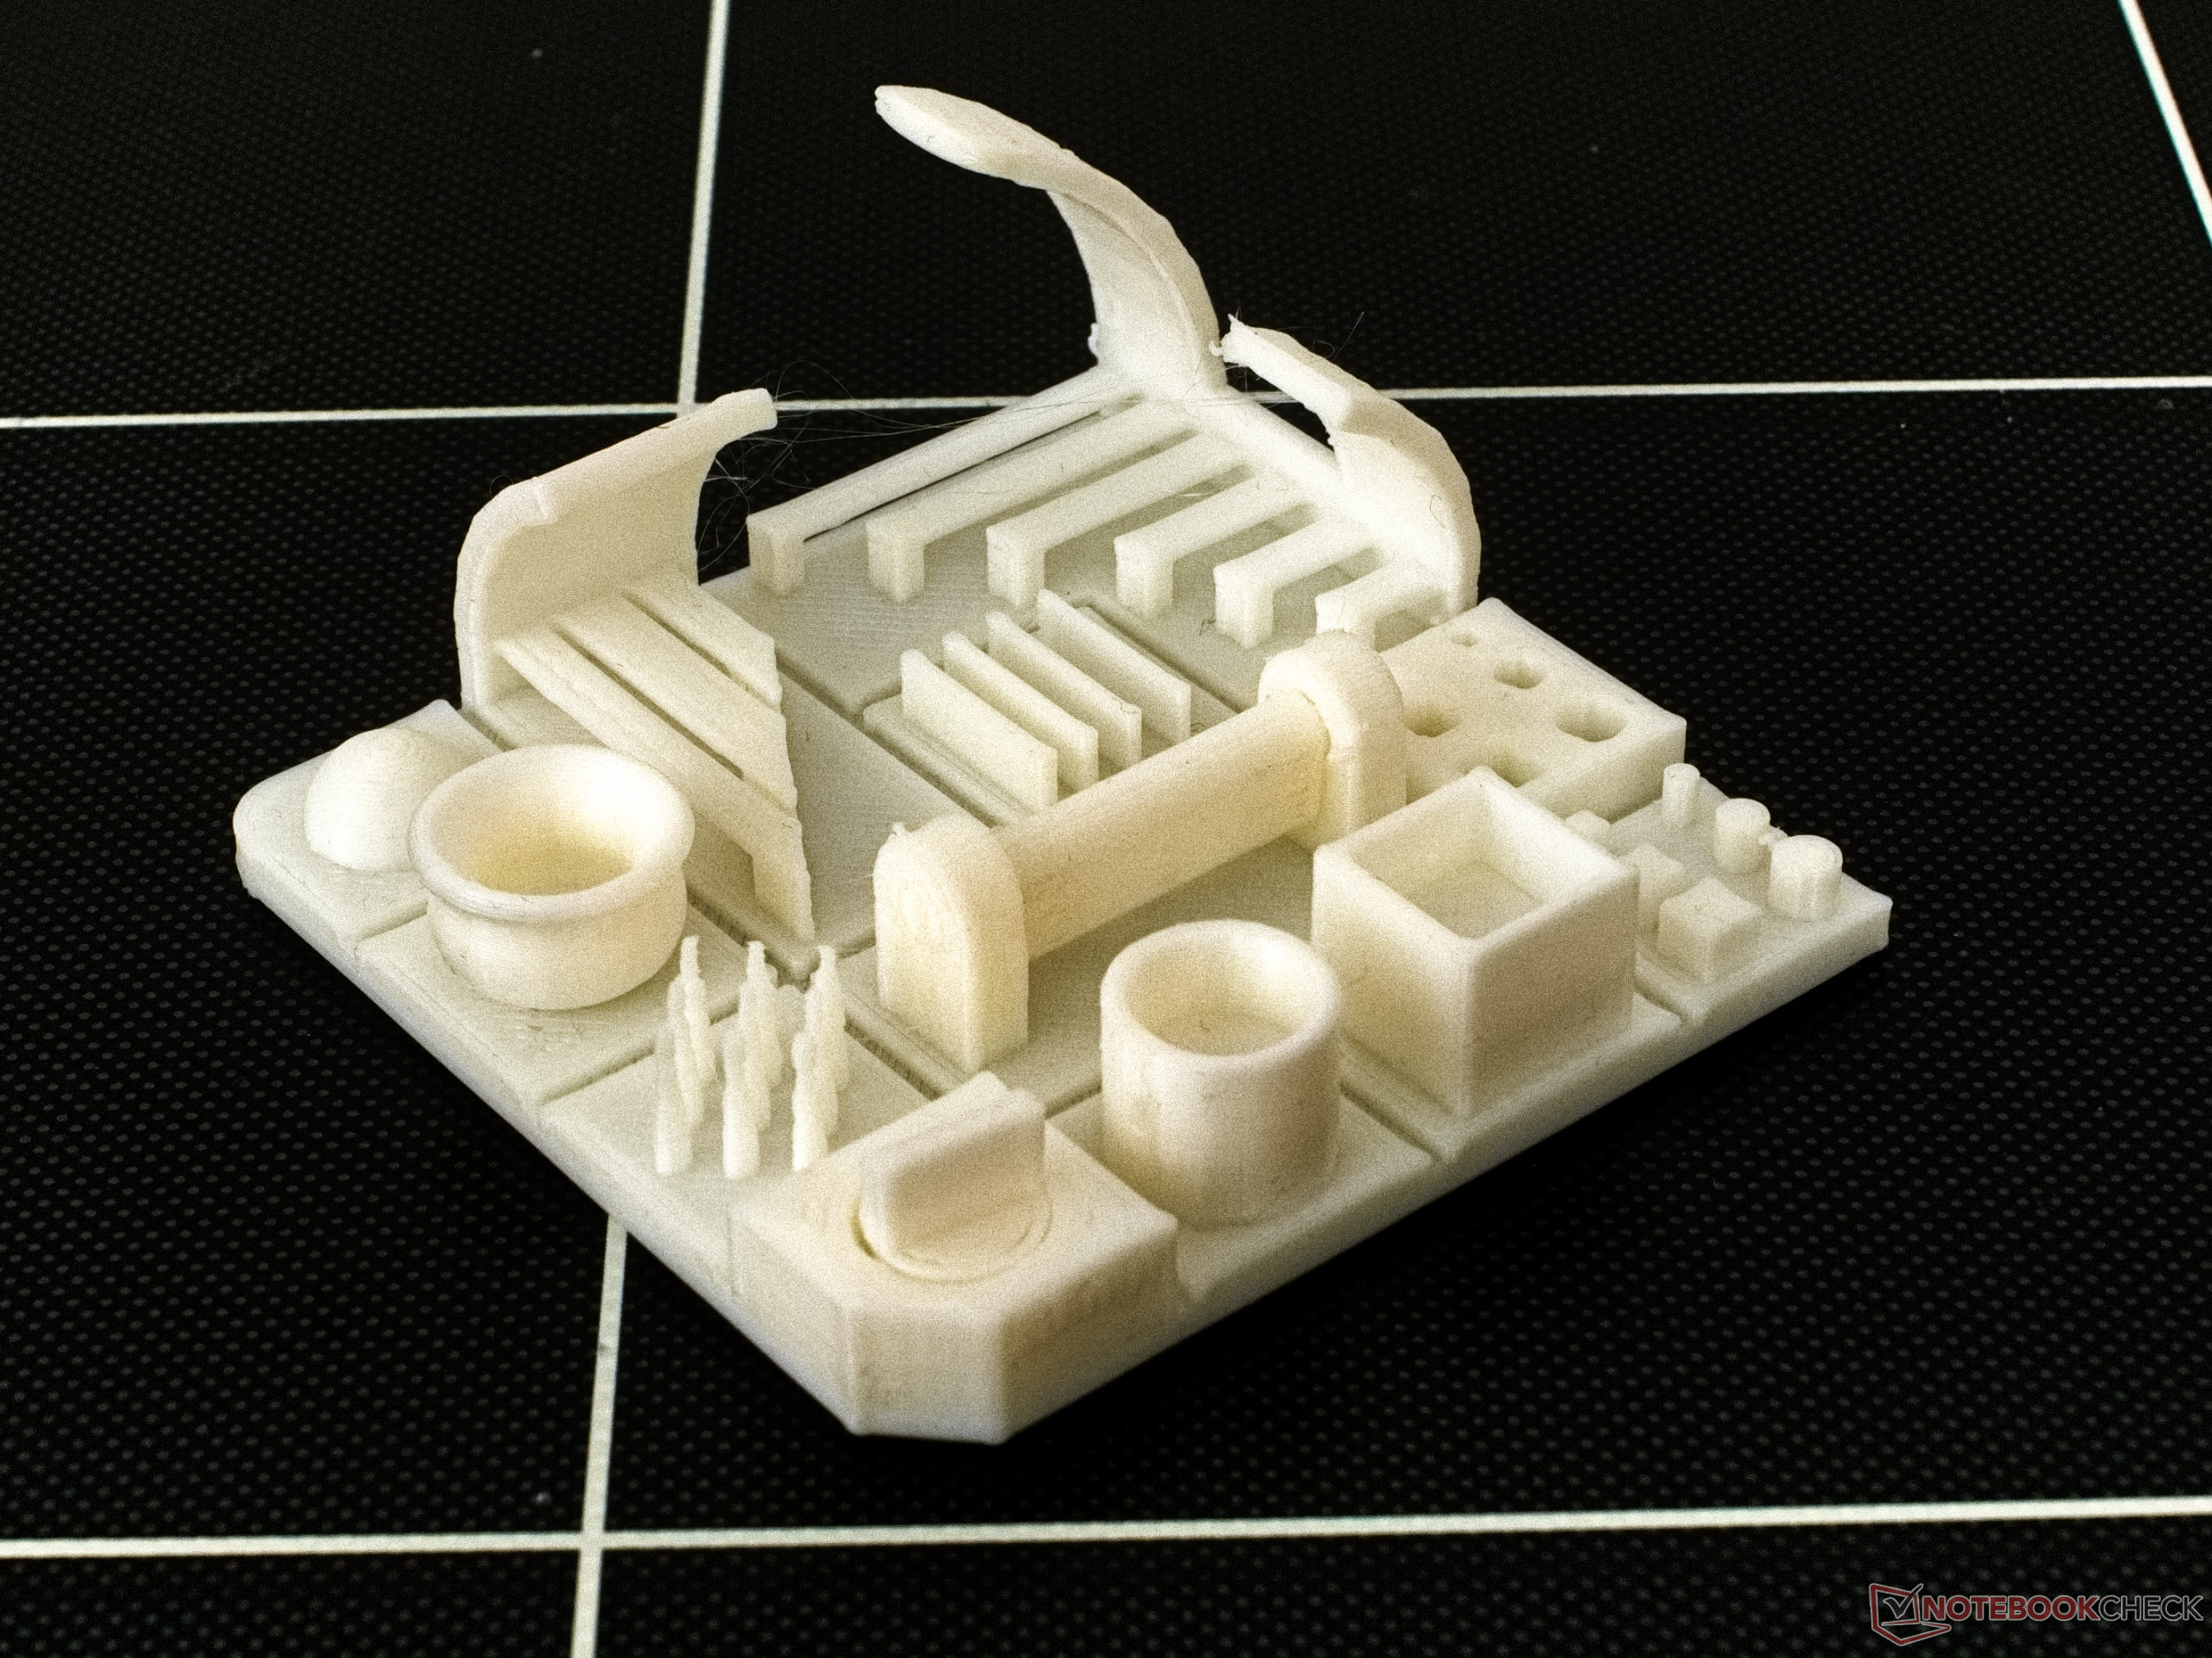
Robust results create a favourable impression of the device’s overhang printing capability. Even at an angle of 70° there are no visible issues. There is some sign of stringing and blobs but these are very limited. Even between thin walls and in spaces between small needles, plastic strands are barely noticeable. And lastly, the printed gate and the rotating knob were found to be movable even though breaking up small, fused plastic strands on either of them was somewhat difficult.
With regard to dimensional accuracy, the largest deviation measured was 0.08 mm (80 μm). That is to say, the extruder delivers less plastic than assumed by the slicer. This might also explain the slight under-readings of our test measurements. The adhesion to the printing bed of our test sample was excellent and none of the corners showed signs of lifting or wrapping.

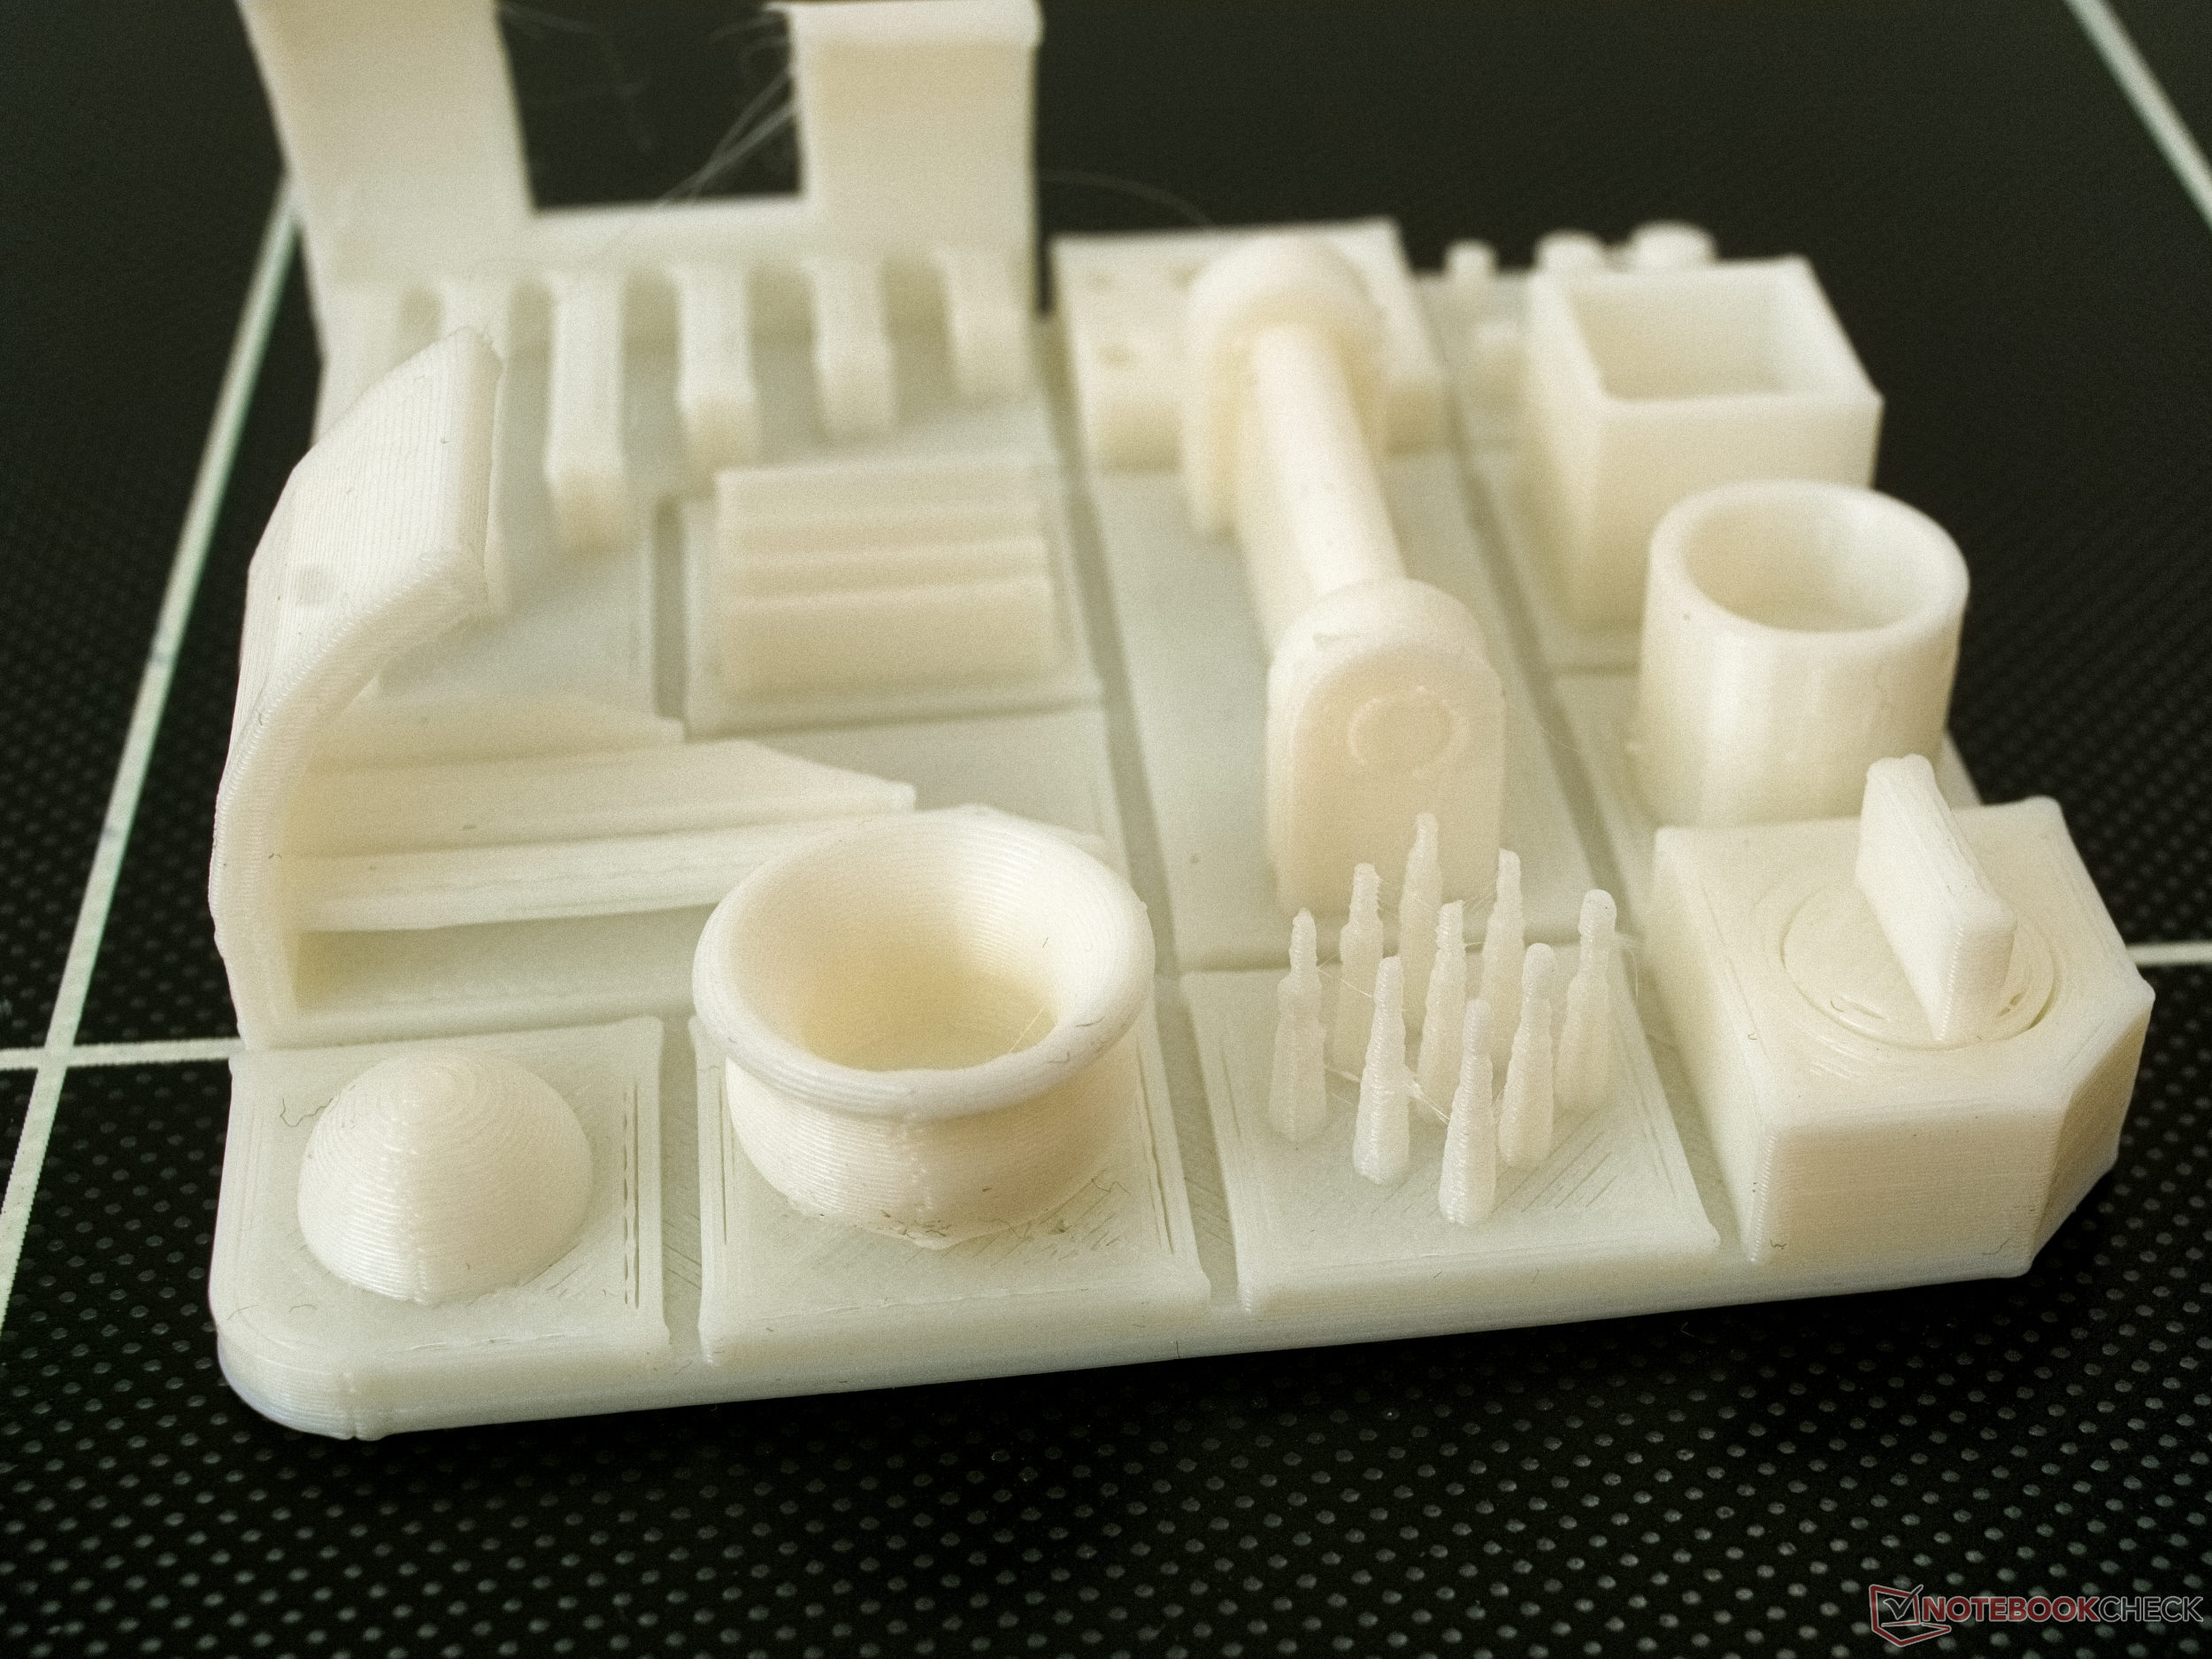

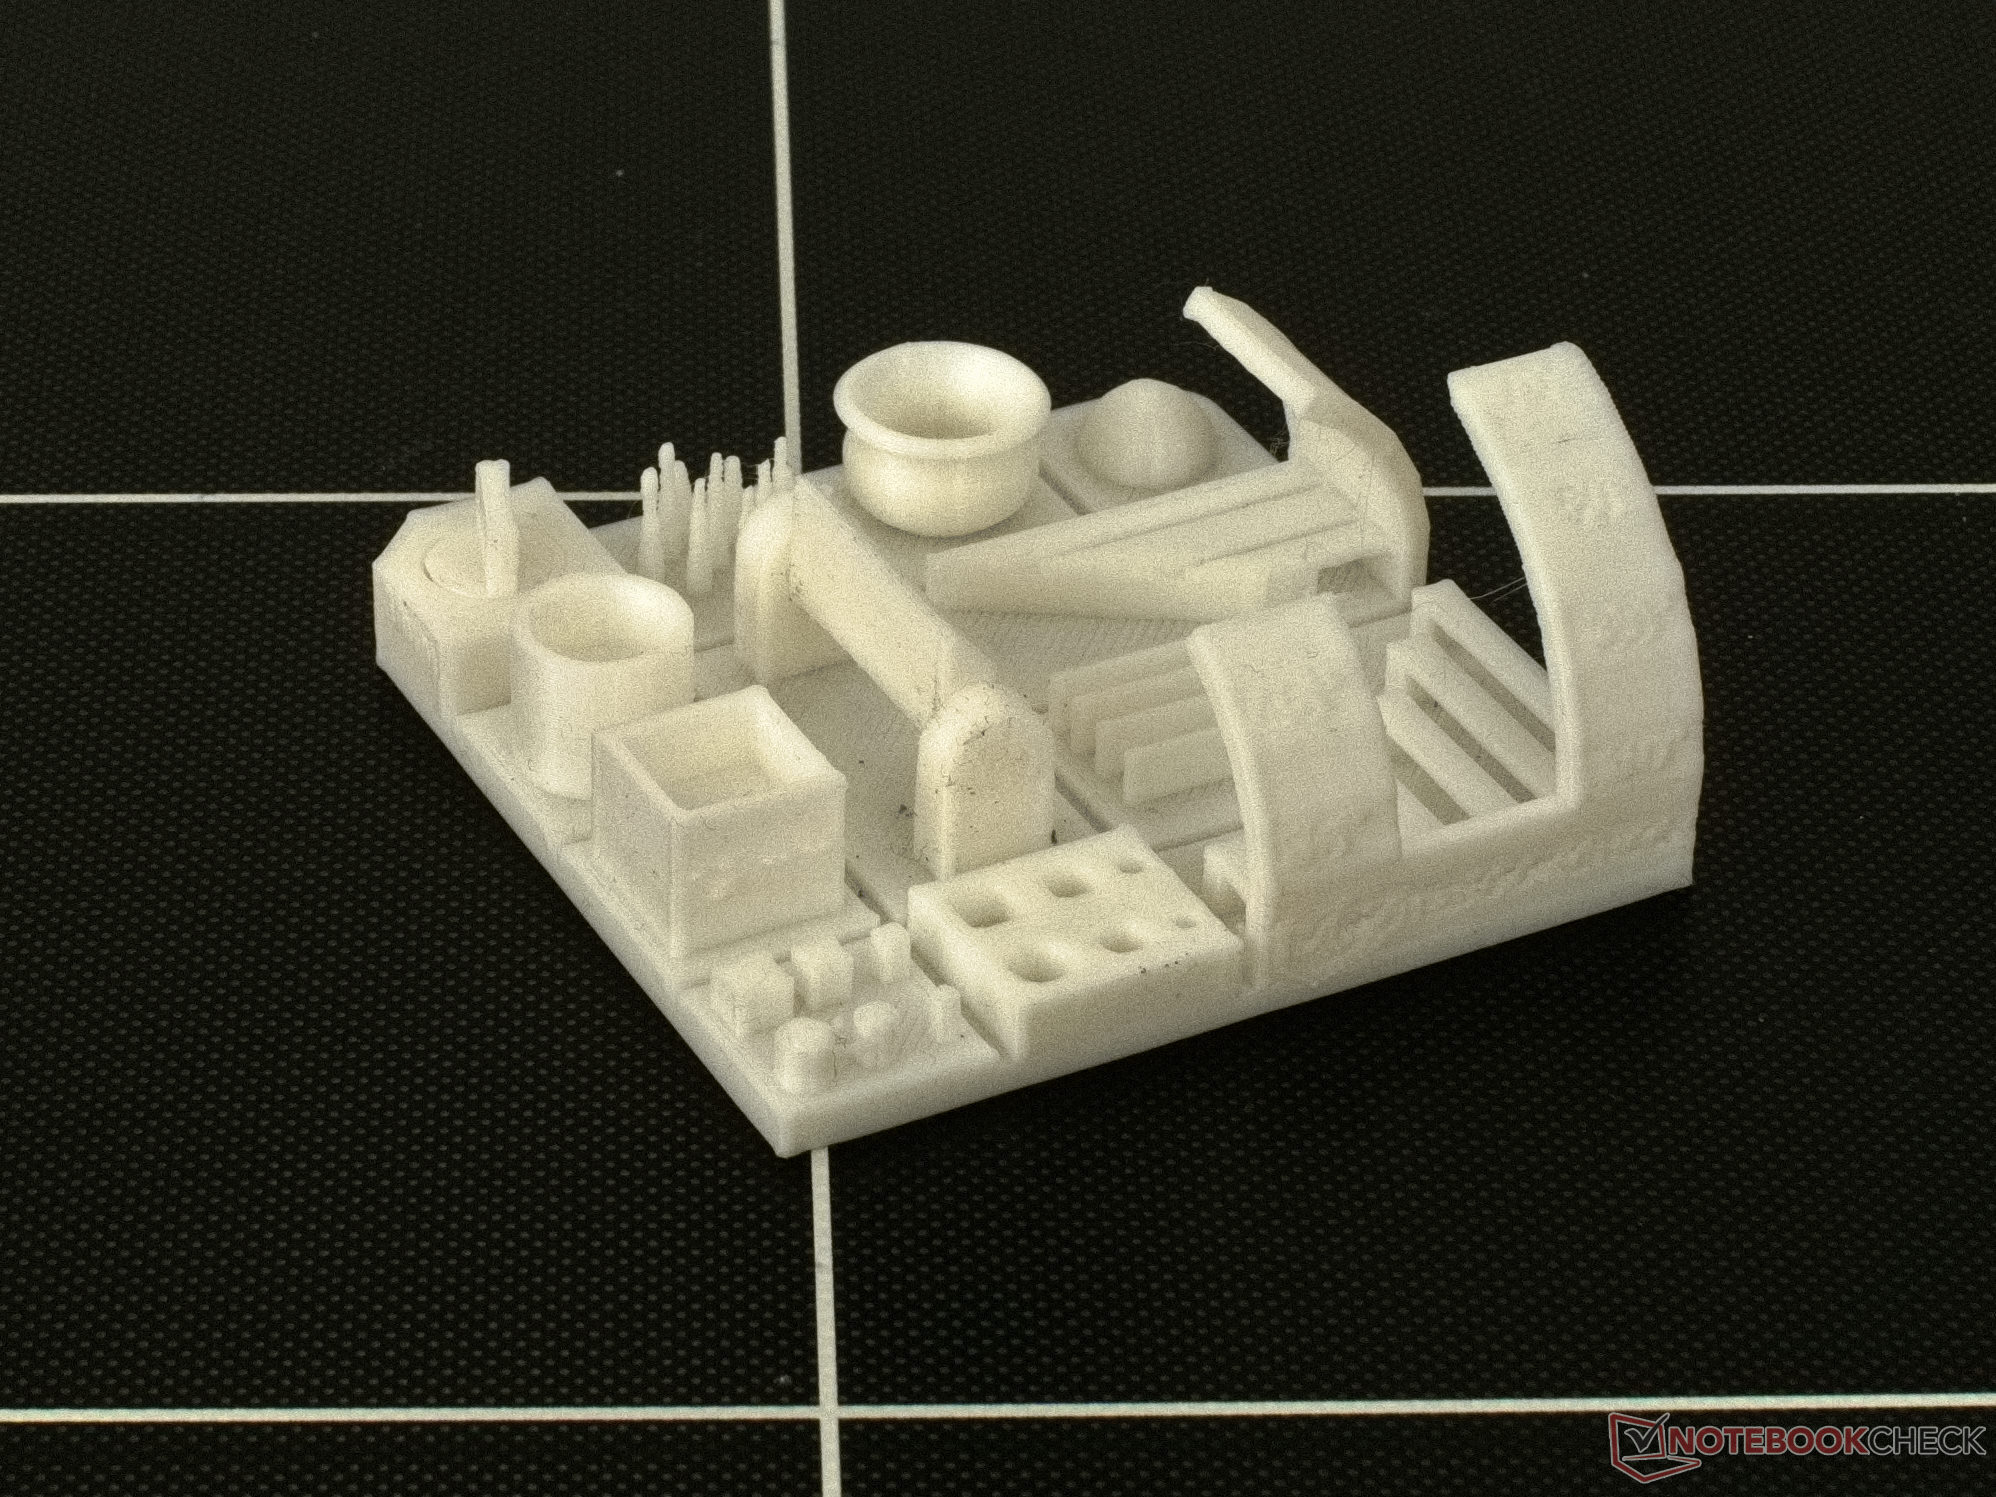
In practice, this large 3D printer works flawlessly and there is barely anything to find fault with other than negligible under-extrusion. The Cura print profile works well and allows print quality and print speeds to achieve very good levels of performance.
Safety
Our test unit’s temperature-fault shutdown mechanism and temperature runaway protection worked well in every instance. The printer detects both short-circuited and unplugged sensor cables and switches off the corresponding heating elements as required. When artificially heating or cooling the hotend or print bed, the 3D printer also cuts the power to the heating elements.
Environmental factors
If it weren't for the loud fan of the 500-watt power supply, the 3D printer could be very quiet. However, the demand-driven ventilation system drowns out all the other noise generated by the 3D printer by far. When this fan is not working, the Voltcraft SL-10 sound level meter measures a maximum volume of 48 dB(A) from a distance of one meter (~3.3 feet). As soon as the power supply fan is needed, the sound volume increases to around 57 dB(A). Due to the open design of the 3D printer, the smells of the melted plastic are dispersed into the room.

Power consumption
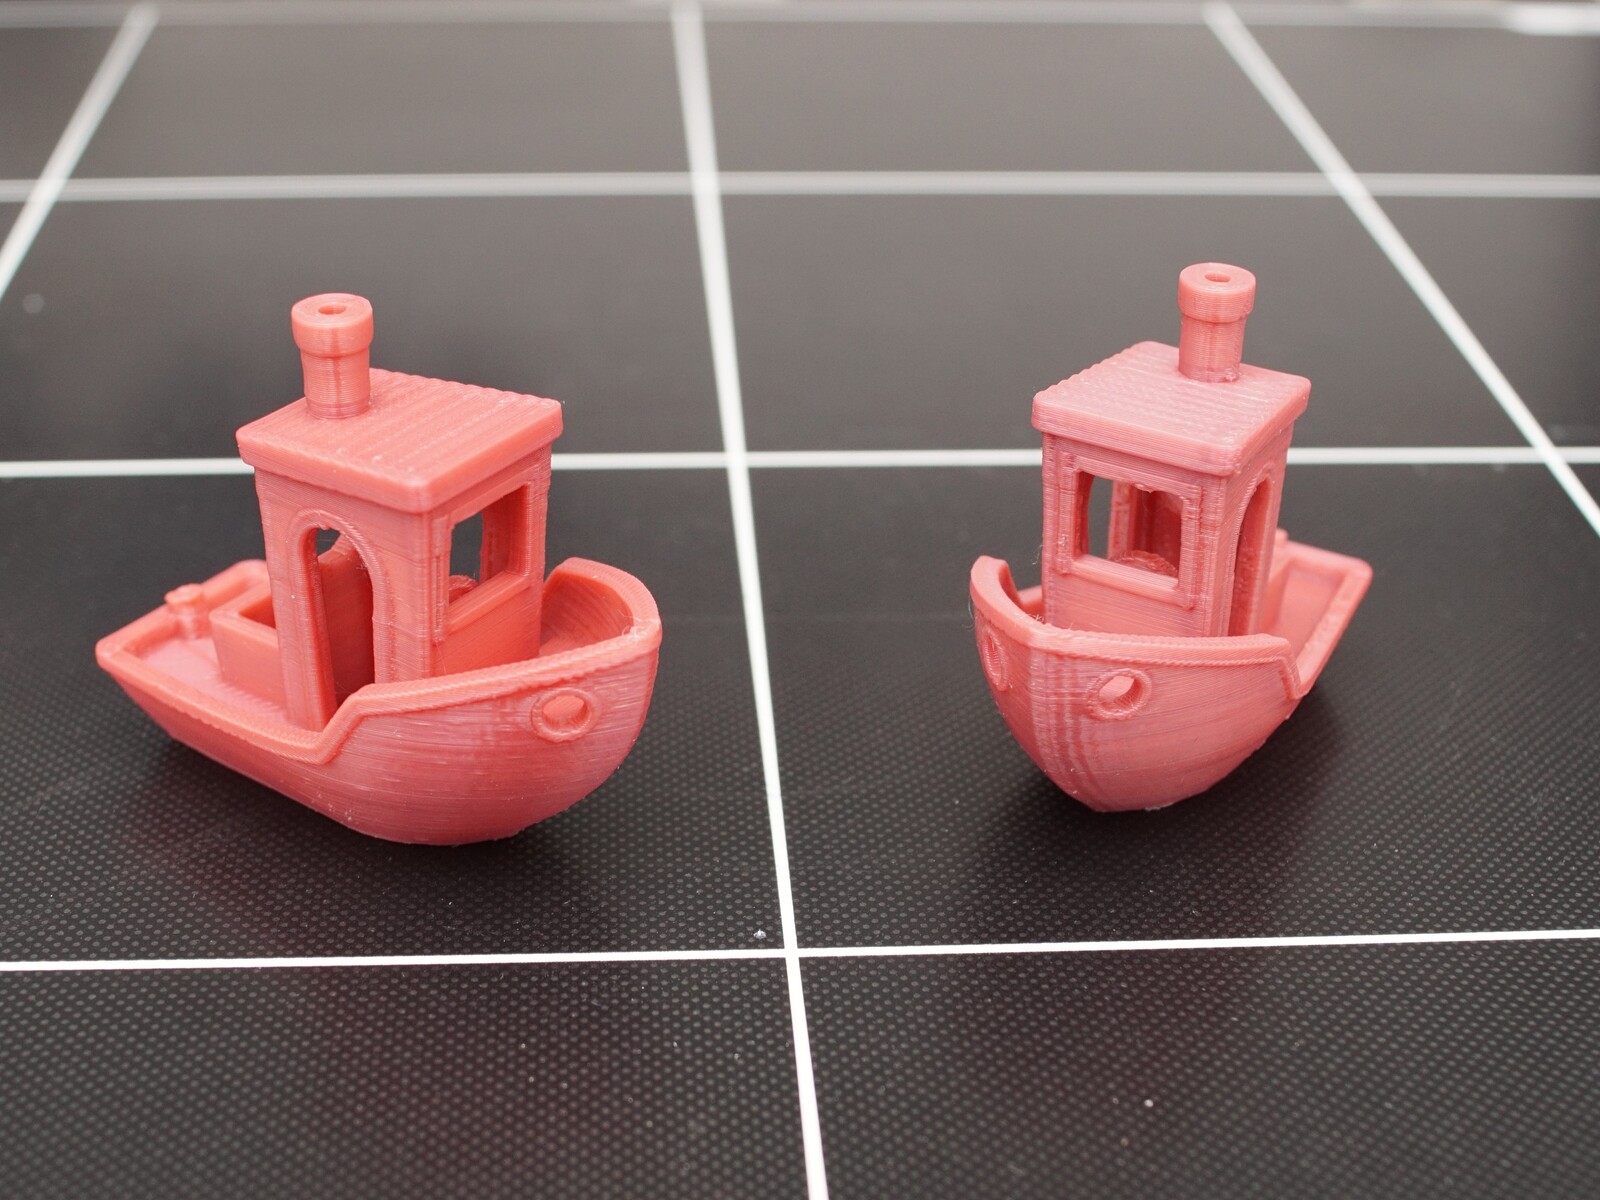
The energy consumption of the Anycubic Kobra Max can be relatively high, if you compare this 3D printer with smaller devices such as the Artillery Genius Pro. We measured the energy consumption with a Voltcraft SEM 6000 while printing a 3DBenchy. The power requirement for the printing bed heated to 60 °C (140 °F) is around 230 W after the initial warm up. Due to the size of the print bed, the heat loss due to convection is quite high. In order to save power, it is worth reducing the fan speed to cool an object or to use the fans only when they are needed. What is more, for many PLA prints the temperature of the print bed can be reduced by 10 oC after printing the first layer.
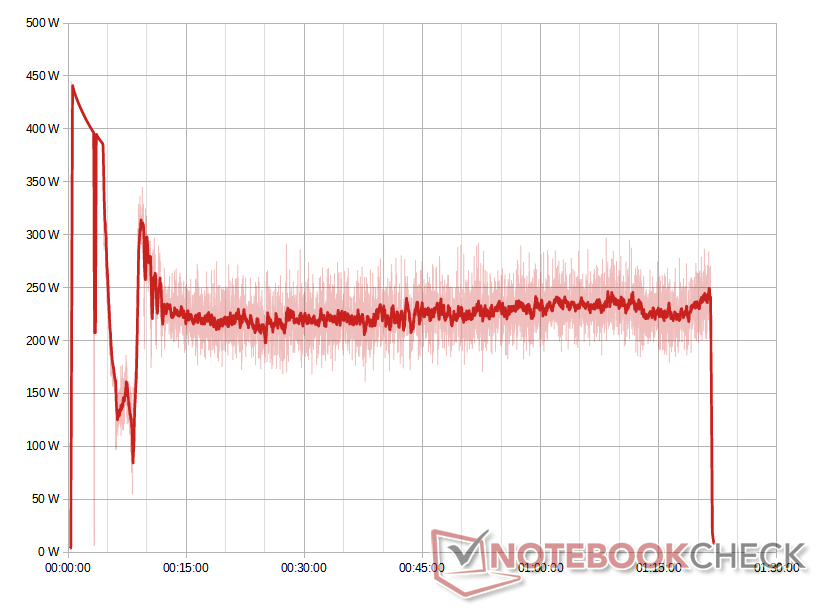
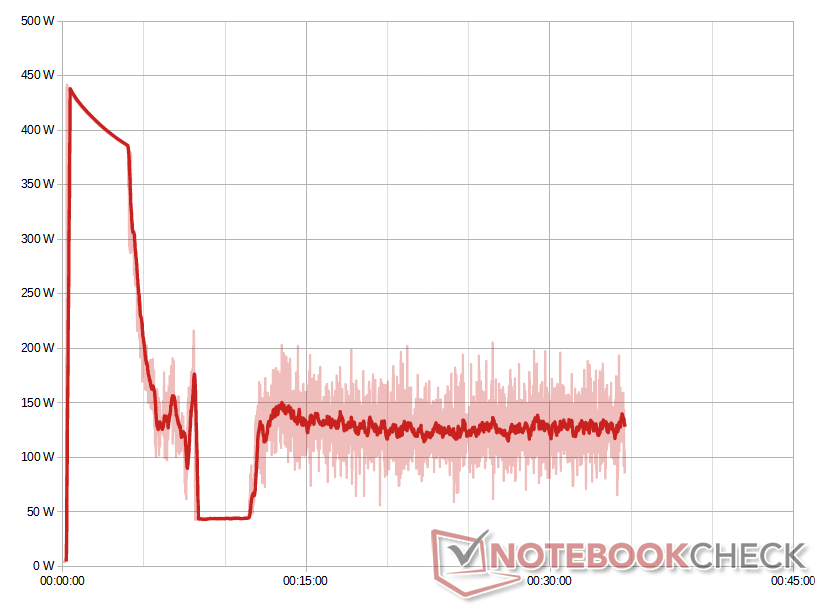
In a subsequent test using these energy-saving settings, the power consumption of the Kobra Max fell by a good 100 W and by almost 200 W over the approximately 4 minutes long cool-down period. While the quality of the two 3D benchys hardly differs, the proposed energy saving settings require 140 fewer watt hours.
Verdict
Due to its size, the Anycubic Kobra Max 3D printer is certainly not suitable for everyone. If you want to take full advantage of the capabilities of this 3D printer with its 400mm x 400mm (16in by 16in) print bed, you should aim to gain a solid understanding of the 3D printer and slicing software settings that come with your device as these are many and varied. Small adjustments to the Cura profile can reduce printing time for larger objects by days. One should also be aware that prints that take advantage of the large volume print capacity of the Anycubic Kobra Max can take several days. Apart from issues that may arise due to the dimensions of the device, our testing of the Anycubic Kobra Max was convincing. From a quality perspective, the results are in line with many other 3D printers.
If your projects require copious amounts of real estate, you can confidently rely on the Anycubic Kobra Max. Our testing showed that this 3D printer works consistently and delivers high quality output.
High energy consumption is probably our biggest criticism of the device. Although some power can be saved with appropriate adjustments to the slicing profile, smaller printers are ultimately the right choice for smaller parts. If you need to print large parts faster, you should also consider other nozzle sizes. The 0.4 mm nozzle installed in the Volcano hotend is universally considered an appropriate choice, but larger hole diameters and extrusion widths can greatly accelerate 3D printing, while the level of detail will often decrease only marginally.
Pricing and Availability
The Anycubic Kobra Max is now available on Anycubic's website, Amazon, eBay and AliExpress starting at $569.
Sources
References and supplies
3D templates
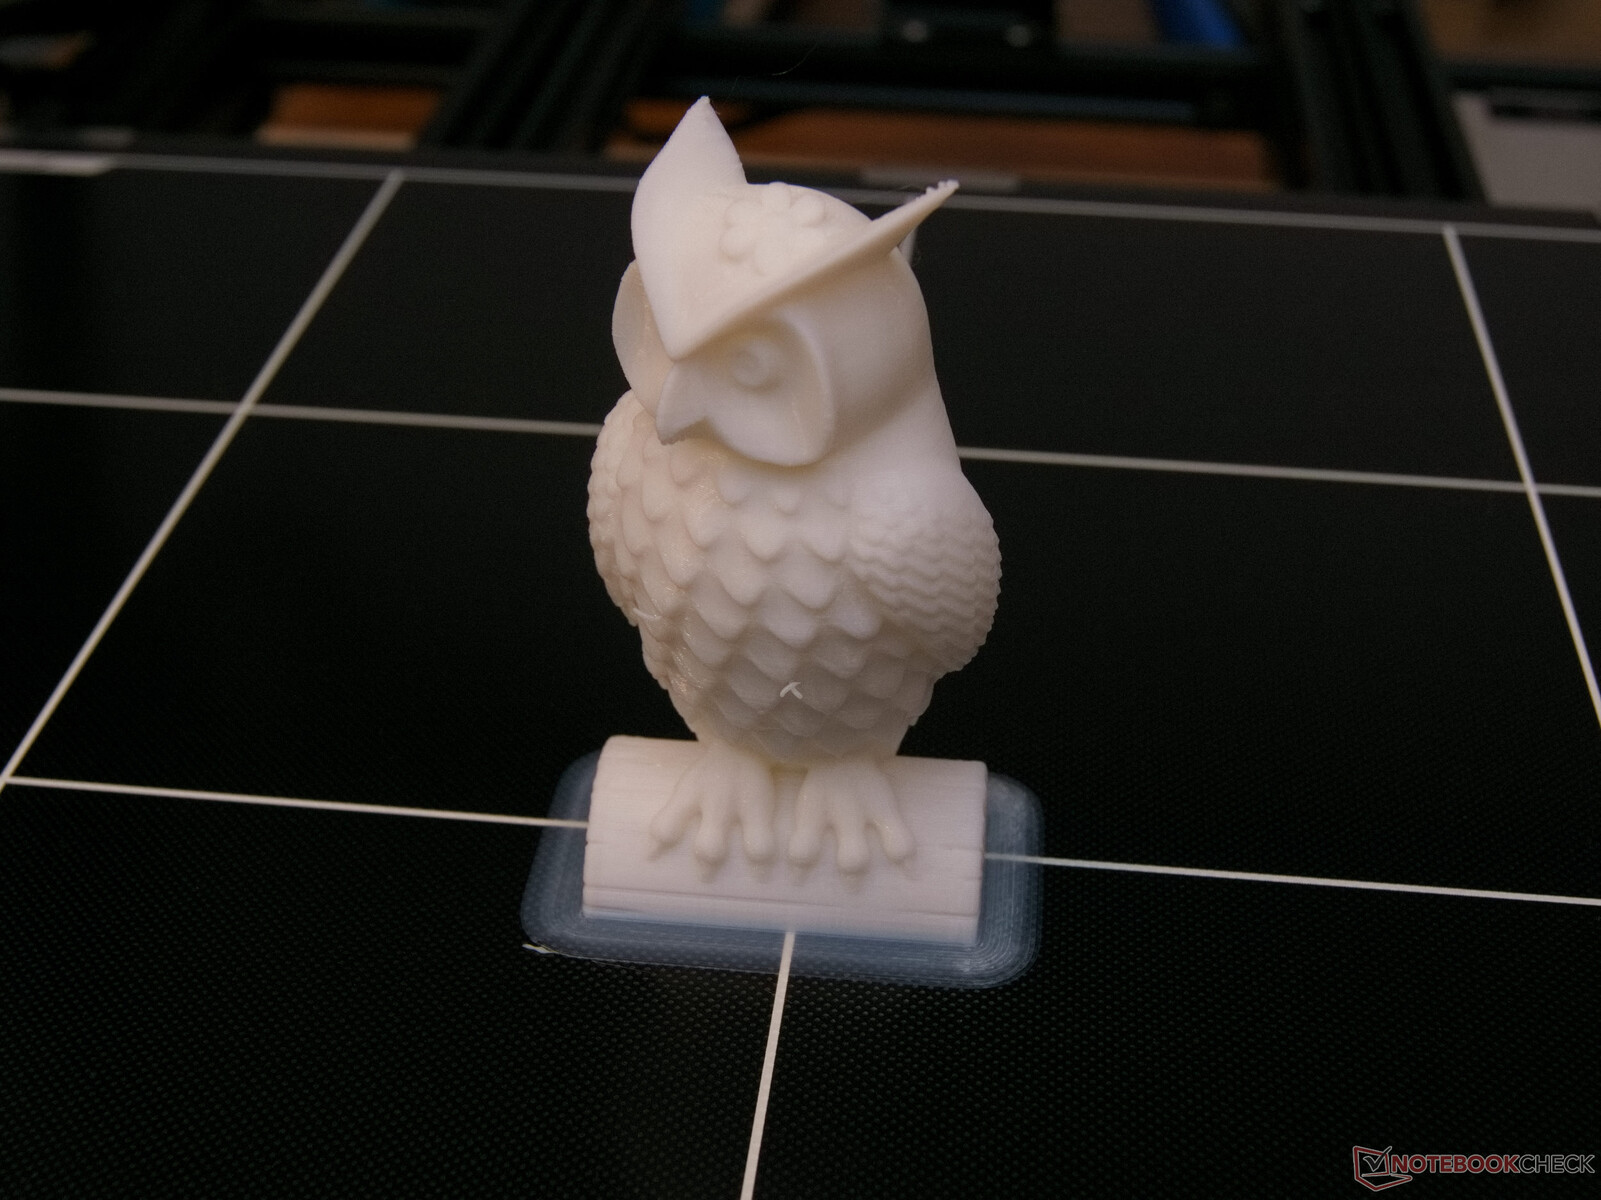
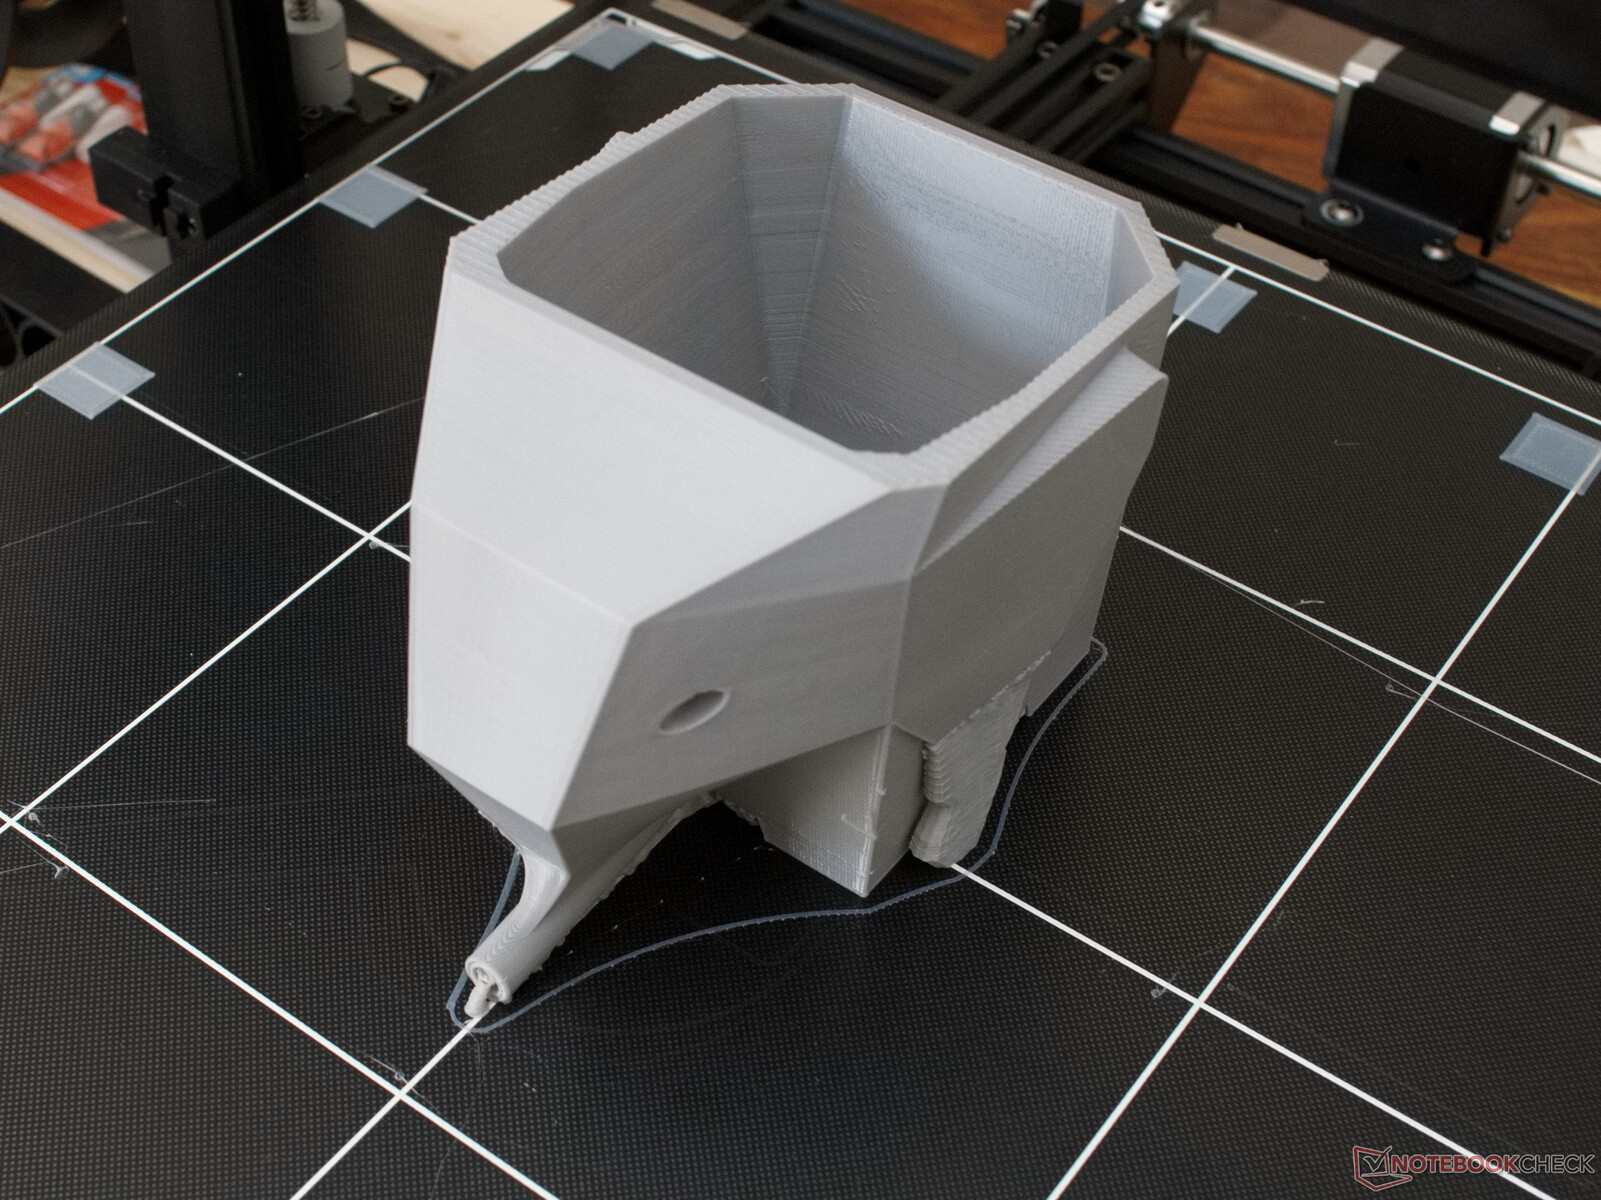
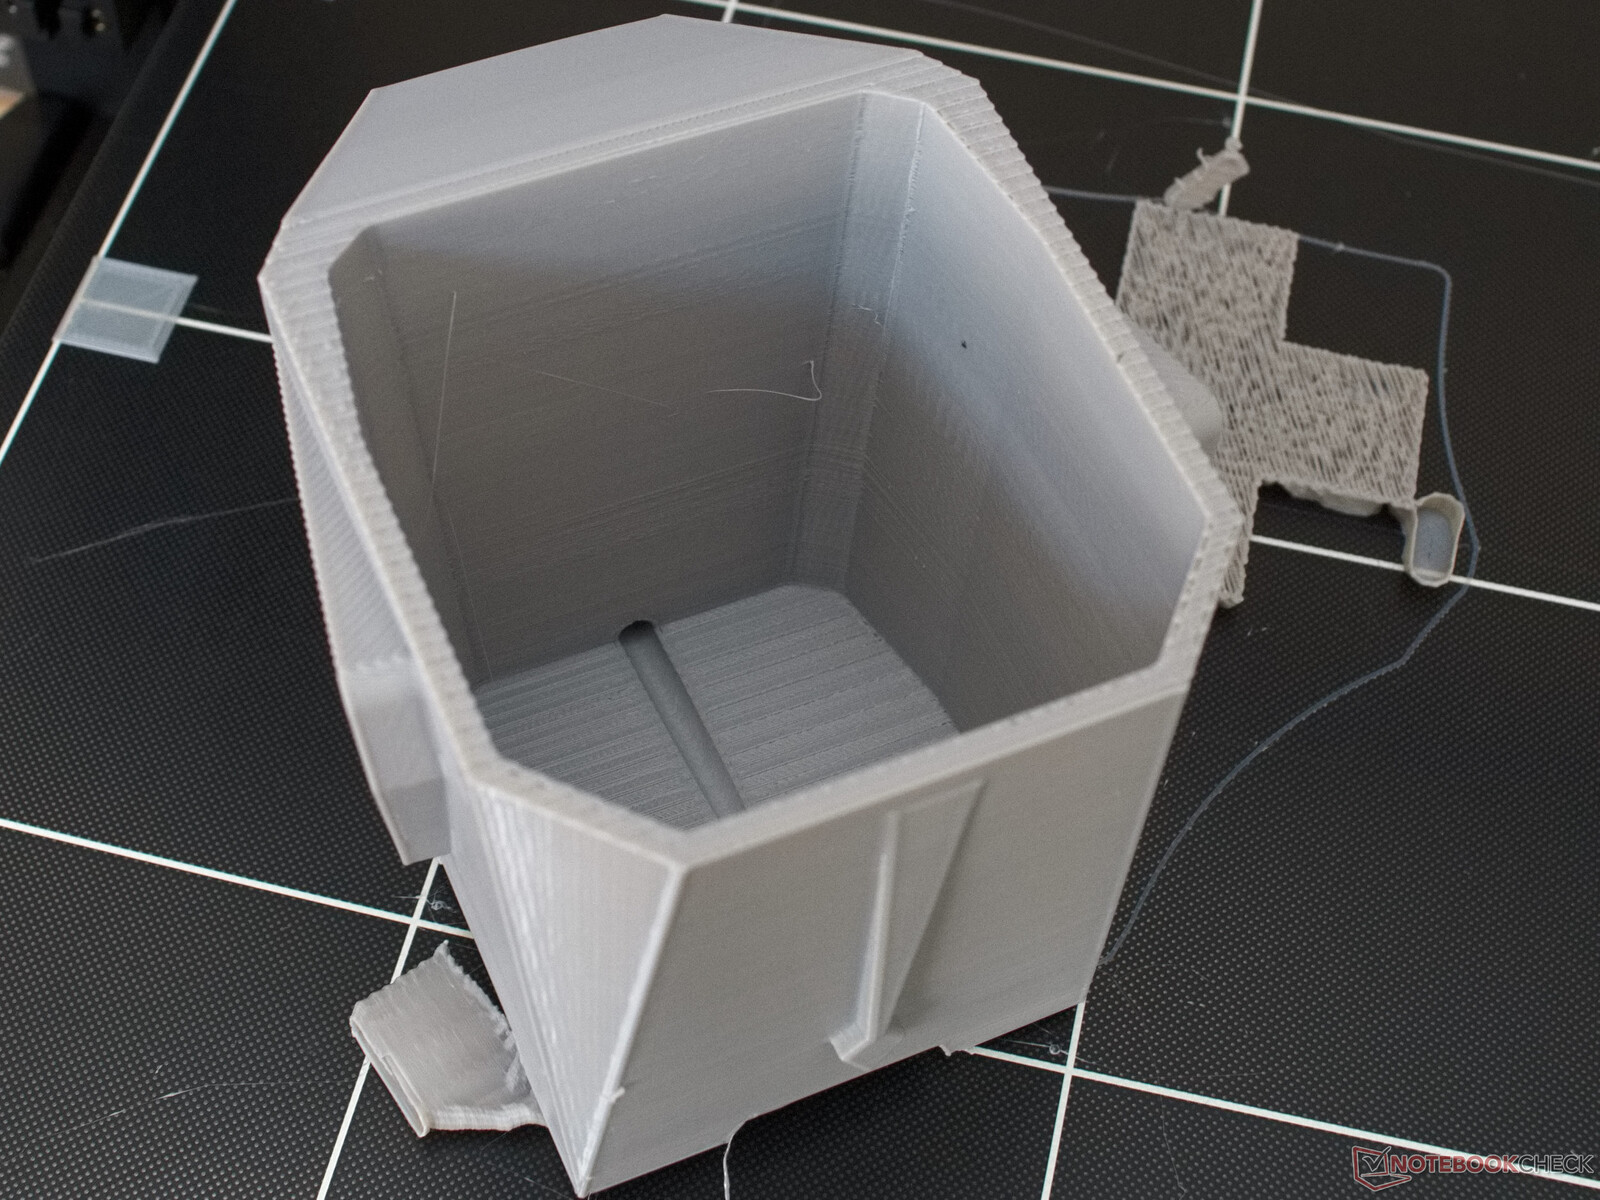
Jumbo Elephant Cutlery Drainer by aleiovanevcp - Thingiverse
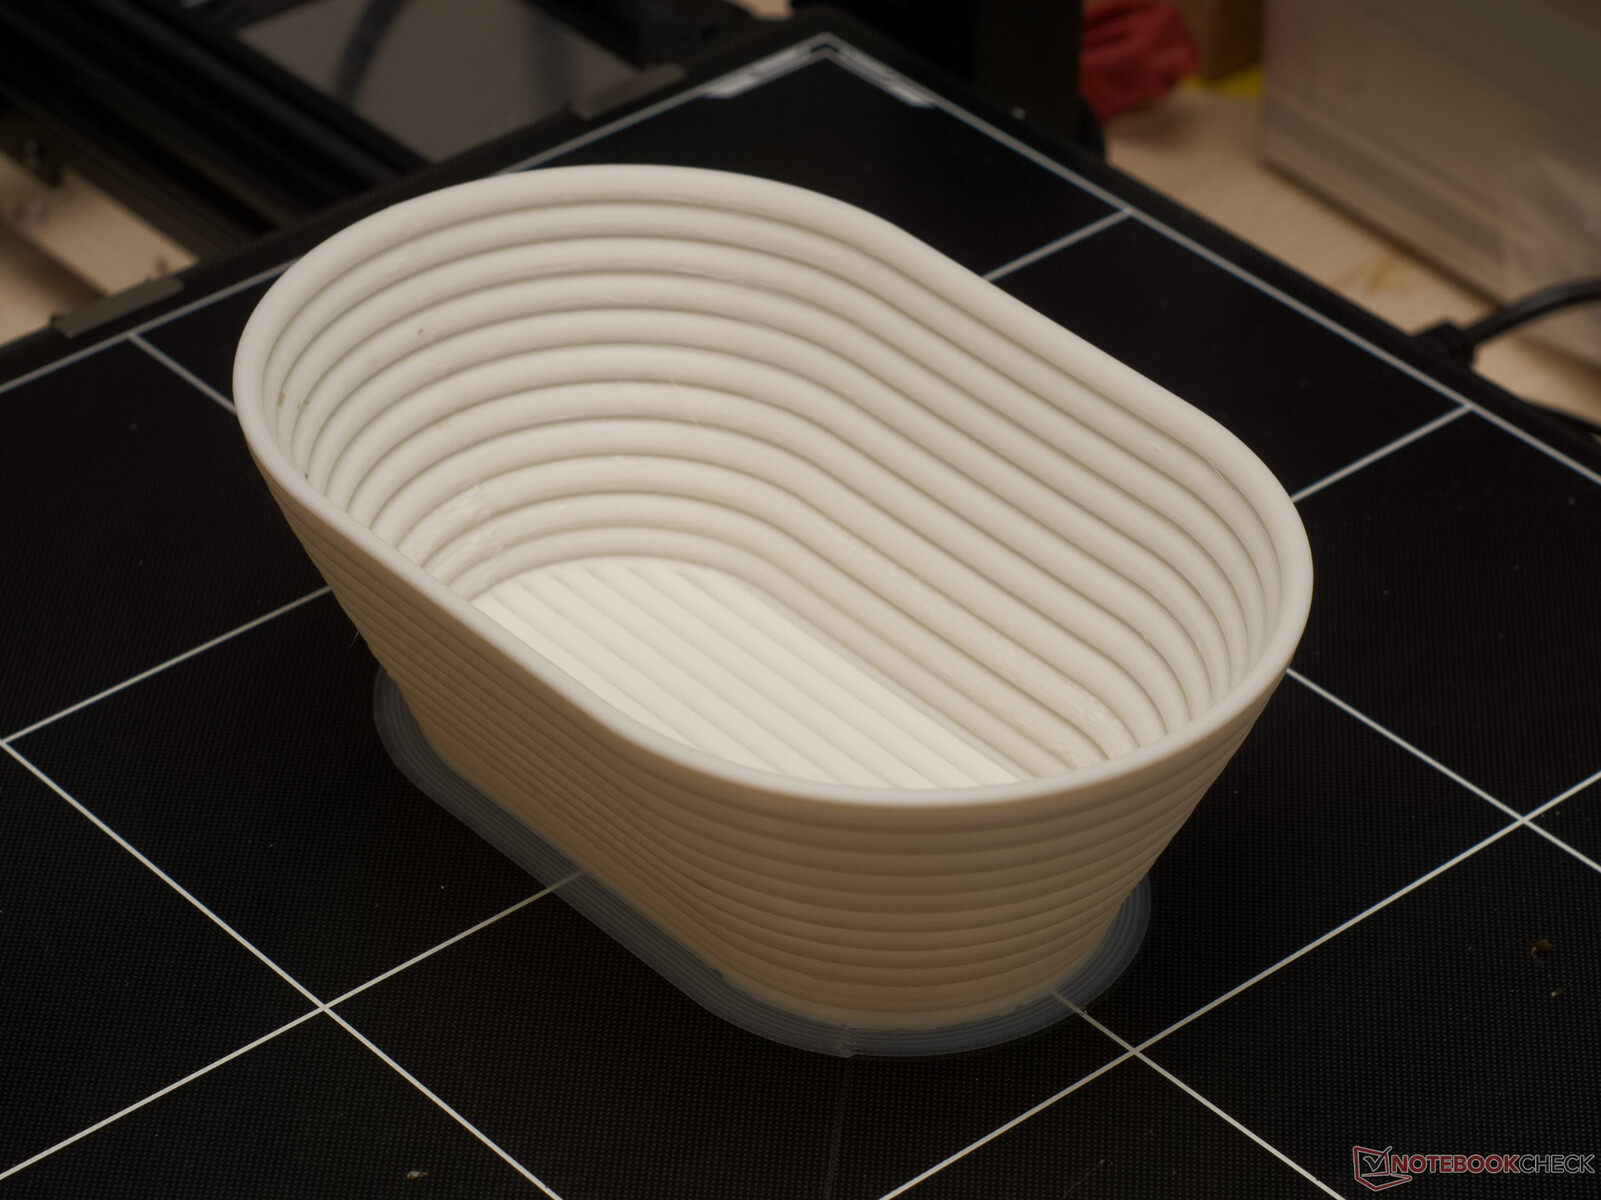
Bread Proofing Baskets by MEH4d - Thingiverse
FDM printer benchmark by MarcImay of Notebookcheck - Thingiverse
#3DBenchy – The jolly 3D printing torture-test
Filament
ANYCUBIC 1.75 mm PLA 3D-Druckerfilament (Weiß#): Amazon.de: Gewerbe, Industrie & Wissenschaft

